Page 2 of 4
Posted: Fri Jun 01, 2007 4:11 pm
by Frank C
Jim,
You're looking at the steering shaft in your above picture. Not shown in their photo is the mounting bracket & outer bezel, called the X34 bezel kit. However, it's included in the box they'll ship to you.
You're correct, looks as if the RoTech steering head trades length of the rack for width of the planetary box. Ergo .... it looks like it might require raising the steering wheel, or other customization to get it into your M's ped-box. I'm wondering why it seems that the steering shaft is closer to the far side in your picture??
I doubt anyone has done this in the 26M. Yours is the first failure I've read of. The Detmar racks have been pretty long-lasting in the 26X, and aren't facing as much punishment in the 26M. Not sure what happened to yours.
The planetary gearset design appears more reliable to me. In your shoes, I might ask them to sell me both the RAcktech and the Rotech, then return one of them.

Posted: Fri Jun 01, 2007 4:18 pm
by c130king
The pic is a little deceptive. The steering wheel is centered. It is hard to tell how big the throttle mechanism is in the picture.
I am very leary of modifying my pedastal to raise the steering wheel just to get the UFlex to fit. I think I would be more likely to go with the Rack & Pinion System instead. Price is the same.

On the steering wheel shaft at the end there is a spring with a bolt in it. Does this have to be removed to remove the steering wheel? And look to the right in the picture, just inside the pedastal there is an "arm" coming off the steering wheel shaft support. Any able to tell me what that is?
Thanks again,
Jim
Posted: Fri Jun 01, 2007 4:43 pm
by Frank C
Yeah, pictures are worth thousands of words, but still imperfect. I'd not want any modifying of the ped either, which is why I'd order both systems. The Racktech isn't identical to the Detmar, so it might not be a perfect, no-changes fit either, and I think the Detmar's no longer available. I'm betting the rotary head will be an easier fit.
The lateral arm is just part of Detmar's steering head casting. Each mfg's design will vary a bit. Steering wheel removal is 100 percent external to the pedestal. You'll understand as soon as you remove the black center cap. Notice that the Racktech has no end-spring on its steering shaft? ... just different design from the Detmar.
One hint about removing the steering wheel ... after removing the (outside) center nut, beneath the black center cap, use a hammer to sharply rap straight into the end of the steering shaft. That should pop the wheel loose from the shaft. You might want a helper to hammer the shaft while you pull on the wheel. You might need to wiggle the wheel top, then bottom, then each side, to break it free. After 3 years service on my X, the wheel fell into my lap with just one, single sharp hammer blow the the shaft.
Finally, it might be lots easier to hire a mechanic to do it for you, but consider this, too. Now that you've done your own troubleshooting, diagnosis and repair, you'll be more self-sufficient when the next problem pops up ... maybe out in the middle of Chesapeake!
Posted: Fri Jun 01, 2007 6:09 pm
by Catigale
One hint about removing the steering wheel ... after removing the (outside) center nut, beneath the black center cap, use a hammer to sharply rap straight into the end of the steering shaft
Put the nut back on the shaft so that you hammer on the nut, not the end of shaft, to prevent galling the shaft threads. Make sure the nut sits above the end of the shaft when you tap it. Sharp blows more than heavy blows will do this.

Posted: Fri Jun 01, 2007 6:10 pm
by Duane Dunn, Allegro
It looks like you have the old style M pedestal with the metal post base. From what Todd at BWY has said these were actually much easier to work with than the new style one.
To get cables pulled through the pipe section they would actually just un-bolt the fiberglass top from the pipe and take it off after disconnecting the steering cable, and any wiring harnesses. This gave much better access for pulling in stiff motor control cables, etc. This same approach migh be easier for the steering replacement as well instead of having to bend the cabel into the pipe from the side.
Posted: Sat Jun 02, 2007 5:21 am
by c130king
Frank, Stephen, Duane,
You guys are the HEAT

I will go fiddle with it some more today...any excuse to go sit on my boat.
Thanks again,
Jim
Posted: Sat Jun 02, 2007 6:49 am
by Mac Ziggy
Have you looked at the steering mod by Octaman? I know you are anxious to get back on the water but it seems to solve some problems with the Mac steering. It has two parts.
http://macgregorsailors.com/cgi-bin/mod ... record=662
http://macgregorsailors.com/cgi-bin/mod ... record=663
Met a C-130 driver at Clark. He didn't talk much. Drove the black model. Took him downtown to Angeles City and made sure he got back on base OK.
Posted: Sat Jun 02, 2007 8:45 am
by c130king
Mac Ziggy,
Thanks for the info.
I lived in the PI for 7 years. But as a kid.
Been to Angeles City as well. But I am pretty sure I didn't go to the places that Herc Driver went

Jim
Posted: Sat Jun 02, 2007 9:13 am
by c130king
I just got back from some more quality time with my

.
I have completely freed up the cable and it will easily come right up the pedastal. I was not able to remove the steering wheel yet because I don't have big enough sockets. Lowes and WalMart are both right over by WM (have to buy a few SS bolts) so I will make that my after dinner trip.
And since I figured there have to be others like me who really don't know what rack & pinion is and how it works I took some more pictures to show what it looks like and how it works...and what broke on mine. And for those of you that are already experts on these steering systems (and I thank you for all your great words/experience) please bear with us with those of us with "less" knowledge and feel free to chime in to point out other aspects that will help everybody out.
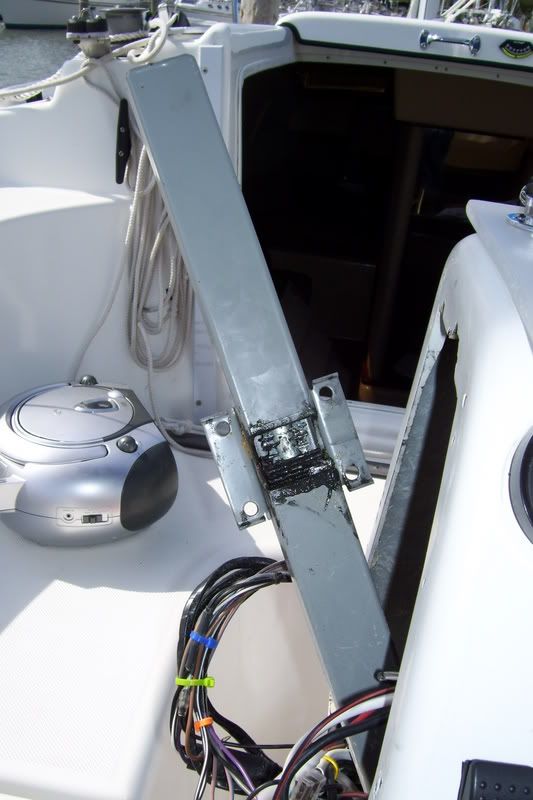
Here is the rack pulled part way out of the pedastal so that I could twist it around and look at the opening where the rack gears are. These gears mesh with the ones on the pinion (steering wheel shaft). This metal frame has the cable attached to it and is ready to just pull all the way out. All 8' of cable.
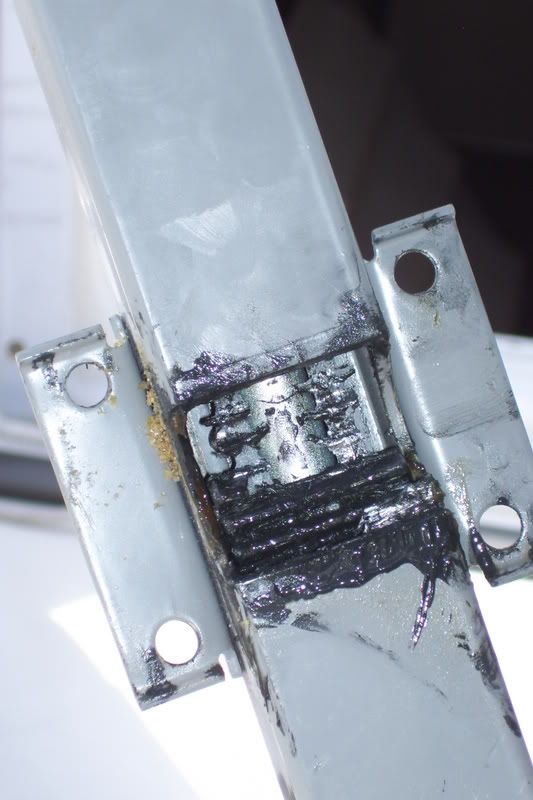
Here is close up of the rack gears. You can see there are two still showing at the bottom of the opening but the three above it are completely gone. There are metal bits up inside it and all over the pinion gears.
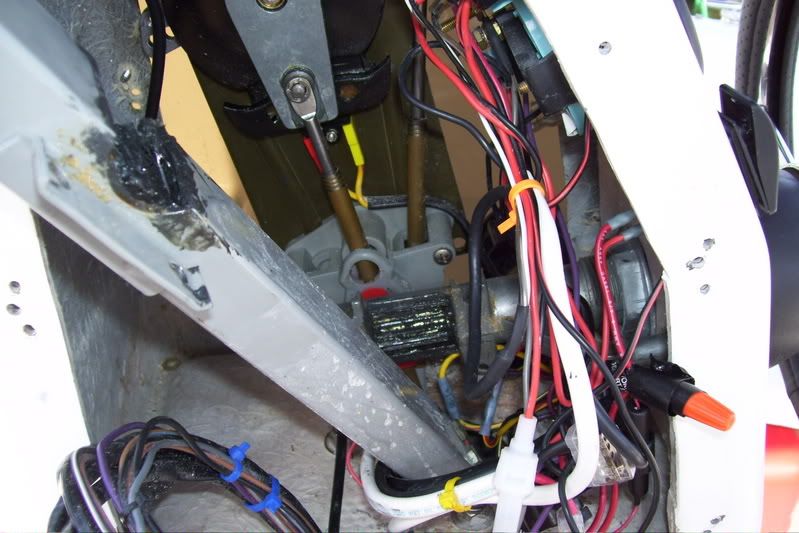
Here is another shot of the rack and the pinion.
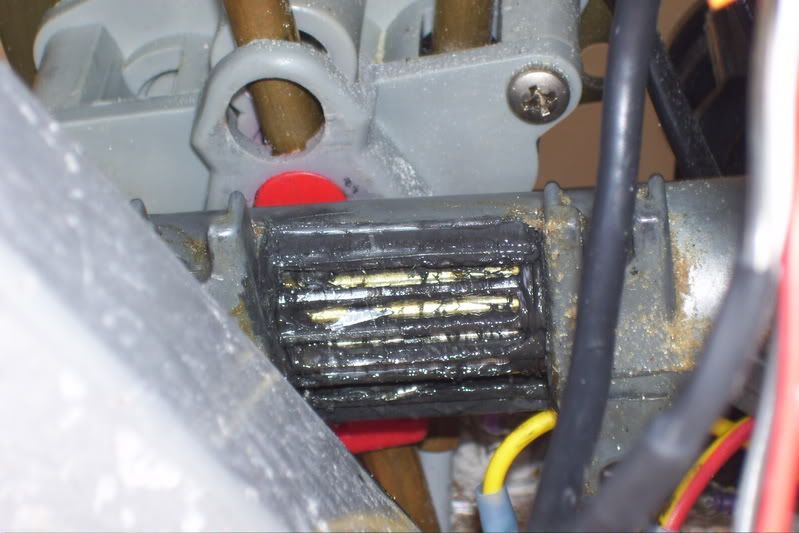
Here is a close up of the pinion gear. You may be able to see a large shard of metal (from the rack gears) on the left side of the pinion. The whole area (rack and pinion) still had a large amount of grease.
And here is a slighty different angle of the pinion and the steering wheel shaft. I am pretty sure that this will all come out and be replaced when I get my new steering system.

Stay tuned to this same Mac Channel for further updates on this continuing saga.
Jim
Posted: Sat Jun 02, 2007 1:04 pm
by Frank C
I'm assuming you're just waiting for the Racktech to arrive. In looking at your last pic above, several questions occur. I figure you'll be less dismayed if you start thinking early, and planning for possibilities.
- 1. How wide is the Uflex rack -- ergo, will it fit down the standing pipe?
(sorry, drawing doesn't show it)
2. The Uflex steering head seems to be a "fatter" cylinder (~4" diam) than Detmar. You may need to raise the exit of steering shaft just slightly higher on the pedestal.
(A hole-saw or dremel work assures shaft exits 2.25" above bottom)
3. How much clearance btw top of rack & top of pedestal box? ... such that raising the steering shaft won't push the rack past the top?
(Rack stands a skosh more than 9" above shaft)
4. One more critical dimension is distance from the steering head's mounting bolt-face to the center of rack (appears ~4") ... hoping it matches the distance from ped-box face to the center of standing pipe.
(If the ped-box is much longer than 4", add a plywood shim at back of the ped-face.)
Uflex has a PDF with dims & drawings, so I extracted some of them to my Bucket.
Get out your tape & measure that pedestal~!

 Bummer that your last two weeks of sailing, for the next 2 years, are occupied in repairs!
P.S. just in case it's not obvious, this steering uses a 3/4" tapered shaft, evident in the drawing. Hence the earlier hints about "wiggling" the wheel to break it free. Also, there's a woodruff key (a half-moon metal bit) used to lock the wheel to the shaft. Easy to lose, be sure to look for it, curved surface fits into the shaft.
Bummer that your last two weeks of sailing, for the next 2 years, are occupied in repairs!
P.S. just in case it's not obvious, this steering uses a 3/4" tapered shaft, evident in the drawing. Hence the earlier hints about "wiggling" the wheel to break it free. Also, there's a woodruff key (a half-moon metal bit) used to lock the wheel to the shaft. Easy to lose, be sure to look for it, curved surface fits into the shaft.
Posted: Sat Jun 02, 2007 3:00 pm
by c130king
Frank,
Once again thanks. Good info. I will take some measurements and call UFlex on Monday to see how well everything will fit.
I have not yet ordered anything.
Looks like Macgregor is putting Teleflex SS134 8' cables in the new
's. There are some available on other marine websites. However, I don't think Teleflex is making them anymore. Can't find them on the Teleflex website. Just the SS141 which also looks like it might work.
Jim
Posted: Sun Jun 03, 2007 10:45 am
by Frank C
Don't forget that the new 26Ms are using a new pedestal ...
Posted: Wed Jun 06, 2007 6:29 pm
by c130king
The König is back in business
Over the weekend, after figuring out what was wrong and removing the old steering system, I cancelled the mechanic I had called. And I ordered a new Teleflex SS141 8' Rack Steering System from go2marine.com
I payed almost $70 extra for 2 day shipping and it worked just as advertised. Shipped Monday at 1000 and it was in my mailbox here at the Joint Forces Staff College right at 1000 this morning.
So I took the big leap of faith and attempted the installation process this afternoon all by my lonesome. It really wasn't that hard to install. Some issues I faced however:
1) The hole that was in the front of the console for the steering wheel shaft had to be cut bigger. I borrowed a friends hole saw and went to work. Since I already had a hole there the center bit of the hole saw was useless. And it was hard to get the hole where I wanted it without the center bit to guide the saw. The black plastic "bezel" will cover my "mistakes"

2) Also, the layers of wood and fiberglass on the thick part of the console is thicker (probably more than 1") than the hole saw so I couldn't drill all the way through. I had to punch about 12-15 holes with a drill bit and then use my screwdriver like a chisel and bang out the layers one by one. But it worked.
3) I had measured the size of the rack on a Teleflex SS141 at WM (but with a 16' cable so I couldn't use it) and found that it was very close to the same size as my old Detmar system. It was a tight fit but I got it to line up and it works. However, the angle is slightly different and now my depth guage (which is about 3-3.5" deep) won't fit all the way in. It sticks out about 1.5". I may see if I can swap locations with my fuel gauge as it is only about 1.5" deep and should fit. Hopefully my depth guage will fit on the other side but the throttle linkages may get in the way. I will figure something out eventually. For now the depth guage works...it just sticks out about 1.5" farther than it used to.
I still have to drill 3 more holes for the bolts that secure the steering mount plate to the console. I drained the battery on the drill trying to get that hole saw to cut through the very tough console wall.
Also, the half moon thing-a-ma-jig (terminology???) that came with the new steering wheel shaft is about 1mm too thick for my current steering wheel. The old one fits but it is barely big enough to fit in the groove on the steering wheel shaft and have enough metal sticking up to contact the steering wheel. But I think it will work.
The new steering seems very smooth. Much easier than before. My initial thoughts are that the rudders go to full travel before the rack has gone to full travel. Not sure if that is good or bad. Will just have to be a little cautious not to crank the wheel further than the rudders will go.
But the bottom line is that it works. And I can sail my last weekend in Norfolk.
Thanks again to all of you that have given me advice on this issue and for all great info on Macgregors over the past 6 months. I think you guys gave me the courage to take on this project by myself.
Jim
Posted: Wed Jun 06, 2007 10:58 pm
by Frank C
Congrats on officially joining as a Mac repairs apprentice!
Lots of my mistakes are under a cushion or hatch cover.
Others of 'em are out in the stark daylight~!!

Posted: Thu Jun 07, 2007 6:25 am
by Mac Ziggy
Great progress in a short time! Still, you might want to keep the crew chief on the C-130.
