

Thank you for the encouragement! I haven't posted anything in a while, but I've been around. Is there a good way that I can better document this process, with pictures? I can link the pics from my drive account, however there is no way to resize the images when inserting them on the forum. I'd have to manually downsize all of my pictures, which is too much work.
Anyway, here are some updates...
Unfortunately most of the weekends were filled with other priorities and I wasn't able to mess with the boat as much as I'd like to, but temps have maintained above 60 lately, and I've been hitting the fiberglass work hard over the last couple weeks. Everything is glassed and just began the fun task of gelcoating. I'm not an artist, so matching the color apparently is not my thing, but good enough for me. Things are coming together faster than expected, should be able to drop it in the water in a few days to see if she floats.
I ordered a new mainsal from Loong Sails, it just arrived a few days ago, after a 6 week wait. Great price BTW, appears to be well made, and exactly to my spec. After an extensive conversation with Challenge over the phone, I went with a heavier than normal high modulus dacron. I wanted a very rugged sail that may hold shape a little better over the years and in heavy weather, however the tradeoff is the extra weight and rigidity, and possible poor shape in very little wind. After fiddling with it, It doesn't feel too bad at all. I've heard people complain about the heavier cloth sails feeling like folding cardboard, etc., the OEM must be like bed sheets in comparison, this feels natural to me, just like my Hobie 16 sails. I went with loose foot, partial battens, plastic slides, dog bones in the cringles, jacklines, etc. The total price shipped came way under some of the other quotes that I received. There is a crack on the furler extrusion, I'm just going to patch over it with one or two layers of fiberglass while I have all of the stuff out, just to make sure it doesn't spread. No need to buy a new extrusion at this point.
The two drain holes that were in the bottom are patched up. Just guessing, but the bottom thickness of the boat is around 1.5", so I had to grind out the taper quite a bit. I bet I used 35 layers or more of fiberglass matt to fill that depth. The factory uses a heavier matt in the main construction, all that I have on hand is readily available Bondo brand matt, which is not nearly as thick, so I have to use more layers, but that works out well in some areas of the patch work. I also glassed quite a few layers from inside the boat, just to be safe. I had some large gelcoat chips on the transom. I just re-coated them and finally got the outboard mounted last night. I still need to run the control cables, wiring, and battery wires.
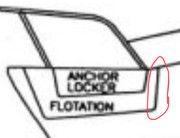
The bow damage, as shown in one of my pictures from the first page of this post was pretty challenging. You can see it was ripped from the rub rail lip, all the way across into the anchor locker. There is no access panel in the bow foam area, but there is a tiny opening up near the front. If you stand on your head, snap your arms at the elbows so that they can bend backwards, you can almost reach all of the hardware nuts on the underside of the deck. Since the dock was kind enough to take care of the front bow pulpit mounts, this left the rear, which still needed unbolted in order to try to straighten the pulpit. I was going to make an access hole inside the boat, in the foam area, but opted to cut two access holes inside the anchor locker, one on each side, directly in line with the rear pulpit mount. Since water is allowed into the locker, I'll just make some small access covers and seal them over it, it's never seen anyway. I had to cut a small block of foam out in order to get a wrench on the pulpit mount nuts, but I think in the end, going through the locker was way easier than from inside the boat. The bow pulpit was pretty bent out of shape. Not only the main curvature and legs, but also the mounting feet. for the main curvature, I had the dimensions of where the mounting feet are supposed to be, so I just bent into shape by hand. For the feet, and the bent bars near the feet, what I did was welded bolts to a welding table, bolted down the foot, and was able to leverage the tube to get the feet straightened out. In the process, one of the tubes started to break away from the foot, so had to weld that back. It must be chrome plated stainless, it kept drawing into the weld and making a mess, but it burned out and worked out in the end. It's not perfect, but plenty good.
In order to even begin patching up the gaping holes where the pulpit mounts ripped out, I first used a couple 3/16"x4"x12" strips of aluminum, glassed a few layers onto the ends, then wetout the mating area underneath the deck where the two ends of the aluminum would rest. I had some some small holes pre-drilled into the aluminum so that I could feed through wire, and attached the other end to the mast, which was hanging overhead. I then pulled and tied it tight so that the aluminum was pulled hard under the deck and let the fiberglass harden. That took care of the wide flat area, but the shape up there is a bit diverse, so I just cut some pieces of wood I had laying around to fit, and did the same thing where needed. Once that was all done, this gave a rough "base" which was close to the original contour of the deck. I started laying glass here and there to try to fill in and level it up near the original fiberglass. Once I was happy, I went to town with the main pieces of fiberglass until it was level with the original. I faired the top (low spots, imperfections) by using the polyester resin, and just mixing in some West system 403 filler which I had on hand. That worked very good to firm up the resin so that it could be worked at the edges & corners so it didn't run. It's not perfectly smooth, I could probably have spent more time, add more resin over top of the imperfect spots, and sand it back down to make it virtually unnoticeable that there was a repair, but I think it's good enough, a few layers of thick gelcoat should hide all of that. I got a layer of gelcoat down everywhere the other day. I brushed it on, and unfortunately it didn't level out like it was supposed to. Once I was done sanding in order to blend the high/low spots, there was fiberglass showing in some of the high spots. I'll throw on a thicker 2nd coat and use a roller this time, the brush just wasn't able to get it smooth enough. Once that hardens, I'll re-install the rub rail and take it for a test. Once I know everything's good, I'll need to get rid of the heavy oxidation, then just a matter of finishing up some of the interior, which can be done at any point, just want to get out there and start using the boat!
New 26X owner, going to need a lot of help!
-
OverEasy
- Admiral
- Posts: 2873
- Joined: Mon Sep 28, 2020 11:16 am
- Sailboat: MacGregor 26X
- Location: NH & SC
Re: New 26X owner, going to need a lot of help!
Hi SlowSL
You have been really busy the past couple of weeks! Doing a great job of it too!
Congratulations!
Liked your description of that bow area access!
I fully agree with your access approach.
Glassing to plug the holes in the anchor locker is about the only durable way that works.
I haven’t seen an access cover available to purchase the can fit that areas dimensions.
Maybe there is but I haven’t.
Some people have made their access holes for the aft pulpit feet in the interior aft face of the liner.
It would have been nice if at the design level there had been access to all the bolted junctures for inspection and maintenance.
Thanks for including the thickness in the transom area.
If you find a way to make the gel coat flow out please let me know as that has been problematic for me too.
One of the ways I “dumbed down” picture size is with screen shots.
Resolution is fine for posted and a lot of times allow one to zoom in on the feature you want to convey without altering the original image. Just a thought.
Again, Congratulations on the significant progress!

-
Russ

- Admiral
- Posts: 8301
- Joined: Thu Oct 11, 2007 12:01 pm
- Sailboat: MacGregor 26M
- Location: Bozeman, Montana "Luna Azul" 2008 M 70hp Suzi
Re: New 26X owner, going to need a lot of help!
YES!
When making a post, click the "Add image to post" button on the bottom left. It will upload them and create smaller "thumbnails" that users can click to see the full size image. I believe the limit is 10 photos per post.

--Russ
-
SlowSL
- Chief Steward
- Posts: 61
- Joined: Tue Nov 17, 2020 6:17 am
- Sailboat: MacGregor 26X
- Location: Northern Indiana
Re: New 26X owner, going to need a lot of help!
I didn't even see that button down there! That will make things easier. I only noticed the insert html image, however all of the html resize tricks would not work. I'll give this a try and throw some pictures up in a bit.
-
SlowSL
- Chief Steward
- Posts: 61
- Joined: Tue Nov 17, 2020 6:17 am
- Sailboat: MacGregor 26X
- Location: Northern Indiana
Re: New 26X owner, going to need a lot of help!
My thought was that I didn't really want any eyesores anywhere, especially inside the cabin. I couldn't judge exactly what size, or location would be best to access under there, but as I was standing on the deck assessing the damage, it struck me that the mounting bolts were only a few inches from the anchor locker side, aft end. a quick cut out and it was easily accessible, and since there is a lid to the locker, you'd never see it under normal circumstances. Lucky for me, I'm a fabricator, so I can easily make covers from any material with machines at the shop. Still haven't decided if I want an access, or just to permanently seal it back up. I don't think there will be a need to get back in there unless I buy a new bow pulpit later down the road. I suspect I'll never need access to them again though, might just seal it up completely.OverEasy wrote: ↑Mon Jun 21, 2021 6:20 am Hi SlowSL
Liked your description of that bow area access!
I fully agree with your access approach.
Glassing to plug the holes in the anchor locker is about the only durable way that works.
I haven’t seen an access cover available to purchase the can fit that areas dimensions.
Maybe there is but I haven’t.
Some people have made their access holes for the aft pulpit feet in the interior aft face of the liner.
It would have been nice if at the design level there had been access to all the bolted junctures for inspection and maintenance.
Thanks for including the thickness in the transom area.
If you find a way to make the gel coat flow out please let me know as that has been problematic for me too.
I called the gelcoat manufacturer, they suggested the roll & tip method. I know you can thin gelcoat, but I don't want to wait for a product to ship, I'm on a roll and want it done in the next day or two. I suspect the cheap paint brush I used was just too firm. I think a high quality, extra soft brush would be way better. I thought for sure the gelcoat would have flowed level better, but guess not, that was my mistake. I noticed the deep brush marks, but just assumed it'd level out after a while. This time I'll make sure there are no large valleys or peaks, and brush on extra thick, giving me some headroom to sand back down smooth. Someone at work said a hair dryer or heat gun can quickly even the coating out, but not sure about that, the stuff I have is pretty thick.
-
SlowSL
- Chief Steward
- Posts: 61
- Joined: Tue Nov 17, 2020 6:17 am
- Sailboat: MacGregor 26X
- Location: Northern Indiana
Re: New 26X owner, going to need a lot of help!
I started a new thread in the repairs section and added some photos....
viewtopic.php?f=8&t=28409
viewtopic.php?f=8&t=28409
-
dlandersson

- Admiral
- Posts: 4931
- Joined: Fri Aug 27, 2010 10:00 am
- Sailboat: MacGregor 26X
- Location: Michigan City