Restoration of hurricane damaged '99 26x

A forum for discussing boat or trailer repairs or modifications that you have made or are considering.
SlowSL
Chief Steward
Posts: 61
Joined: Tue Nov 17, 2020 6:17 am
Sailboat: MacGregor 26X
Location: Northern Indiana

Restoration of hurricane damaged '99 26x

Post by SlowSL »

I figured I'd share my experience with restoring our 1999 26x that was damaged in a storm, and was in all around poor condition, inside and out. I have very little boat repair knowledge, so if I can get it done, anyone should be able to. My main goal is to keep the project cost as low as possible. I'm far from done, but I think I should be able to drop it in the water and test things out. I'll try to leave some details on how things were done, ask away if you have any questions, it really hasn't been as bad as I thought so far. The main damage was from the dock. The bow pulpit mounts had ripped up the fiberglass at the two front feet. There was a large crack on the starboard side, midship, above the waterline, as well as a smaller one on the port side. Lots of minor cosmetic damage that will be fixed later on.

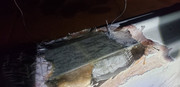
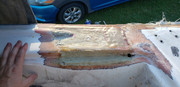
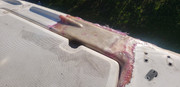
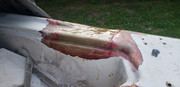
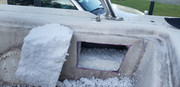
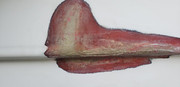
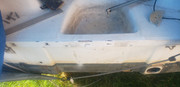
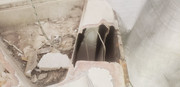
You can see that the fiberglass has pulled from the edge of the molding at the rub rail, all the way over to well into the anchor locker. If you ever wondered why on earth Macgregor used such tiny, thin washers underneath the hardware, this goes to show that they hold better than you'd think. I would have thought the immediate area directly around the washers would have pulled out.

Image

Image

Image

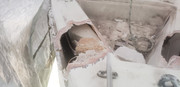
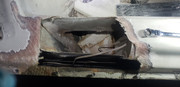
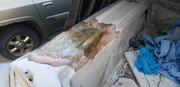
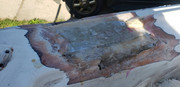
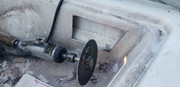
In order to even begin patching up the gaping holes where the pulpit mounts ripped out, I first used a couple 3/16"x4"x12" strips of aluminum, glassed a few layers onto the ends, then wetout the mating area underneath the deck where the two ends of the aluminum would rest. I had some some small holes pre-drilled into the aluminum so that I could feed through wire, and attached the other end to the mast, which was hanging overhead. I then pulled and tied it tight so that the aluminum was pulled hard under the deck and let the fiberglass harden. This is not meant to take any load, this is just a surface to start laying fiberglass. The pulpit mount bolts will be bolted through this plate though, so it will be fastened and pulled up when the pulpit is installed. That took care of the wide flat area, but the shape up there is a bit diverse, so I just cut some pieces of wood I had laying around to fit, and did the same thing where needed. Once that was all done, this gave a rough "base" which was close to the original contour of the deck. I started laying glass here and there to try to fill in and level it up near the original fiberglass. Once I was happy, I went to town with the main pieces of fiberglass until it was level with the original. I faired the top (low spots, imperfections) by using the polyester resin, and just mixing in some West system 404 filler which I had on hand. That worked very good to firm up the resin so that it could be worked at the edges & corners so it didn't run. I also used the thickened resin to form the little "hill" which fades down to nothing right before the pulpit foot. It's not perfectly smooth, I could probably have spent more time, add more resin over top of the imperfect spots, and sand it back down to make it virtually unnoticeable that there was a repair, but I think it's good enough, a few layers of thick gelcoat should hide all of that, was my thinking. I got a layer of gelcoat down everywhere the other day. I brushed it on, and unfortunately it didn't level out like it was supposed to. Once I was done sanding (220 grit) in order to blend the high/low spots, there was fiberglass showing in some of the high spots. After speaking with the gelcoat supplier, I'll throw on a thicker 2nd coat and use the roll & tip method this time, with a softer brush. The cheap, somewhat firm brush I used just wasn't able to get it smooth enough.


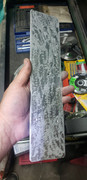
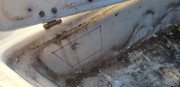
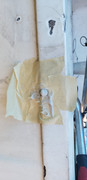
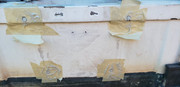
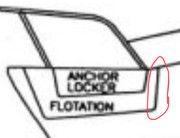
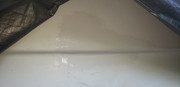
Here is the progress up to a few days ago, just before gelcoating. The purple marking are from a sharpie. I circled where each later of fiberglass would go, as well as held the fabric on the area and traced/cut.... The deck is surprisingly thing, and the anchor locker sides are paper thin, making it kind of hard to blend the new glass into the old glass without making a "step".

Image

Image

Image

Image

Image

Image

Image
Last edited by SlowSL on Tue Jun 22, 2021 5:25 am, edited 1 time in total.
User avatar
Bilgemaster
First Officer
Posts: 467
Joined: Sun Apr 26, 2015 5:03 pm
Sailboat: MacGregor 26X
Location: Woodbridge, Virginia--"Breakin' Wind" 2001 26X, Honda BF50A 50hp engine

Re: Restoration of hurricane damaged '99 26x

Post by Bilgemaster »

Looks like you're doing a fine job. In the event you come across aspects of this or that about which you may be a bit foggy (for my light fixer-upper 26X it was its electrics, a rat's nest of half-installed stuff handed off to me by the previous owner--with no documentation or designs, natch), then I can unreservedly recommend the guides of Don Casey. His little Sailboat Electrics Simplified is perhaps the single greatest reason mine hasn't burnt down to the waterline.

I believe his more extensive Don Casey's Complete Illustrated Sailboat Maintenance Manual may include most or all of the elements of his electrical manual along with lots more besides, and may possibly be extremely useful for a more challenging restoration than mine needed.
SlowSL
Chief Steward
Posts: 61
Joined: Tue Nov 17, 2020 6:17 am
Sailboat: MacGregor 26X
Location: Northern Indiana

Re: Restoration of hurricane damaged '99 26x

Post by SlowSL »

Access cut in anchor locker for rear pulpit mount nuts.

Image

Image

Image

Image


Side of hull crack, all loose material removed, and a taper ground out. The hull is very thin in this area as well. Luckily I was also able to access the back side through the head locker, so I added a few more layers inside as well. I'd be a little nervous if I only had the outside to work with, but at least it would be pretty far above the waterline. The white stiff in the last photo was polyester resin with West system 404 filler in order to thicken up the resin, fair out the area, and build up the ridge a bit which was not quite level with the hull contour. I ended up adding another thin coat of thickened resin and sanding it back down to match the hull better.

Image

Image

Image
Last edited by SlowSL on Tue Jun 22, 2021 5:25 am, edited 1 time in total.
SlowSL
Chief Steward
Posts: 61
Joined: Tue Nov 17, 2020 6:17 am
Sailboat: MacGregor 26X
Location: Northern Indiana

Re: Restoration of hurricane damaged '99 26x

Post by SlowSL »

Bilgemaster wrote: Mon Jun 21, 2021 12:12 pm Looks like you're doing a fine job. In the event you come across aspects of this or that about which you may be a bit foggy (for my light fixer-upper 26X it was its electrics, a rat's nest of half-installed stuff handed off to me by the previous owner--with no documentation or designs, natch), then I can unreservedly recommend the guides of Don Casey. His little Sailboat Electrics Simplified is perhaps the single greatest reason mine hasn't burnt down to the waterline.

I believe his more extensive Don Casey's Complete Illustrated Sailboat Maintenance Manual may include most or all of the elements of his electrical manual along with lots more besides, and may possibly be extremely useful for a more challenging restoration than mine needed.
Thanks! Lucky for me, the PO left the boat pretty much as it was from the factory, so I've got a clean slate with the wiring, which I've already planned. The boat came with a brand new battery, and I have an extra one sitting in my garage. I'll put a 1,2, both, off switch for those. I plan on adding some convenience lighting, deck lighting, some new dimmable light fixtures, and a on-demand freshwater pump.
SlowSL
Chief Steward
Posts: 61
Joined: Tue Nov 17, 2020 6:17 am
Sailboat: MacGregor 26X
Location: Northern Indiana

Re: Restoration of hurricane damaged '99 26x

Post by SlowSL »

I used West System's epoxy to fill the PO's previous outboard holes. I could have used polyester resin with filler, but just opted to use the epoxy. The hole pattern didn't match my motor's hole patter, and neither conform to the BIA standard. I'll just fill and re-drill holes as needed. I taped the holes from inside the boat so that the epoxy didn't ooze out. When filling the holes, you have to work at it for a while to ensure the air inside the hole exits so there are no voids. There was also a broken depth finder bracket which was removed and epoxied over as well. A 2nd batch of epoxy was used on the outside of the holes, they had dished in a tad once cured. Once hardened, it was sanded flush.

Image

Image

Image

Image


The PO had installed semi-flush drain plugs in the aft end of the hull bottom, just outside both sides of the ballast tank. Those seem like a perfect item to forget while taking on a massive amount of water (5/8" openings, x2). The bottom of the hull is roughly 1.5" thick, so I had to grind out quite a bit of taper, until it was about 3/4" way through the hull. It took roughly 30 layers or so to fill the hole, and again, faired the final bit with thickened polyester resin, then sanded to match the hull. I was able to prep and install several layers of glass on the inside of the boat as well, for piece of mind.
Image

Image

Image

Image

I should also caution that unless you want to end up floating around Pluto, be sure that the boat is well ventilated, and you have a fan circulating fresh air, and a good mask on. Several times, while trying to glass the inside in the hard to reach areas, my mask would push up against the hull and break the seal, not good after a few breaths of straight resin fumes.
User avatar
Jimmyt
Admiral
Posts: 3402
Joined: Sat Jul 18, 2015 9:52 am
Sailboat: MacGregor 26M
Location: Mobile AL 2013 26M, 60 Etec

Re: Restoration of hurricane damaged '99 26x

Post by Jimmyt »

Nice work! You're making good progress.
Jimmyt
P-Cub-Boo
2013 26M, Etec 60, roller Genoa, roller main
Cruising Waters: Mobile Bay, Western Shore, Fowl River
krum
Chief Steward
Posts: 67
Joined: Tue May 28, 2019 8:38 am
Sailboat: MacGregor 26X
Location: PLATTE CITY, MO

Re: Restoration of hurricane damaged '99 26x

Post by krum »

I was planning to replace my bow pulpit on my '01 26x, I didn't realize there was so much foam underneath the pulpit mounting area, looks like I'll have to rethink my approach. For not having done this before it looks great.

Karl
User avatar
dlandersson
Admiral
Posts: 4931
Joined: Fri Aug 27, 2010 10:00 am
Sailboat: MacGregor 26X
Location: Michigan City

Re: Restoration of hurricane damaged '99 26x

Post by dlandersson »

Kudos to you 8)
SlowSL
Chief Steward
Posts: 61
Joined: Tue Nov 17, 2020 6:17 am
Sailboat: MacGregor 26X
Location: Northern Indiana

Re: Restoration of hurricane damaged '99 26x

Post by SlowSL »

krum wrote: Mon Jun 21, 2021 4:18 pm I was planning to replace my bow pulpit on my '01 26x, I didn't realize there was so much foam underneath the pulpit mounting area, looks like I'll have to rethink my approach. For not having done this before it looks great.
Karl
SlowSL wrote: Mon Jun 21, 2021 11:19 am
OverEasy wrote: Mon Jun 21, 2021 6:20 am Hi SlowSL

Liked your description of that bow area access!
I fully agree with your access approach.
Glassing to plug the holes in the anchor locker is about the only durable way that works.
I haven’t seen an access cover available to purchase the can fit that areas dimensions.
Maybe there is but I haven’t.

Some people have made their access holes for the aft pulpit feet in the interior aft face of the liner.
Image
It would have been nice if at the design level there had been access to all the bolted junctures for inspection and maintenance.

Thanks for including the thickness in the transom area.

If you find a way to make the gel coat flow out please let me know as that has been problematic for me too.
Here is a different approach, from inside.
User avatar
Russ
Admiral
Posts: 8301
Joined: Thu Oct 11, 2007 12:01 pm
Sailboat: MacGregor 26M
Location: Bozeman, Montana "Luna Azul" 2008 M 70hp Suzi

Re: Restoration of hurricane damaged '99 26x

Post by Russ »

SlowSL wrote: Mon Jun 21, 2021 11:54 am I have very little boat repair knowledge
Could have fooled me. :D

I didn't realize Roger put foam EVERYWHERE. Around the anchor locker voids. EVERYWHERE.

Smart to get rid of those drain plugs. They aren't needed and just another failure point that can test all that foam.

Looking good. It's fascinating seeing your progress. Thanks for posting.
--Russ
SlowSL
Chief Steward
Posts: 61
Joined: Tue Nov 17, 2020 6:17 am
Sailboat: MacGregor 26X
Location: Northern Indiana

Re: Restoration of hurricane damaged '99 26x

Post by SlowSL »

Brushed on the 2nd layer of gelcoat last night on the bow and hull side. I used a much softer, higher quality brush this time. This layer is double the thickness of the first, hopefully it doesn't shrink and crack. It turned out much better, but still left brush marks, but shallow enough that they should be able to easily sand out once cured, I hope. I'll be able to mount the bow pulpit and navigation light. Right as I was about to pull the tarp over it for the night, one of those giant mosquitos decided right onto the still wet gelcoat. One side of him sunk right in, and as it was trying to fly away was spinning in circles, making a mess of it, ugh. I tried pulling it out, but pieces kept falling off, oops, might have to touch up that area.

Image

Image

Next is cleaning off and prepping to re-install the rub rail. Not sure how this will turn out, I'm using the one that was pulled off of it. It has a couple chunks missing, but I think I'll be able to patch it up with some black RTV sealant. I'm going with this stuff, which is readily available at menards.
https://www.menards.com/main/paint/adhe ... 628654.htm
From what I've read, it has very similar properties to 4200, guess I'll find out.
User avatar
Russ
Admiral
Posts: 8301
Joined: Thu Oct 11, 2007 12:01 pm
Sailboat: MacGregor 26M
Location: Bozeman, Montana "Luna Azul" 2008 M 70hp Suzi

Re: Restoration of hurricane damaged '99 26x

Post by Russ »

SlowSL wrote: Tue Jun 22, 2021 6:27 am Next is cleaning off and prepping to re-install the rub rail.
This video might help

--Russ
krum
Chief Steward
Posts: 67
Joined: Tue May 28, 2019 8:38 am
Sailboat: MacGregor 26X
Location: PLATTE CITY, MO

Re: Restoration of hurricane damaged '99 26x

Post by krum »

Slowsl
Thanks for your alternate approach to accessing the rear legs of the pulpit. I kept reviewing your repair of the deck where your front pulpit legs pulled out. When your repaired the area of the front legs, how did you remount the front of the pulpit?
I see no access hole to reach the bottom of the thru-bolts of the front legs. Mystery?
SlowSL
Chief Steward
Posts: 61
Joined: Tue Nov 17, 2020 6:17 am
Sailboat: MacGregor 26X
Location: Northern Indiana

Re: Restoration of hurricane damaged '99 26x

Post by SlowSL »

krum wrote: Wed Jun 23, 2021 8:01 am Slowsl
Thanks for your alternate approach to accessing the rear legs of the pulpit. I kept reviewing your repair of the deck where your front pulpit legs pulled out. When your repaired the area of the front legs, how did you remount the front of the pulpit?
I see no access hole to reach the bottom of the thru-bolts of the front legs. Mystery?
That is a great question, I haven't completely addressed this issue yet. I've been thinking of three different ways to accomplish this, not 100% sure which way is best. My original idea which I've already partially incorporated, and the one I'll probably stick with, is to use the fiberglassed in 3/16" aluminum plate, and simply drill/tap the holes and use thread locker. I made sure the plate was completely underneath where the pulpit feet would sit when I glassed it in. I believe they are 1/4-20 bolts, x3 fasteners per foot, which would allow 3-4 threads each to grab the aluminum. I'm no expert, but I believe that should be plenty of holding power. 2nd option, to install some kind of anchor/toggle into the holes so it grabs the back side as the fastener is threaded in. I'm just touching up the gelcoat, so I haven't mounted the pulpit yet and decided for sure. My 3rd thought, if tapping the aluminum plate doesn't work out, would be to cut more accesses in the anchor locker. I'd like to avoid that, the boat has enough holes. I was also speculating if an access could be cut from inside the cabin. This would be cut into the area between the foam box and the front of the boat. I'm talking the little area where you are able to get an arm or two up to the underside of the deck, forward of the anchor locker, where you'd normally access the nuts on the bow cleats. I haven't checked, but if there was enough room to cut a hand sized access there, it wouldn't be visible. This would mean that you would have to get through quite a few inches of foam to reach back to the pulpit nuts though, and would be pretty involved. I'm not even sure if it's feasible, I haven't spent enough time looking over the area. I should probably just stick with tapping the aluminum plates and see how that holds up, I think it should be fine.
krum
Chief Steward
Posts: 67
Joined: Tue May 28, 2019 8:38 am
Sailboat: MacGregor 26X
Location: PLATTE CITY, MO

Re: Restoration of hurricane damaged '99 26x

Post by krum »

Have you considered using a circular 3-4 inch hatch plate through the side of the anchor locker, one per side. If I cant convince my wife to put her hand into the hole, I'll need to use the 4 incher so my forearms get thru. Spent some time at home depot trying out different sizes. Got some funny looks but a guys got to do what a guys got to do.
Post Reply