


Good to hear you're on the mend. What a saga!
As or your 2022 trip, as usual you - and everyone - are always welcome to stop in for a visit to "Puffs Woods North" (our place on Lake Champlain near Rouses Point).
A New Journey Begins for OverEasy - 2020/2022
-
NiceAft

- Admiral
- Posts: 6703
- Joined: Tue Feb 01, 2005 7:28 pm
- Sailboat: MacGregor 26M
- Location: Upper Dublin,PA, USA: 2005M 50hp.Honda4strk.,1979 Phantom Sport Sailboat, 9'Achilles 6HP Merc 4strk
Re: A New Journey Begins for OverEasy
OverEasy,
1st, I am glad you are on the mend, and on your way back to fulfilling your dreams.
As always, Shakespeare has the best words for any occasion; “Live a little; comfort a little; cheer thyself a little.” [AsYou Like It, II/vi]
As to that “impenetrable jungle”; “O fie! ‘it’s a unweeded garden, That grows to seed; things rank and gross in nature Possess it merely. [Hamlet, I/ii]
Lastly, remember, you own a Mac; “Be glad of our success; We are the Jason’s, we have won the fleece. [The merchant of Venice, III/ii]

Ray ~~_/)~~
-
ris

- Captain
- Posts: 705
- Joined: Sat Feb 28, 2015 4:27 pm
- Sailboat: MacGregor 26X
- Location: Frostproof Florida
Re: A New Journey Begins for OverEasy
OverEasy we just missed you. We have arrived in Hudson Falls NY. We plan to put the Jill Kristy in the water at Fort Edwards NY on the 3rd of June. We will then be on the Champlain Canal and heading for Champlain Lake. Hope you complete all your plans for the boat and house. Maybe when we finish our Triangle Loop we can meet up in Sept. Have fun and hope your health is doing better.
Richard
Richard
-
OverEasy
- Admiral
- Posts: 2882
- Joined: Mon Sep 28, 2020 11:16 am
- Sailboat: MacGregor 26X
- Location: NH & SC
Re: A New Journey Begins for OverEasy
Hi Kmclemore, NiceAft & Ris,
Thank you for your kind words and encouragement! They are all very appreciated!
We’re a lot more flexible with this year’s plans (sortabynecessity) but a trip late Summer to Lake Champlain (albeit for a shorter term than last year) is still on the list. Thank you for the invite Kevin.
We appreciated the references to the Bard. His way with words are still appropriate and thoughtful. His writings are always enjoyable because they make one actually think about the words and characters as people.
So sorry we are missing the opportunity to meet up with you Ris. We sincerely hope that you have a wonderfulful journey upon the Hudson, Champlain Canal and Lake Champlain. It sounds like a great adventure.
We are driving South today.
Fair winds and clear skies to everyone.
Best Regards
Over Easy


fudt
-
OverEasy
- Admiral
- Posts: 2882
- Joined: Mon Sep 28, 2020 11:16 am
- Sailboat: MacGregor 26X
- Location: NH & SC
Re: A New Journey Begins for OverEasy
Hi All!
We made it South!
Arrived in Beaufort Saturday May 28.
Nice road trip down, got to visit friends in NJ and weathered a surprisingly strong storm front while enroute.
Glad we weren’t out on the water when that blew through!


Would have been too much of an adventure!
Spent the next days recovering from the trip.
(Getting older is a pain but it does beat the alternatives )
Eventually got things unloaded from the van and the house opened up and aired.
It’s been a long unplanned 6 months away…so much for snowbirding (again )!
)!
Noticed a big tree with a triple trunk precariously looming over the driveway and house has died and needs to be removed.
(The professional tree people are hoping to get here before the end of June… fingers crossed .)
.)
After rearranging the crowded garage we were able to finally get an engine crane to help with the removal and storage of our 20+ year old 50 hp Tohatsu engine in preparation for our new Suzuki in July back north in NH.
Hopefully we can get this accomplished this week if the current heat wave abates!
Been in the 90s with 70-80% humidity which seems to take the wind outta my sails… .
.
Current plan for the Tohatsu is to rebuild/replace the carbs and engine fuel pump over the winter.
Then keep it for a small build/buy flats fishing boat or sell it on.
There are too many other bigger projects to accomplish too get too excited about that right now.
The Over Easy task list to accomplish this month is to power wash the exterior, clean-up the interior, install the new bow berth extension, install/adapt the thicker foam cushions for the bow & dinette berths, check the zincs on the swing keel (added last year before going to Lake Champlain), order and fit a 5/8 x 12 x 24 G10 transom backing plate for the new Suzuki to help distribute the transom loads better, make/install new interior mounted ‘through the hull’ glycol filled sonar transducer box in the aft dinette bilge area (to hopefully get enough view angle to use the side scan feature ) and pack up for the return trip North in July. ( So far I’ve gotten off to a slow start on Over Easy but I’ve gotten several of the smaller home ‘To-Do’ projects knocked off.
Still seem to be slowly recovering from the medical issues of earlier this year.
Slow but incremental progress (I wasn’t in prime condition before ) so I don’t have much to grouse about.
Hope everyone out there are happy, healthy and gonna have a great time out on the water this summer with their Macs!
Best Regards
Over Easy
We made it South!
Arrived in Beaufort Saturday May 28.
Nice road trip down, got to visit friends in NJ and weathered a surprisingly strong storm front while enroute.
Glad we weren’t out on the water when that blew through!
Would have been too much of an adventure!
Spent the next days recovering from the trip.
(Getting older is a pain but it does beat the alternatives
Eventually got things unloaded from the van and the house opened up and aired.
It’s been a long unplanned 6 months away…so much for snowbirding (again
Noticed a big tree with a triple trunk precariously looming over the driveway and house has died and needs to be removed.
(The professional tree people are hoping to get here before the end of June… fingers crossed
 .)
.)After rearranging the crowded garage we were able to finally get an engine crane to help with the removal and storage of our 20+ year old 50 hp Tohatsu engine in preparation for our new Suzuki in July back north in NH.
Hopefully we can get this accomplished this week if the current heat wave abates!
Been in the 90s with 70-80% humidity which seems to take the wind outta my sails…
Current plan for the Tohatsu is to rebuild/replace the carbs and engine fuel pump over the winter.
Then keep it for a small build/buy flats fishing boat or sell it on.
There are too many other bigger projects to accomplish too get too excited about that right now.
The Over Easy task list to accomplish this month is to power wash the exterior, clean-up the interior, install the new bow berth extension, install/adapt the thicker foam cushions for the bow & dinette berths, check the zincs on the swing keel (added last year before going to Lake Champlain), order and fit a 5/8 x 12 x 24 G10 transom backing plate for the new Suzuki to help distribute the transom loads better, make/install new interior mounted ‘through the hull’ glycol filled sonar transducer box in the aft dinette bilge area (to hopefully get enough view angle to use the side scan feature
Still seem to be slowly recovering from the medical issues of earlier this year.
Slow but incremental progress (I wasn’t in prime condition before
Hope everyone out there are happy, healthy and gonna have a great time out on the water this summer with their Macs!
Best Regards
Over Easy
-
OverEasy
- Admiral
- Posts: 2882
- Joined: Mon Sep 28, 2020 11:16 am
- Sailboat: MacGregor 26X
- Location: NH & SC
Re: A New Journey Begins for OverEasy
Speaking of removing engines….. We never would have thought when we first thought of starting our journey with Over Easy that we would have had so many different adventures, get to do many interesting projects and ‘meet’ so many others who love their Macs!
Projects that have Included pre-emptive bilge pumps, new DC electrical systems, remodeled galleys, onboard A/C and chart plotter/sonar.
Trips exploring the numerous estuaries surrounding Beaufort SC and getting to spend 70 nights on Lake Champlain VT while the heat of late August Summer turned to mid November Fall where we were able to stay until the Marina literally was pulled from the lake as ice formed!
We have really enjoyed our journey so far and very much appreciate this MacGregor Sailors Forum. The hosts and members of this forum are all remarkable individuals!
Now we attempt to get back on track after dealing with our (my) unplanned medical diversions 
 that are now (& hopefully remain in the rear view mirror). So our next adventure is removing our old 50 hp Tohatsu engine in preparation to get our new Suzuki DF60AV engine installed.
First step is how to get the puppy off the back end of Over Easy (and in a manner that doesn’t try to nix me!)
Well for better or worse we decided to continue on with the use of a portable engine crane to remove our old 50 hp Tohatsu.
Harbor Freight had two models, 1 ton & 2 ton. Both models were about about $100+ less than Norther Tool, Home Depot,
Lowes, or Tractor Supply.
We selected the 2 ton version as it gives us more margin and capability for not only this project but others in the future.
(With my mobility issues lifting & moving things around is a challenge, just can’t pick up and carry the stuff I used to ).
Both models are more than adequate but Harbor Freight was offering 25% off on a single item in store only and a rain check as they didn’t have either in stock at that moment but hoped to by the following week. Oops! It didn’t come in! Fortunately their Stateside GA store had one that they would honor the rain check and hold for me! It was a bit of a drive over there and back but worth it to us.

The Admiral and I spent an hour or so one afternoon putting the thing together without any issues.
Great Team Work!
(One of the first things we did was use the new crane to remove our 3500 watt home generator we moved fron NH to SC from the van! It weighs about 150 lbs and the crane as much easier than the 8 foot ramp we used to get it wheeled in! )
So now we’re set to remove the engine (after we power wash and clean up Over Easy from her 7 month storage hiatus) before we have to head back North in early July. (It’s amazing the amount of external grunge Southern Pines and Water Oaks along with heat and humidity can generate! )
I believe we can borrow your idea of the wedge bracket Sheppie62 for the longer term storage and engine work once we get back down South in the fall. I think I can adapt a free standing frame to mount it and make an anti-tip bracket on one of the walls of the garage which would allow running it up in a barrel/tank. Then lift the engine off with the crane, move the frame to the inside of the garage, secure it and remount the engine to it until we buy/build a flats fishing boat and trailer. Thanks Sheppie62!
Best Regards
Over Easy
Projects that have Included pre-emptive bilge pumps, new DC electrical systems, remodeled galleys, onboard A/C and chart plotter/sonar.
Trips exploring the numerous estuaries surrounding Beaufort SC and getting to spend 70 nights on Lake Champlain VT while the heat of late August Summer turned to mid November Fall where we were able to stay until the Marina literally was pulled from the lake as ice formed!
We have really enjoyed our journey so far and very much appreciate this MacGregor Sailors Forum. The hosts and members of this forum are all remarkable individuals!
Now we attempt to get back on track after dealing with our (my) unplanned medical diversions
First step is how to get the puppy off the back end of Over Easy (and in a manner that doesn’t try to nix me!
Well for better or worse we decided to continue on with the use of a portable engine crane to remove our old 50 hp Tohatsu.
Harbor Freight had two models, 1 ton & 2 ton. Both models were about about $100+ less than Norther Tool, Home Depot,
Lowes, or Tractor Supply.
We selected the 2 ton version as it gives us more margin and capability for not only this project but others in the future.
(With my mobility issues lifting & moving things around is a challenge, just can’t pick up and carry the stuff I used to
Both models are more than adequate but Harbor Freight was offering 25% off on a single item in store only and a rain check as they didn’t have either in stock at that moment but hoped to by the following week. Oops!
The Admiral and I spent an hour or so one afternoon putting the thing together without any issues.
Great Team Work!

(One of the first things we did was use the new crane to remove our 3500 watt home generator we moved fron NH to SC from the van!
So now we’re set to remove the engine (after we power wash and clean up Over Easy from her 7 month storage hiatus) before we have to head back North in early July. (It’s amazing the amount of external grunge Southern Pines and Water Oaks along with heat and humidity can generate!
I believe we can borrow your idea of the wedge bracket Sheppie62 for the longer term storage and engine work once we get back down South in the fall. I think I can adapt a free standing frame to mount it and make an anti-tip bracket on one of the walls of the garage which would allow running it up in a barrel/tank. Then lift the engine off with the crane, move the frame to the inside of the garage, secure it and remount the engine to it until we buy/build a flats fishing boat and trailer. Thanks Sheppie62!
Best Regards
Over Easy
-
Russ

- Admiral
- Posts: 8303
- Joined: Thu Oct 11, 2007 12:01 pm
- Sailboat: MacGregor 26M
- Location: Bozeman, Montana "Luna Azul" 2008 M 70hp Suzi
Re: A New Journey Begins for OverEasy
Sound like a great device. Should be fun to lift the old motor off the boat.
With your permission, I would suggest breaking this thread into a new one. Maybe. New Journey for OverEasy 2022?
This one is getting rather long and it might be a good new chapter.
With your permission, I would suggest breaking this thread into a new one. Maybe. New Journey for OverEasy 2022?
This one is getting rather long and it might be a good new chapter.
--Russ
-
OverEasy
- Admiral
- Posts: 2882
- Joined: Mon Sep 28, 2020 11:16 am
- Sailboat: MacGregor 26X
- Location: NH & SC
Re: A New Journey Begins for OverEasy
Hi All!
It’s been a month of slow steady progress getting Over Easy ready for the 2022 season (after a slow delayed start….but that’s water under the bridge).
So far we have removed the old 2001 vintage 50 hp Tohatsu 2-stroke engine and stripped out the related engine controls and cables. The portable engine hoist/crane was a great choice allowing for one person removal and movement to temporary storage in the garage. (More about it’s future at a later date ).
).
We pulled the side panels on the pedestal to gain access to remove the engine cables and wires. Well that didn’t go as easily as anticipated . The “Well Nuts” we installed last year bound up and just spun int the fiberglass even though we had used 5200 to bed them in and applied Teflon to the threads. Felt like Monkey with a coconut
  through a picket fence as the problem occurred on most of the fasteners on both sides
 effectively locking them on! With lots of gentle persuasion and much more time than anticipated the panels were finally removed without damaging the panels or pedestal. Post Mortum showed the brass thread inserts of the rubber sheathed “Well Nuts” had corroded jamming the threads. Won’t be doing that again!!!
The next fix for this is going to be mixing up some fiber glass “hair” epoxy filler and plugging the holes in the pedestal then drilling new pilot holes for new SST screws. More work….
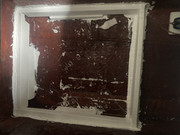
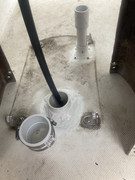
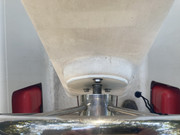
While having to unbolt the pedestal from the cockpit floor I decided that while the cables were removed it was a prime time to investigate the persistent nuisance leak into the aft berth I’ve suspected originates at the two pedestal feed throughs. It appears that at sometime in the past (from factory?) the larger 2” feed thru had a piece of PVC pipe inserted through the cockpit floor but not through the aft berth head liner. This allowed it to cock to one side in the interspace slightly. The silicone sealant applied minimally at the cockpit floor cracked through allowing water to migrate into the interspace and into the aft berth and on back to the engine bowl head liner void.
The second existing (Factory? PO?) feed thru was a 1-1/2 dia hole through the cockpit floor and aft berth head liner without a sleeve pipe. A plastic boot was screwed to the cockpit floor. Removal of the boot showed that sealant was not fully applied to the floor interface and what had been applied was done to a dirty floor surface. This also had been allowing water to migrate into the aft berth and interspace and on back to the engine bowl.
These migration leak locations could very well explain the aft berth leaks and the fracturing of the inner head liner of the engine bowl and water leakage at the bottom lip flange of the bowl liner!
The fix done was to get the feed troughs cleaned up to remove ALL trace of ANY old silicone sealant.
— then get the existing PVC sleeve to go all the way through the inner head liner
— a new PVC sleeve with a 6” riser was added to the second feed through hole of the cockpit deck and aft berth headliner
— these were then throughly wetted and bedded with 5200 sealant with a generous overlay at both the cockpit floor and aft berth head liner interfaces after a through cleaning, scuffing and acetone wipe down.
— an extension was added to the larger PVC sleeve to increase the opening height above the cockpit floor as well.
Hopefully this will eliminate these nuisance leaks!!!
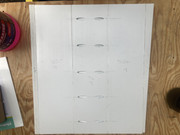
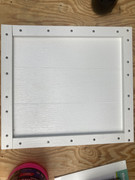
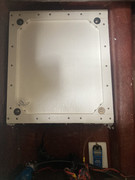
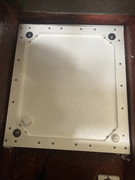
The new 3/4” thick G-10 transom reinforcement plate was cut to size, drilled, edge routered both sides, primed and coated with anti fouling paint. It was then mounted to the transom aft face with sealing washers (sealed with 5200 on both contact faces) and bolted in position with the engine mount bolts to cure. A separate retention bolt was added so that the new reinforcement plate will stay in position and not drop out whenever the engine mount bolts are removed ( like when our new engine is installed.
{Note of Interest: With the opportunity to work on the transom intimately I discovered that the as built Mac26X factory transom is rather limited. The glassed in reinforcement appears to be two sections of plywood… the section most aft appears to be 12x18x1/2” thick…the section in front of that appears to be 12x12x3/4” thick…It’s hard to tell the exact thickness but the width and height are pretty close. This may help substantiate why MacGregor recommended the engine size he did…. Just passing it along .}
.}
Our additional 3/4 thick G-10 fiberglass reinforcement & load distribution plate is 23-1/2” wide and 12” tall. This should be more than adequate to help manage the additional thrust loads of our new engine installation.
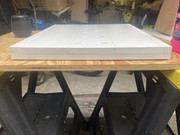
We are also upgrading our cabin bed cushions for the Vee-Berth and Dinette-Berths to 7” thick mattress foam! We have cut and trimmed the sections to fit. SO MUCH MORE COMFORTABLE THAN THE OLD FACTORY PADS!!!
We will be making (or have made) the Sunbrella covers later as well as adding air-gap underlayment once we get North. For now we will just wrap the sections in flat sheets for our trip North.
The improved larger size interior through the hull sonar transducer mount is completed, the porous foam fitted, filled with 3 gallons of RV antifreeze and sealed! Finally! The new tank uses the three existing surfaces of the under aft dinette seat area. When the ballast is flooded and the boat is in the water the areas opposite these surfaces are wetted areas. The box is fabricated from PVC lumber, SST screws and 5200 adhesive. All surfaces were throughly scuffed and cleaned with Acetone. No punctures were made in the interior hull liner. The new sonar transducer tank spans the distance from the keel trunk side over to the Starboard water ballast transfer tube which is about 18 inches. The forward portion abuts the water ballast tank aft wall under the forward dinette seat and goes aft about 19 inches. The depth of the tank varies with the slope of the hull and is deepest by the keel trunk (~5 inches) and shallowest by the ballast transfer tube (~3 inches). The transducer I’d suspended in saturated foam at about 1 inch above the interior hull and level fore-aft and side-to-side. We’re hoping when the water ballast is fully flooded that this should give us good depth readings and allow us to use the side scan feature of our Garmin Chartplotter system. Next step is to test it once we are on the water up North…

Our target is to get on the road North by this coming Tuesday morning via Vermont to watch our older daughter participate in a 10k (6 mile) Open Water Swim at Lake Memohremagog starting at Prouty Beach in Newport Vt. Then on to NH to get our new engine installed the first week of August!
Best Regards
Over Easy

It’s been a month of slow steady progress getting Over Easy ready for the 2022 season (after a slow delayed start….but that’s water under the bridge
).So far we have removed the old 2001 vintage 50 hp Tohatsu 2-stroke engine and stripped out the related engine controls and cables. The portable engine hoist/crane was a great choice allowing for one person removal and movement to temporary storage in the garage. (More about it’s future at a later date
 ).
). We pulled the side panels on the pedestal to gain access to remove the engine cables and wires. Well that didn’t go as easily as anticipated
 . The “Well Nuts” we installed last year bound up and just spun int the fiberglass even though we had used 5200 to bed them in and applied Teflon to the threads. Felt like Monkey with a coconut
  through a picket fence as the problem occurred on most of the fasteners on both sides
 effectively locking them on! With lots of gentle persuasion and much more time than anticipated the panels were finally removed without damaging the panels or pedestal. Post Mortum showed the brass thread inserts of the rubber sheathed “Well Nuts” had corroded jamming the threads. Won’t be doing that again!!!
The next fix for this is going to be mixing up some fiber glass “hair” epoxy filler and plugging the holes in the pedestal then drilling new pilot holes for new SST screws. More work….
While having to unbolt the pedestal from the cockpit floor I decided that while the cables were removed it was a prime time to investigate the persistent nuisance leak into the aft berth I’ve suspected originates at the two pedestal feed throughs. It appears that at sometime in the past (from factory?) the larger 2” feed thru had a piece of PVC pipe inserted through the cockpit floor but not through the aft berth head liner. This allowed it to cock to one side in the interspace slightly. The silicone sealant applied minimally at the cockpit floor cracked through allowing water to migrate into the interspace and into the aft berth and on back to the engine bowl head liner void.
The second existing (Factory? PO?) feed thru was a 1-1/2 dia hole through the cockpit floor and aft berth head liner without a sleeve pipe. A plastic boot was screwed to the cockpit floor. Removal of the boot showed that sealant was not fully applied to the floor interface and what had been applied was done to a dirty floor surface. This also had been allowing water to migrate into the aft berth and interspace and on back to the engine bowl.
These migration leak locations could very well explain the aft berth leaks and the fracturing of the inner head liner of the engine bowl and water leakage at the bottom lip flange of the bowl liner!
The fix done was to get the feed troughs cleaned up to remove ALL trace of ANY old silicone sealant.
— then get the existing PVC sleeve to go all the way through the inner head liner
— a new PVC sleeve with a 6” riser was added to the second feed through hole of the cockpit deck and aft berth headliner
— these were then throughly wetted and bedded with 5200 sealant with a generous overlay at both the cockpit floor and aft berth head liner interfaces after a through cleaning, scuffing and acetone wipe down.
— an extension was added to the larger PVC sleeve to increase the opening height above the cockpit floor as well.
Hopefully this will eliminate these nuisance leaks!!!
The new 3/4” thick G-10 transom reinforcement plate was cut to size, drilled, edge routered both sides, primed and coated with anti fouling paint. It was then mounted to the transom aft face with sealing washers (sealed with 5200 on both contact faces) and bolted in position with the engine mount bolts to cure. A separate retention bolt was added so that the new reinforcement plate will stay in position and not drop out whenever the engine mount bolts are removed ( like when our new engine is installed.
{Note of Interest: With the opportunity to work on the transom intimately I discovered that the as built Mac26X factory transom is rather limited. The glassed in reinforcement appears to be two sections of plywood… the section most aft appears to be 12x18x1/2” thick…the section in front of that appears to be 12x12x3/4” thick…It’s hard to tell the exact thickness but the width and height are pretty close. This may help substantiate why MacGregor recommended the engine size he did…. Just passing it along
 .}
.}Our additional 3/4 thick G-10 fiberglass reinforcement & load distribution plate is 23-1/2” wide and 12” tall. This should be more than adequate to help manage the additional thrust loads of our new engine installation.
We are also upgrading our cabin bed cushions for the Vee-Berth and Dinette-Berths to 7” thick mattress foam! We have cut and trimmed the sections to fit.
 SO MUCH MORE COMFORTABLE THAN THE OLD FACTORY PADS!!!
 We will be making (or have made) the Sunbrella covers later as well as adding air-gap underlayment once we get North. For now we will just wrap the sections in flat sheets for our trip North.
The improved larger size interior through the hull sonar transducer mount is completed, the porous foam fitted, filled with 3 gallons of RV antifreeze and sealed! Finally! The new tank uses the three existing surfaces of the under aft dinette seat area. When the ballast is flooded and the boat is in the water the areas opposite these surfaces are wetted areas. The box is fabricated from PVC lumber, SST screws and 5200 adhesive. All surfaces were throughly scuffed and cleaned with Acetone. No punctures were made in the interior hull liner. The new sonar transducer tank spans the distance from the keel trunk side over to the Starboard water ballast transfer tube which is about 18 inches. The forward portion abuts the water ballast tank aft wall under the forward dinette seat and goes aft about 19 inches. The depth of the tank varies with the slope of the hull and is deepest by the keel trunk (~5 inches) and shallowest by the ballast transfer tube (~3 inches). The transducer I’d suspended in saturated foam at about 1 inch above the interior hull and level fore-aft and side-to-side. We’re hoping when the water ballast is fully flooded that this should give us good depth readings and allow us to use the side scan feature of our Garmin Chartplotter system. Next step is to test it once we are on the water up North…
Our target is to get on the road North by this coming Tuesday morning via Vermont to watch our older daughter participate in a 10k (6 mile) Open Water Swim at Lake Memohremagog starting at Prouty Beach in Newport Vt. Then on to NH to get our new engine installed the first week of August!
Best Regards
Over Easy
Last edited by OverEasy on Mon Jul 18, 2022 1:44 pm, edited 1 time in total.
-
Jimmyt

- Admiral
- Posts: 3402
- Joined: Sat Jul 18, 2015 9:52 am
- Sailboat: MacGregor 26M
- Location: Mobile AL 2013 26M, 60 Etec
Re: A New Journey Begins for OverEasy
Nice work! Looking forward to the rest of the story! Sounds like you may have found your leak. That is excellent.
Jimmyt
P-Cub-Boo
2013 26M, Etec 60, roller Genoa, roller main
Cruising Waters: Mobile Bay, Western Shore, Fowl River
P-Cub-Boo
2013 26M, Etec 60, roller Genoa, roller main
Cruising Waters: Mobile Bay, Western Shore, Fowl River
-
Russ
- Admiral
- Posts: 8303
- Joined: Thu Oct 11, 2007 12:01 pm
- Sailboat: MacGregor 26M
- Location: Bozeman, Montana "Luna Azul" 2008 M 70hp Suzi
Re: A New Journey Begins for OverEasy
Nice work.
I'm surprised the well nuts failed as they did. Wouldn't expect them to corrode. I was thinking of using some on my pedestal where screws are spinning.
Very impressive transducer box.
I've got the same one and simply bedded it in a block of this stuff. So far it seems to work well. Got readings up to 200' depth so that's good. I haven't really tested the side sonar. It seems to work, but the bottom I tested was fairly flat.
https://www.amazon.com/Gardner-Bender-D ... B00689V41G
--Russ
-
OverEasy
- Admiral
- Posts: 2882
- Joined: Mon Sep 28, 2020 11:16 am
- Sailboat: MacGregor 26X
- Location: NH & SC
Re: A New Journey Begins for OverEasy
Thanks JimmyT and Russ!
On the transducer aspect…
The duct putty looks like a great option just like the sticky wax.
We found, as you have, that it works great for the looking straight down function of maybe 15-to-30 degree cone.
The side scan function purports the capability of looking through an arc of about 160-to-170 degrees.
We originally tried casting sticky soft wax in a protective box for our transducer.
The straight down depth reading was fine but the side scan wouldn’t work .
With our intention to explore the ICW eventually we wanted to be able to ‘see’ to the sides so that we might be able to more readily stay in the ‘channels’ rather than ricochet from side to side (as we have done when exploring our local rivers and estuaries in SC) with only the look down function. There are moving sandbanks and shoals that the charts don’t always accurately reflect. There are, as we have discovered, other numerous other hazards underwater such as submerged/drifting trees and unreported/uncharted wrecks or other hazards. We’ve been told of submerged/discarded/lost shipping containers in the waterways around ports like Savanna and others. While not likely, the last thing we’d like to have happen is to inadvertently turn into one of these hazards .
If the new sonar box works then that a fantastic improvement for us.
If not, then it was a valiant effort (and we should still have the look down function to work with).
Having the transducer being protected inside the hull is a big plus for us given the marine growth aspect in the warm tidal estuaries environment we have!
Best Regards,
Over Easy
On the transducer aspect…
The duct putty looks like a great option just like the sticky wax.
We found, as you have, that it works great for the looking straight down function of maybe 15-to-30 degree cone.
The side scan function purports the capability of looking through an arc of about 160-to-170 degrees.
We originally tried casting sticky soft wax in a protective box for our transducer.
The straight down depth reading was fine
With our intention to explore the ICW eventually we wanted to be able to ‘see’ to the sides so that we might be able to more readily stay in the ‘channels’ rather than ricochet from side to side (as we have done when exploring our local rivers and estuaries in SC) with only the look down function. There are moving sandbanks and shoals that the charts don’t always accurately reflect. There are, as we have discovered, other numerous other hazards underwater such as submerged/drifting trees and unreported/uncharted wrecks or other hazards. We’ve been told of submerged/discarded/lost shipping containers in the waterways around ports like Savanna and others. While not likely, the last thing we’d like to have happen is to inadvertently turn into one of these hazards
If the new sonar box works then that a fantastic improvement for us.
If not, then it was a valiant effort (and we should still have the look down function to work with).
Having the transducer being protected inside the hull is a big plus for us given the marine growth aspect in the warm tidal estuaries environment we have!
Best Regards,
Over Easy
-
Russ
- Admiral
- Posts: 8303
- Joined: Thu Oct 11, 2007 12:01 pm
- Sailboat: MacGregor 26M
- Location: Bozeman, Montana "Luna Azul" 2008 M 70hp Suzi
Re: A New Journey Begins for OverEasy
The side scanning on mine probably won't work then. Which I don't need anyway. I'll have to try some shallow waters and test it.
Your box is VERY clever.
Your box is VERY clever.
--Russ
-
Highlander
- Admiral
- Posts: 5995
- Joined: Wed Sep 21, 2005 8:25 pm
- Sailboat: MacGregor 26M
- Location: Maccutter26M 2008 75HP Merc. 4/S Victoria BC. Can. ' An Hileanto'ir III '
- Contact:
Re: A New Journey Begins for OverEasy
when I done my new steering cable up=grade I couldn't get the old steering cable out because I had so much electrical wiring going thru the same tube  so I had to cut the nut off the lower end of the cable to remove it

then I drilled a new hole & installed a new pipe into the floor
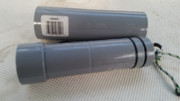
I then seal the open hole edges with this
then installed new pipe & built a putty dam around it top & used same product to fix it in place & sealing the bottom to prevent run off

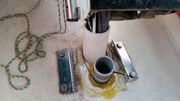
this is a I then removed the putty coated the expoxy with 5200 & installed the new cable into the new pipe now more room for more wiring
J
then I drilled a new hole & installed a new pipe into the floor
I then seal the open hole edges with this
then installed new pipe & built a putty dam around it top & used same product to fix it in place & sealing the bottom to prevent run off
this is a
J
-
OverEasy
- Admiral
- Posts: 2882
- Joined: Mon Sep 28, 2020 11:16 am
- Sailboat: MacGregor 26X
- Location: NH & SC
Re: A New Journey Begins for OverEasy
Hi Highlander!
Nice use of the Conduit Expansion Sleeve!
Instant custom length!
Perfect, gotta remember that one!
Best Regards,
Over Easy
Nice use of the Conduit Expansion Sleeve!
Instant custom length!
Perfect, gotta remember that one!
Best Regards,
Over Easy
-
OverEasy
- Admiral
- Posts: 2882
- Joined: Mon Sep 28, 2020 11:16 am
- Sailboat: MacGregor 26X
- Location: NH & SC
Re: A New Journey Begins for OverEasy
Hi All!
A couple of more modifications we’ve made before our trip north.
While we had the pedestal unbolted we decided to adjust our steering wheel.
The PO replaced the steering unit and the mounting bracket has a three “ish” inch offset flange.
The PO mounted it so the wheel was further aft and the trim collar cone that sits between the wheel and pedestal didn’t quite fit.
This crowded the helm seat for us so we flipped the bracket around to move the wheel forward by about 6 inches.
We ditched the trim collar cone and made a new steering shaft cover plate to the cover over the rough cut out in the pedestal.
This gives us more leg room at the helm seat and looks a fair bit better as well.
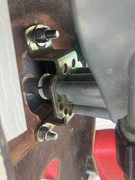
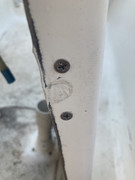
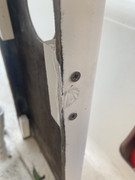
As mentioned previously the Well-Nuts we put in the pedestal to hold the side panels didn’t work out as planned ( to put it mildly ).
After looking at several options we decided to make sections of PVC board blocks and secure them to the interior of the pedestal at each hole location with 5200 and two screws counter sunk flush to the exterior side faces of the pedestal.
This way we can use #10 SST screws to hold the side panels in place.
Later we might upgrade to SST T-Nuts and machine screws.
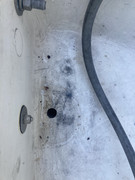
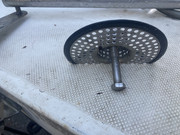
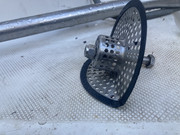
Next we added a engine well drain screen to keep all the nuisance crud, pine needle, acorns, leaves, etc… from wandering down the drain pipe.
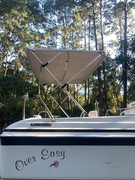
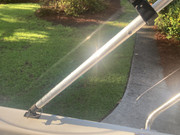
And then we modified the Bimini.
The Bimini height originally was a bit too low in that one couldn’t stand up in the cockpit where moving about basically bent over.
This was more than a bit awkward.
We made a pair of extension legs to raise the Bimini up to allow for a 6’1” person to easily stand at the helm and walk forward.
We realize that this mod might not be to everyone’s taste but it looks like it will work for us.
The Bimini fwd edge will clear the boom so there shouldn’t be a problem on that aspect.
We will need to get longer Bimini stabilizer straps though.
While there isn’t enough time at the moment to make the proper fwd Vee-Berth extension we want we were able to adapt and fabricated a temporary one that should be more than adequate for this season.
We clean-up, pack-up and load the boat Monday. Gonna be a busy day!
Plan is to get on the road north Early Tuesday!
We will try and post some pictures tomorrow.
Best Regards,
Over Easy
Steering Mod Photos:

Engine Bowl Drain Strainer Mod Photos:

Pedestal Side Panel Mounting Mod/Repair:
Bimini Height Improvement Mod:
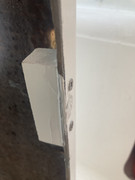
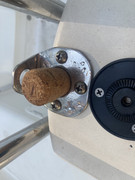
Did you know that a Champagne Cork makes a nice plug to cap off the Pedestal Mast Support socket?
A couple of more modifications we’ve made before our trip north.
While we had the pedestal unbolted we decided to adjust our steering wheel.
The PO replaced the steering unit and the mounting bracket has a three “ish” inch offset flange.
The PO mounted it so the wheel was further aft and the trim collar cone that sits between the wheel and pedestal didn’t quite fit.
This crowded the helm seat for us so we flipped the bracket around to move the wheel forward by about 6 inches.
We ditched the trim collar cone and made a new steering shaft cover plate to the cover over the rough cut out in the pedestal.
This gives us more leg room at the helm seat and looks a fair bit better as well.
As mentioned previously the Well-Nuts we put in the pedestal to hold the side panels didn’t work out as planned ( to put it mildly
After looking at several options we decided to make sections of PVC board blocks and secure them to the interior of the pedestal at each hole location with 5200 and two screws counter sunk flush to the exterior side faces of the pedestal.
This way we can use #10 SST screws to hold the side panels in place.
Later we might upgrade to SST T-Nuts and machine screws.
Next we added a engine well drain screen to keep all the nuisance crud, pine needle, acorns, leaves, etc… from wandering down the drain pipe.
And then we modified the Bimini.
The Bimini height originally was a bit too low in that one couldn’t stand up in the cockpit where moving about basically bent over.
This was more than a bit awkward.
We made a pair of extension legs to raise the Bimini up to allow for a 6’1” person to easily stand at the helm and walk forward.
We realize that this mod might not be to everyone’s taste but it looks like it will work for us.
The Bimini fwd edge will clear the boom so there shouldn’t be a problem on that aspect.
We will need to get longer Bimini stabilizer straps though.
While there isn’t enough time at the moment to make the proper fwd Vee-Berth extension we want we were able to adapt and fabricated a temporary one that should be more than adequate for this season.
We clean-up, pack-up and load the boat Monday. Gonna be a busy day!
Plan is to get on the road north Early Tuesday!
We will try and post some pictures tomorrow.
Best Regards,
Over Easy
Steering Mod Photos:
Engine Bowl Drain Strainer Mod Photos:
Pedestal Side Panel Mounting Mod/Repair:
Bimini Height Improvement Mod:
Did you know that a Champagne Cork makes a nice plug to cap off the Pedestal Mast Support socket?