

The main halyard should not be used to raise an X mast. It puts the load to far up at the top of the mast. The main halyards cheek block is also facing the wrong way and will put a twisting load on the mast. When putting the final load on to pin the headstay you can bend the unsupported mast tip when using the main halyard.
The correct and only halyard to use for mast raising on a X is the jib halyard (or a dedicated line attached at the same place).
I also backup the halyard cleat (the two small screws of the cleat in aluminum do not inspire confidence, they should have through bolted the two cleats together). It's simple and easy to take the halyard tail and tie a quick couple half hitches to the vang bail.
Since my jib halyard is used for nothing other than mast raising (With the CDI roller furler it has no other use) I just leave this tied off all the time. I leave my pole on all the time as well, the fewer things to change the quicker the setup. It's easiest to just leave everything connected mast up or down. In the up position the pole folds tight to the front of the mast and the lines are cleaned up with bungee's, In the down position once the mast is on the pulpit the pole and the lines are all bungee'd up to the bottom of the mast. Not messing with all this stuff will cut quite a few minutes off your mast raising time.
Mast Raising Advice?
-
Duane Dunn, Allegro

- Admiral
- Posts: 2459
- Joined: Fri Jan 02, 2004 6:41 pm
- Sailboat: MacGregor 26X
- Location: Bellevue, Wa '96 26x, Tohatsu 90 TLDI and Plug In Hybrid Electric drive
- Contact:
-
Catigale

- Site Admin
- Posts: 10421
- Joined: Fri Jun 11, 2004 5:59 pm
- Sailboat: MacGregor 26X
- Location: Admiral .............Catigale 2002X.......Lots of Harpoon Hobie 16 Skiffs....Island 17
- Contact:
True, if you are tensioning the forestay with the halyard like many do. For just getting the mast into position I doubt you would put enough force to bend anything although I dont think twisting that block is a good thing.
I have a quick release lever on my forestay which lets me pin the mast, then tension from the foredeck at my leisure.
I have a quick release lever on my forestay which lets me pin the mast, then tension from the foredeck at my leisure.
-
Duane Dunn, Allegro
- Admiral
- Posts: 2459
- Joined: Fri Jan 02, 2004 6:41 pm
- Sailboat: MacGregor 26X
- Location: Bellevue, Wa '96 26x, Tohatsu 90 TLDI and Plug In Hybrid Electric drive
- Contact:
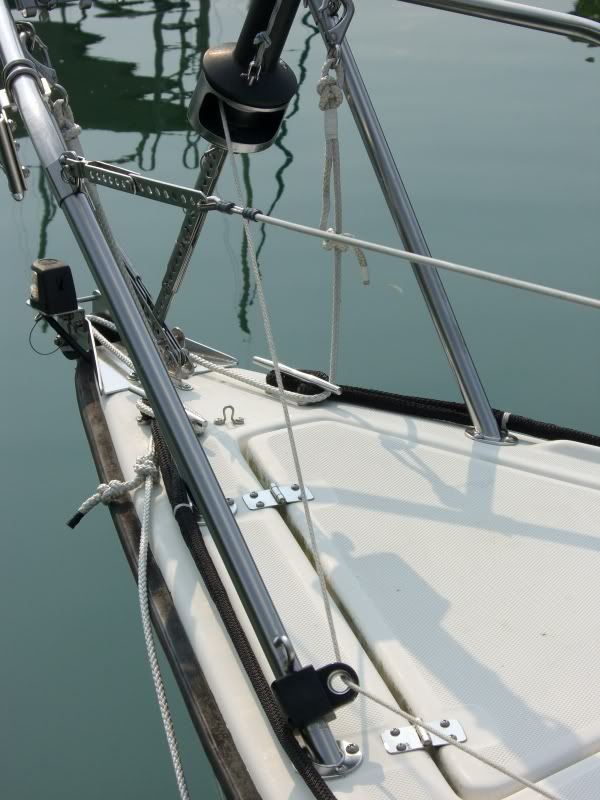
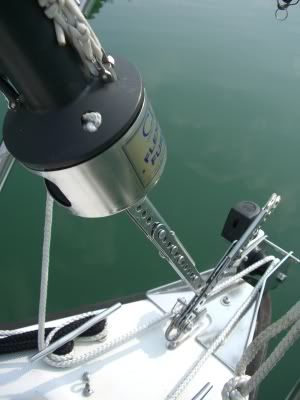
I made the tensioning lever designed for the X by "Winderra". Easy to make and it works well. This avoids the high tension on the raising tackle needed to pin the forestay directly on a tight rig and let's my wife easily pin and tension the rig while I'm in the cockpit cranking the winch.

More things that make the setup quicker.
This combined with the oversize clevis pin with the large plate end sold by BWY makes attaching the headstay easy.
More things that make the setup quicker.
This combined with the oversize clevis pin with the large plate end sold by BWY makes attaching the headstay easy.
With roller reefing, my "jib halyard" is only needed for mast raising. My PO had halved the length of the line, which is simply tied with a bowline at the top end so the block is therefore not needed either. It's one less bit of rope at the mast.
Anything wrong with this? Is it a satisfactory way of overcoming Duanne's concerns regarding the security of the riveted cleats which also become redundant (at least when raising the mast)?
It also serves as a backup up for the forestay.
Regards
Mike
Anything wrong with this? Is it a satisfactory way of overcoming Duanne's concerns regarding the security of the riveted cleats which also become redundant (at least when raising the mast)?
It also serves as a backup up for the forestay.
Regards
Mike
-
baldbaby2000

- Admiral
- Posts: 1382
- Joined: Sun Mar 28, 2004 8:41 am
- Location: Rapid City, SD, 2005 26M, 40hp Tohatsu
- Contact:
Phillip,
The winch on our mast raiser just barely touches the mast once the mast is raised. So I agree your line to from the top of your mast raising pole to the deck cleat needs to be longer. I'm always careful that no one is in a position to get hit by the mast if there's a failure.
Once I forgot our mast raiser and did it by hand like I used to do on my Mac 25. I'm not a very strong guy either. Of course if it's real windy that would add complications.
BB
-
Don n Cheri

- Deckhand
- Posts: 30
- Joined: Sun Oct 16, 2005 6:44 pm
- Location: Mukilteo, WA . . . . . . "Carriacou" ................ . 1999 26X w/ Tohatsu 50 . . . .
Duane, the tensioning lever designed for the X by "Winderra" is way cool. I had been thinking of raising the attachment point on the mast so I could put the thumb lever on as was on another mod. But this looks so much simpler.
Why is the shroud adjuster trimmed at the back end for the 1.5 inches? In looking at my boat just now it looked like it would fit without the trimming.
I'm copying you "dude"
thanks for the tip have not seen it b4 and thought I had looked at all the mods for pinning the forstay.
thanks
don
Why is the shroud adjuster trimmed at the back end for the 1.5 inches? In looking at my boat just now it looked like it would fit without the trimming.
I'm copying you "dude"
thanks for the tip have not seen it b4 and thought I had looked at all the mods for pinning the forstay.
thanks
don
-
ALX357

- Admiral
- Posts: 1231
- Joined: Thu Jul 22, 2004 6:09 am
- Location: Nashville TN -- 2000 MacGregor 26X, Mercury two-stroke 50hp
the trimming, if I am correctly understanding the question, is to allow the adjuster's solid "web" to clear the chain-plate tab. It has to be able to line up the holes and still pivot upward to loosen tension. The holes are not quite spaced the same, the tab's two holes and the adjuster's holes, so the adjuster has to have its nearly-lined up holes elongated to allow pinning thru.
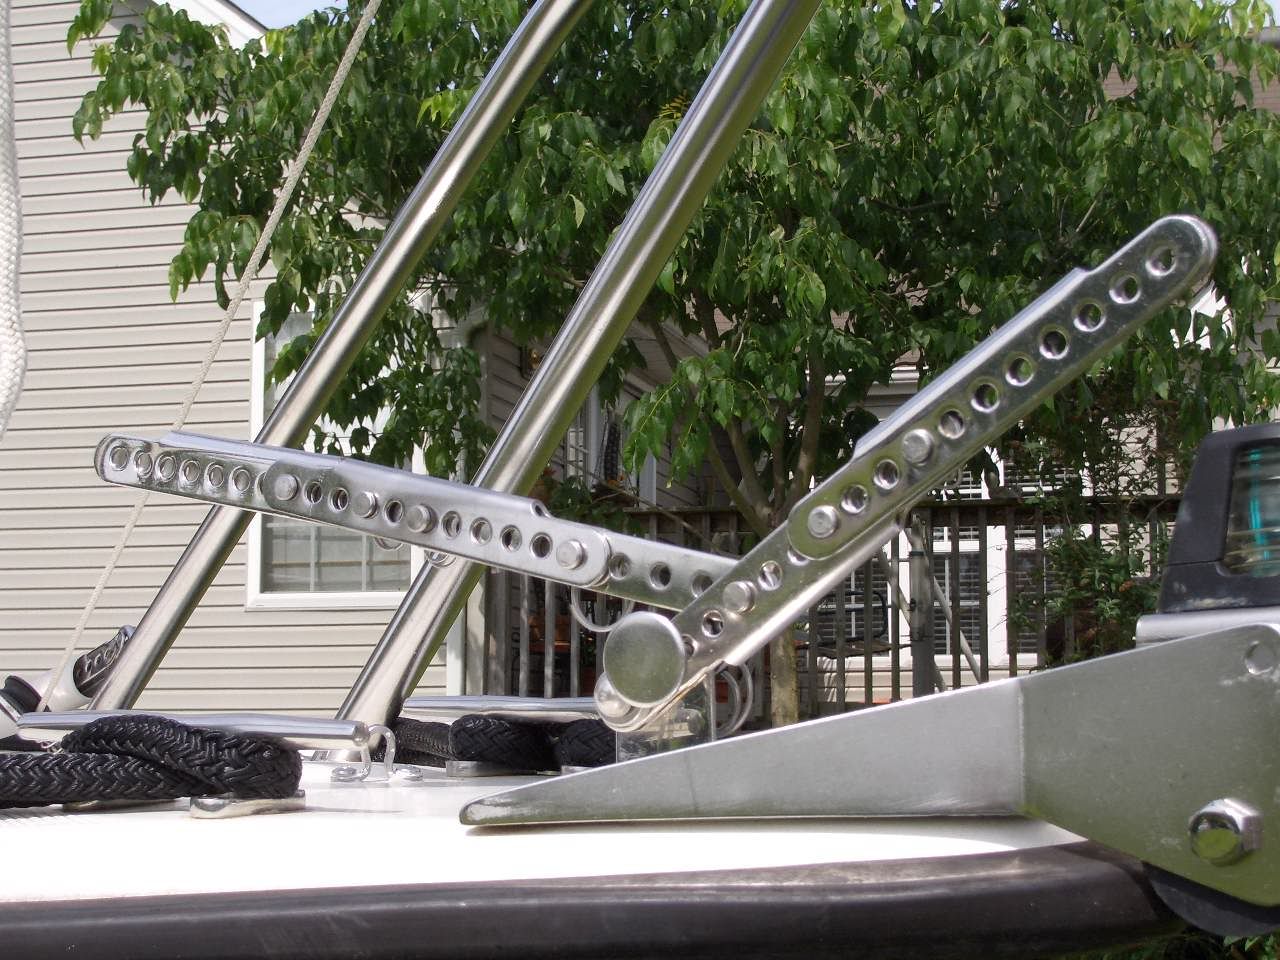


the extra adjusters you see are just ganged for extra leverage, and sail height extension, with singles inside, to re-inforce them. The furler Genny on this boat is mounted high enough to clear the lifelines which are moved to the tops of the bow pulpit rails, and allows a decent view of the way ahead of the boat under the sail.
the extra adjusters you see are just ganged for extra leverage, and sail height extension, with singles inside, to re-inforce them. The furler Genny on this boat is mounted high enough to clear the lifelines which are moved to the tops of the bow pulpit rails, and allows a decent view of the way ahead of the boat under the sail.
-
Don n Cheri
- Deckhand
- Posts: 30
- Joined: Sun Oct 16, 2005 6:44 pm
- Location: Mukilteo, WA . . . . . . "Carriacou" ................ . 1999 26X w/ Tohatsu 50 . . . .
Thanks ALX,
Guess I didn't ask this very well.
It looks like you could install the adjuster with the "web" up so it sat on the chain-plate tab rather than cutaway a section to mount it "web" down as the photo showed.
I found an adjustor in the tool box from the PO and sat it on the chain-plate tab, it looked like it could be installed that way and not have to do the trimming.
Is that not possable or do I have something other than an adjustor
don
-
ALX357
- Admiral
- Posts: 1231
- Joined: Thu Jul 22, 2004 6:09 am
- Location: Nashville TN -- 2000 MacGregor 26X, Mercury two-stroke 50hp
with the web of the lever adjuster up, you could not place the furler extension adjuster tangs into it. See the photo looking down onto the assembly.
To avoid cutting the web, you could mount two single tang adjusters, for the furler extension, outboard on both sides of the lever adjuster, and then trap pin them together higher up, or partially cut and stretch open a duplex one, but I think it would be more cumbersome and too wide. Keep in mind this joint has to go from almost parallel, at the longest / loosest, to just past the angle shown, to fully tension the furler.
To avoid cutting the web, you could mount two single tang adjusters, for the furler extension, outboard on both sides of the lever adjuster, and then trap pin them together higher up, or partially cut and stretch open a duplex one, but I think it would be more cumbersome and too wide. Keep in mind this joint has to go from almost parallel, at the longest / loosest, to just past the angle shown, to fully tension the furler.
-
Trav White

- Chief Steward
- Posts: 61
- Joined: Wed Mar 29, 2006 8:44 pm
- Location: Jacksonville, FL '02X with 26M rotating mast, Mercury 60hp 4-stroke
Phillip,
Your setup looks correct except for the angle of the gin pole. It should be more vertical as many responders have posted. To do this, just lengthen the line from your bow cleat to the top of the gin pole. To see the proper angle go to the Macgregor website, table of contents, then "mast raising". I see you also have the "baby stays" in place to reduce sideways motion. There is a lot of tension on the lines, and I raise mine slowly, also watching that the shrouds don't get caught up or kinked. I control any sideways movement, by pulling on the line itself to bring the mast back to center. This is definitely a safer way to raise the mast. The M mast is very heavy and I did lift it a few times with my 13-yr old pulling hard on the jib halyard for control. Never again.
Your setup looks correct except for the angle of the gin pole. It should be more vertical as many responders have posted. To do this, just lengthen the line from your bow cleat to the top of the gin pole. To see the proper angle go to the Macgregor website, table of contents, then "mast raising". I see you also have the "baby stays" in place to reduce sideways motion. There is a lot of tension on the lines, and I raise mine slowly, also watching that the shrouds don't get caught up or kinked. I control any sideways movement, by pulling on the line itself to bring the mast back to center. This is definitely a safer way to raise the mast. The M mast is very heavy and I did lift it a few times with my 13-yr old pulling hard on the jib halyard for control. Never again.
-
Sloop John B

- Captain
- Posts: 871
- Joined: Sat Jan 03, 2004 2:45 am
- Sailboat: MacGregor 26X
- Location: Florida 'Big Bend'. 02x Yamaha T50
I use Duane's method, using the Windara adjuster from a removed lifeline stainless adjuster (replaced with pelican hooks).
Positioning the mast raising gin pole before raising is critical. It's not vertical, it's positioned so it's angled toward the stern.
Take a permanent marker and mark the jib halyard so you know where to cleat it henceforth, once you have determined the correct position. Further secure the halyard to the vang or have your mate clinch it in her teeth.
After raising the mast, run the raising line through the little cam cleat if you must, but secure it with a good wrap on the aft horn cleat before you leave the area to secure the forestay. Otherwise, your Mate will bump it loose and the mast will come crashing down on her head and it will get bent beyond repair.
With the Windara method, I use two BWY 'exhaust valve' clevis pins to attach the furling drum to the forestay tang. I drilled a hole through the ‘valve’ part so that I could tie a cord to it. That way, when it rolls overboard, I can retrieve it. They’re expensive.
-
c130king

- Admiral
- Posts: 2730
- Joined: Sun Nov 05, 2006 5:30 pm
- Sailboat: MacGregor 26M
- Location: Wiggins, MS --- '05 26M "König" w/ 40hp Merc
- Contact:
Ditto to what Trav said. Be careful of lines getting caught while raising the mast. I allowed one of my stays to get caught on the adjacent stay adjuster one time and the stay adjuster got a pretty good kink in it as I unknowingly overtightened. But it still works. One of these days I will actually take it off and use a vise or something to straighten it out.
Jim
Jim

-
Duane Dunn, Allegro
- Admiral
- Posts: 2459
- Joined: Fri Jan 02, 2004 6:41 pm
- Sailboat: MacGregor 26X
- Location: Bellevue, Wa '96 26x, Tohatsu 90 TLDI and Plug In Hybrid Electric drive
- Contact:
Don and Cheri,
As explained above, but perhaps a bit clearer, the fitting on the bottom of the furler does not have enough width to straddle the full width of the adjuster. It has to be attached with one leg in and one leg out. This means the adjuster has to be installed with the web down which requires trimming. I found it easy to trim with an abrasive disk in my dremmel tool.
There are more Windarra mods at his web site under the sailing links on the left.
Alex357,
That's quite the setup with 4 adjusters. Mine is just the simple single adjuster as shown in the Windarra drawing.
You also have a great shot of the oversized clevis pin and ringding with the easy grip flat plate that I use as well (two actually one for attaching the furler to the lever and one for the lever to the chainplate). I drilled a small hole through the end plates and attached them to the drum and lever with a short length of heavy mono and a couple crimps. This makes it impossible to drop them over the side when raising or lowering the mast on the water. I've done the same thing with my sail stop at the gooseneck after loosing 2 of those babies into the drink.