Page 2 of 2
Posted: Sun Nov 05, 2006 3:17 am
by delevi
It's a 105 jib. I'm not sure what the standard is. I heard figures from 99 to 105. Sunbrella cover for RF. I also had a luff pad put on so it can be reefed to 2/3 size without loosing much shape. Haven't used that feature yet, since the winds are light this time of year. Same material as the main... Quantum Fusion X. Elaborate pattern of pentex strands on a milar scrim with taffeta on both sides for added durability. Beautiful sails. I'm really loving them.
Posted: Wed Nov 08, 2006 7:47 pm
by pythonguy
Can anyone advise on using a non-lead filler in the keel? Cement?
Posted: Thu Nov 09, 2006 2:12 pm
by Richard O'Brien
pythonguy wrote:Can anyone advise on using a non-lead filler in the keel? Cement?
I wouldn't recommend it since cement cracks easily, and only weighs 150 -160 lbs. cu. ft. without the larger aggregate. It would bang around too much, and damage the plastic eventually I think. I'm going to try lead shot mixed with epoxy this winter. More weight lower where you need it.
Posted: Thu Nov 09, 2006 9:11 pm
by pythonguy
lead shot with epoxy, that sounds like something even I can do! What kind of epoxy are you using? Do you plan to flow it into the existing hole or cut a larger port into the daggerboard?
Posted: Fri Nov 10, 2006 5:19 am
by baldbaby2000
I drilled two holes in mine (about 1 1/4" dia. I think). I put one hole forward of the center brace inside the dagger board and then on the opposite side I put another hole aft of the brace about 1 foot up from the bottom of the board (I can measure it if you like). I then taped pieces of aluminum to plug the drain holes at the bottom while I poured in the lead.
Because I was worried about strength--I didn't want the bottom of the board to break off and sink--I put a stainless steel pipe along the aft vertical section of the center brace. I secured it with a screw at the top and bottom and poured some epoxy around it too.
BB
Posted: Fri Nov 10, 2006 10:53 am
by Richard O'Brien
pythonguy wrote:lead shot with epoxy, that sounds like something even I can do! What kind of epoxy are you using? Do you plan to flow it into the existing hole or cut a larger port into the daggerboard?
I believe I'll follow BB's lead, as he seems to have found the right height?
I always use West System epoxy with "fast" setting catalyst #205. Don't waste time with their pumps, and just measure by volume into plastic pre-marked painter's containers. About 2-3 hrs setting time initially, then 12 hrs. before using.
Don't overuse epoxy as it gets hot, and a little goes a long way.
My current concern is to get the right combination of blocks to hoist the extra weight quickly and completely. Any thoughts Daniel or Leon?
Posted: Fri Nov 10, 2006 11:23 am
by delevi
My current concern is to get the right combination of blocks to hoist the extra weight quickly and completely. Any thoughts Daniel or Leon?
Read my post on page one of this thread about the raising/lowering system
Leon
Posted: Sat Nov 11, 2006 11:01 am
by Richard O'Brien
Thanks Leon. I wasn't paying enough attention. I think that I only need about 2 to 1 for 50 -70 lbs. Maybe Daniel's setup or even frank's? I already have so much spaghetti in the cockpit that it has become my next situation to address. Do you hear "clunking" when you come about now, or is that not an issue?
Posted: Sat Nov 11, 2006 1:19 pm
by baldbaby2000
With the weight of the board, plus the pipe for strength and the lead my total weight is about 95 lbs. I think this is about 4 times the stock board weight. I have a 5:1 system on my uphaul now. I use mesh bags to hold my lines so the extra length doesn't really bother me too much.
Daniel
Posted: Mon Nov 13, 2006 12:00 am
by delevi
Do you hear "clunking" when you come about now, or is that not an issue?
I don't but my board is a bit larger in cord and width than stock, so it takes up almost all the excess space in the db well. The dowside is that it often jams up when fully deploeyd so to pull it back up, I have to either put my whole body into the 6:1 or use the winch for one or two cranks to get it unstuck. There is plenty of reinforcement on the trailing and leading edges in the place where it sits in the well in the fully down postion. I would highly recommend this to anyone with a weighted keel, since even the stock boards get really dammaged along the trailing edge in this area, even w/o extra weight. They just aren't very strong there. The guy who made mine used UHMW, a really strong plastic, shaped the same as the leading and trailing edges of the keel. That area was then cut out of the keel along each edge (17" from the top and about 2 inches deep) and the UHMW was inserted and attached with screws. May be a difficult job with fiberglass, but I would at the very least reinforce th.e trailing edge with some good epoxy.
Leon
Posted: Mon Nov 13, 2006 6:39 am
by baldbaby2000
Yes, the trailing edge is weak whether you have extra weight or not. The bad thing about breaking the trailing edge after you've added weight is that replacing the board is less of an option because of the added work in adding more weight. I've repaired mine twice. I've thought about glueing some stiff material to the board back there to strengthen it. One also has to consider that the board may not always be down all the way and so quite a bit of the trailing edge may be susceptible to damage if an object is hit.
Daniel
Posted: Mon Nov 13, 2006 6:38 pm
by delevi
One also has to consider that the board may not always be down all the way and so quite a bit of the trailing edge may be susceptible to damage if an object is hit.
Yeah. After replacing two of the stock Mac boards due to full breakage on one and a badly damaged trailing edge on the other, I have a new policy with my current one. Either all the way deployed or all the way up. It's the (in-the-middle) stuff which will expose the trailing edge where there is no protection, at lest in my case, and I'm not willing to take that chance with the investment I made. Besides, you want that added ballast working for you as low as possible.
Leon
Posted: Fri Nov 24, 2006 3:52 pm
by baldbaby2000
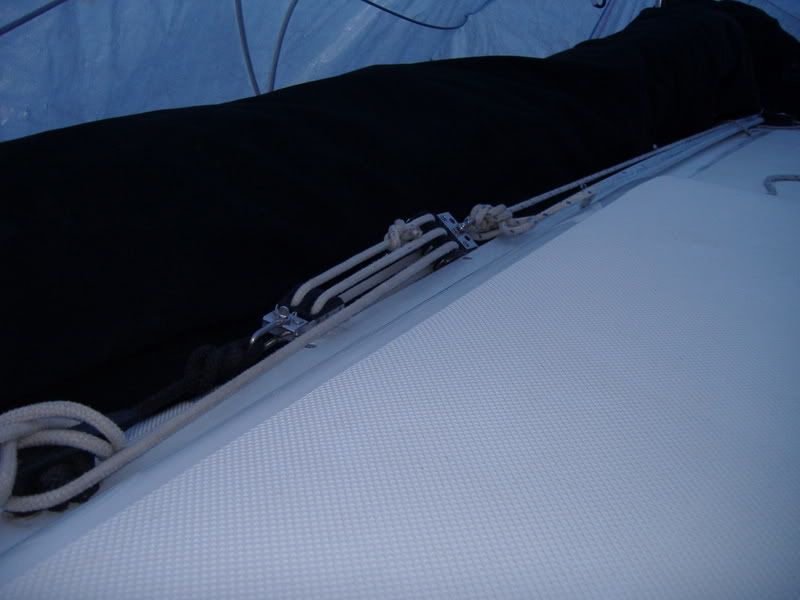
BB, Can you attach a photo of the pulley system that you used to make raising your centerboard easier?
Mark, here's a photo showing the cheek block (on the right), the raising blocks (center) and the cleat (left). The black thing is the covered boom.
Daniel