Rub Rail restore or replace?

A forum for discussing topics relating to older MacGregor/Venture sailboats.
User avatar
kenfyoozed
First Officer
Posts: 234
Joined: Fri Aug 20, 2021 5:19 pm
Sailboat: MacGregor 26D
Location: Mobile, AL

Re: Rub Rail restore or replace?

Post by kenfyoozed »

OverEasy wrote: Fri Apr 22, 2022 4:57 pm Hi Kenfyoozed!

Sorry, I mis read. My bad. :? :o
Sorta read it backwards and the adhesive threw me. :|

Thank you for pointing out my error. :) 👍

Best Regards
Over Easy 😎😎🐩🐈
fudt
No thank you for actually helping me work through this. I want my boat to be safe not only for me but for its life as well. I don't want to do a mod that's going to bring down its value or safety.

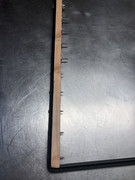
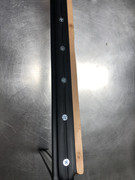
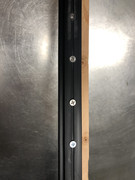
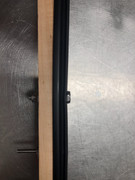
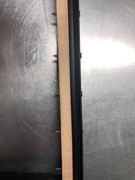
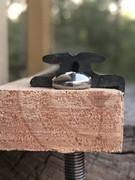
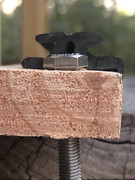
Here is the rail mocked up with my idea to use the machine screws under the rail and counter sink the back side to provide room for the heads. In all these pictures it seems the heads are to large to work in this fashion.
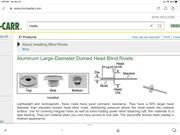
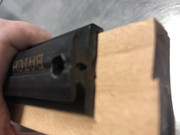
This is the stock fastener.
Image

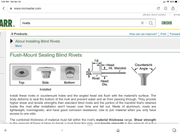
This is a new pan head phillips machine screw
Image

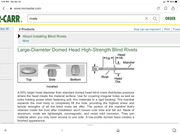
This is a button head hex drive, which seems to have the smallest profile.
Image

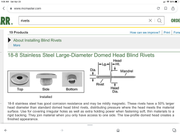
This is a hex head bolt.
Image

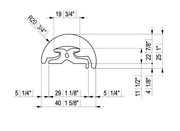
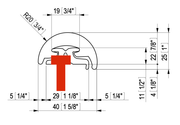
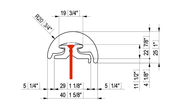
And this is another issue. The center of the rail is 9/16". The center of the holes on the boat are 10/16" or 5/8". Which would cause the head of any machine screw to be off centered if I were to clearance the back side for the head of the screws. This would weaken the rail and cause possible failures.
Image

I have ordered the next size up, a Radial 52 rail to test with it. It won't be here for a week and I won't be back home for 3 weeks from now so the process is going to take a while.

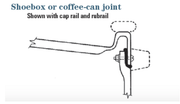
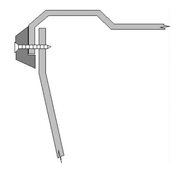
Another option would be to drill new bolt holes lower to line up with the center of the Radial 40 rail, If i wanted to keep the actual through bolts under the rail. Problem with this route is that if they ever need to be tightened then the section of rail would need to come completely off. So trying to through bolt under the rail may be a fools errand anyway. It may be best to simply through bolt the rail and joint in one go.

As for the sealant, from the factory there was none. The new vinyl rail doesn't give much support and is very flexible. I was leaning to use 4200 as it less permanent and somewhat more flexible, but I was thinking that maybe 5200 may be the better choice to add a bit of rigidity that the aluminum rail added that will now be loss.
User avatar
Wyb2
Engineer
Posts: 173
Joined: Tue Jul 06, 2021 8:02 pm
Sailboat: MacGregor 25
Location: Northeast US

Re: Rub Rail restore or replace?

Post by Wyb2 »

Those all look to be the same size (1/4-20?). If you try a #8 button or pan head, does that fit under the rail?

Another thought: do you care if you have to break through the vinyl rail to fit the head? Won’t this be covered up by a cap extrusion?
kenfyoozed wrote: Fri Apr 22, 2022 4:33 pm …Both have the same tensile strength per McMaster Carr website…
This is the material tensile strength in psi, it will be the same for any bolt of the same material. To get the bolt tensile strength (in lbs) you have to multiply by the minor area ( pi*(minor dia/2)^2 ). A #8 should be about half of a 1/4, so spacing them by half makes sense,
OverEasy
Admiral
Posts: 2915
Joined: Mon Sep 28, 2020 11:16 am
Sailboat: MacGregor 26X
Location: NH & SC

Re: Rub Rail restore or replace?

Post by OverEasy »

Hi Kenfyoozed & Wyb2!

Yes, if the tensile listing is for the base material then Wyb2 is correct on compensating for the minor diameter cross section of the screw.

But that triggered an alternative thought with the drilling of new centered holes at half the spacing and the potential need to tighten screws in the future…. There are a variety of SST rivets available with larger diameter shanks and head styles. When mounting these to soft materials like fiberglass one typically uses a backing washer, especially if you have access to the back side, which is slid onto the backside rivet shank before drawing. ( The washer distributes the load over the surface)

There are also two piece double sided rivets which sleeve into each other, rivets where the draw shank pulls through and others.
A couple possible items are listed below from the McMaster Carr Catalog for you to possibly consider. Once a rivet is properly drawn it won’t go loose and could still be drilled out in the future. Might be easier than putting nuts/bolts/washers/Locktite sets in each hole and tightening up time after time while also giving you a lower profile so as to not interfere with the rubber insert. Just a thought …🤔

Your Boat / Your Rules :)

Image

Image

Image

Image

Image

Image

Image

Best Regards
Over Easy 😎😎🐩🐈
fudt
User avatar
kenfyoozed
First Officer
Posts: 234
Joined: Fri Aug 20, 2021 5:19 pm
Sailboat: MacGregor 26D
Location: Mobile, AL

Re: Rub Rail restore or replace?

Post by kenfyoozed »

Wyb2! - thanks for the calcification on the holding strength. Here is a profile of the rail. If I through bolted with machine screw they would need to be flat heads and then the outer cover would cover them. If I clearance the back for the heads of the bolts I think the heads would interfere with the rubber bumper piece.

Image

Pathetic attempt to explain the bold head issue since the holes are not centered on the new rail. I think the heads would contact the rubber cover once installed.
Image

Idea for #8 through bolting....
Image

Overeasy - I'll look into the rivets. I had thought about them but I was worried about pulling the joint closed. As of now with one half the port side removed the joint has opened up about an inch or so. So I would have to work out how to close it up or get longer body rivets.

Another question.... would the 5200 be strong enough to hold the joint together by itself? If so then through bolting with the #8 would be sufficient I would think. If 5200 can keep a heavy lead keel in place after the bolts are removed it should be able to keep the hull joint together.
OverEasy
Admiral
Posts: 2915
Joined: Mon Sep 28, 2020 11:16 am
Sailboat: MacGregor 26X
Location: NH & SC

Re: Rub Rail restore or replace?

Post by OverEasy »

Hi Kenfyoozed!

I can see where you are coming from.
Your idea of the smaller bolts closer together should work fine.
Reliance on an adhesive to fill and hold may be problematic. Especially over time.

All adhesives are surface condition sensitive meaning they require the surface to be exceptional clean and generally with a textured (roughed) characteristic to bond appropriately.

The aging breakdown of the elastomeric constituents may not provide sufficient bonding to withstand the stress/strain/tension/compression/shear/flex/heat/cold the joint will experience over the coming years aside from the aspect of being “gawd awful messy an difficult” to deal with in the future which is why most experienced designers opt out of using them and instead choose a mechanical fastener approach and a polybutylene type caulk caulk sealant.

Having had to undo failed 4200 and 5200 (never mind the WOT silicone based sealant adhesives) caboggled messes that I’ve contended with I can’t say that I’d ever recommend that approach for this type of joint of this size.

Now if dealing with a low stress small area of little consequence where one has good clean prepared surfaces that are in close proximity then it shouldn’t be a problem and there would only be an annoyance if it failed … but then again that depends upon what the specific application was… right?!?🙄🤔😉

A lot of times with a double flanged joint like you have between the “S” or “Z” flange of the top deck and the inverted “J” flange of the hull a good designer would apply the polybutylene type caulk to fill inbetween the two flat horizontal surfaces that compress (gravity) and then mechanically fasten (bolt through) the vertical surfaces. I suspect that this would have been the engineered design intent with your vessel.

For the seal function to work one needs to have the sealant above the bolting holes. The shift at or below the bolting holes really isn’t all that beneficial and may actually function as a hindrance to drainage of any leaks while forcing the moisture up and into the vessel interior space.

A durable compressible closed cell nitrile or viton type foam flat strip material might be a good alternative to caulking that could be placed between the vertical flanges and partially above the bolt holes to provide a seal…

Your Boat / Your Rules

Best Regards
Over Easy 😎😎🐩🐈
fudt
User avatar
kenfyoozed
First Officer
Posts: 234
Joined: Fri Aug 20, 2021 5:19 pm
Sailboat: MacGregor 26D
Location: Mobile, AL

Re: Rub Rail restore or replace?

Post by kenfyoozed »

I found a basic drawing showing the shoebox type overlap of my deck joint.

Image

Image

The sealant would need to be of some type that is able to be applied with a caulk gun. So that's why i was looking at the 5200. I do worry that its gong to be to thin and will sag. Sikaflex 291, 291 lot or 292 are the next options but these do not have the strength that 5200 does.
User avatar
kenfyoozed
First Officer
Posts: 234
Joined: Fri Aug 20, 2021 5:19 pm
Sailboat: MacGregor 26D
Location: Mobile, AL

Re: Rub Rail restore or replace?

Post by kenfyoozed »

I did some testing today with fasteners and learned a few things...

The rail wrapped around this hard corner ok but not great. I am sure on the boat with a radius corner it would do better.
Image

These first five closest to the bend are #8 flat head screws.
Image

Top three are flat head machine screws with one counter sunk
Image

A 1/4" hex bolt and a #8 counter sunk machine screw
Image

Backside and head protrusions , you can see the 1/4" bolt has deformed the rail slightly. This may be able to be seen when the cover goes on.

Image

Image

Image

A 1/4" hole drilled
Image

Showing the amount of material left on each side of the 1/4" hole.
Image

More testing will be needed. I over tighten the 1/4 bolt with my screw gun set to "drill".I started with #8 fasteners as that's what the rail called for. I was able to snap one of the #8 machine screws but did not snap the 1/4" bolt. Snapping the #8 machine screw lead me to look for something stronger. I need to test a countersunk 1/4" flat head machine screw. I did not think they would fit so I did not pick up any from the store. Another trip i guess! But at least this is promising. If I can utilize a 1/4" machine screw then it will have the factory engineered specs back in place, less the aluminum rail. But once the pvc rail is bedded and the joint is bonding it should be as strong, if not stronger than the factory joint.
User avatar
Wyb2
Engineer
Posts: 173
Joined: Tue Jul 06, 2021 8:02 pm
Sailboat: MacGregor 25
Location: Northeast US

Re: Rub Rail restore or replace?

Post by Wyb2 »

kenfyoozed wrote: Sat Apr 23, 2022 3:18 am … As of now with one half the port side removed the joint has opened up about an inch or so….

Another question.... would the 5200 be strong enough to hold the joint together by itself?…
Ahhh, I think I’ve figured out why some of your earlier plans were confusing me a little. You are talking about “holding the joint closed” as in keeping everything in place for a few days or weeks while you go about the remaining work, not as in being the permanent solution. I would think 5200 would be way more than enough, and Sika would probably be enough, but I guess I don’t know. How much effort does it take to close that inch?

Ok here’s my new vote: ditch the two rounds of hardware, no oversized heads under the rub rail base, no removing 500 screws you just installed. Find the size that works with with the rub rail (sounds like #8), and get them way longer than you need. Install everything dry, but only tighten the hardware until you still have an acceptable opening to shoot your sealant in with a caulk gun. Shoot in a generous amount of sealant, then immediately go around and tighten everything down, and then go around and clean up the gobs of extra sealant that have inevitably oozed out.

The only obvious downside is now you have a bunch of long bolts sticking into the cabin. I think this is how the factory did my 25, because in the cabin all the bolts are snapped off at the nut (probably just used a sturdy pair of pliers and worked it back and forth a couple times), but in the hidden areas there is like 2” of exposed thread left on.
User avatar
kenfyoozed
First Officer
Posts: 234
Joined: Fri Aug 20, 2021 5:19 pm
Sailboat: MacGregor 26D
Location: Mobile, AL

Re: Rub Rail restore or replace?

Post by kenfyoozed »

Wyb2, I like your idea. I want to run a bead a sealant under the rub rail as well. So this may become a 3 person job but I have the help. I am going to get a few more fastener sizes. Idodnt like the fact that I was able to snap the #8 machine screw will just my 18v drill. Maybe I can find max torque spec on fasteners some where?
OverEasy
Admiral
Posts: 2915
Joined: Mon Sep 28, 2020 11:16 am
Sailboat: MacGregor 26X
Location: NH & SC

Re: Rub Rail restore or replace?

Post by OverEasy »

Hi Kenfyoozed and Wyb2,

That’s yet a different joint structure than I had understood.
Great diagrams! Thank you!

Your pictures are also great!
They really help understand exactly what you are working with.
It is different than what I had understood from the prior posts.
I can understand your wanting to add sealant/adhesive to the lap joint.
Still hesitant about bonding the joint though but that is entirely your call.

I think Wyb2 has a better approach with the long screws.
The countersinking is good too!

There is a tool called an End Cutting Plier that could help at least score the inward exposed threads prior to wiggling back n forth to snap off the excess length.

It would be a good idea to use a LockTite like compound on the threads though to keep things from backing off.

Best Regards
Over Easy 😎😎🐩🐈
fudt
Image
User avatar
kenfyoozed
First Officer
Posts: 234
Joined: Fri Aug 20, 2021 5:19 pm
Sailboat: MacGregor 26D
Location: Mobile, AL

Re: Rub Rail restore or replace?

Post by kenfyoozed »

I'll be adding fender washers and lock nuts. The factory added neither. The bolts will have to just remain long. There is no way to access them to cut them off except a reciprocating saw. There is only about 1" of space between the hull liner and deck liner to access the nuts. Just wide enough to get your hand up there and start the nut with two fingers. Its going to be a pain to get this completed. Hopefully it will never need to be redone, which is why I want to do this right. One and done!
User avatar
Wyb2
Engineer
Posts: 173
Joined: Tue Jul 06, 2021 8:02 pm
Sailboat: MacGregor 25
Location: Northeast US

Re: Rub Rail restore or replace?

Post by Wyb2 »

kenfyoozed wrote: Sat Apr 23, 2022 7:23 pm Wyb2, I like your idea. I want to run a bead a sealant under the rub rail as well. So this may become a 3 person job but I have the help. I am going to get a few more fastener sizes. Idodnt like the fact that I was able to snap the #8 machine screw will just my 18v drill. Maybe I can find max torque spec on fasteners some where?
I wouldn’t be too worried about being able to snap a #8. Tensile and shear strength is a squared relationship, torsional strength is a cubed relationship. So as bolts get smaller their resistance to torque goes down faster than their ‘strength’ as we would generally think of it.

For 18-8 SS this chart has a recommended torque of 20 in-lbs (~1.6 ft-lbs) for #8-32’s. 1/4-20’s are over 6 ft-lbs.

https://www.boltdepot.com/fastener-info ... orque.aspx

So the torque should be 25%, but a #8 has about 45% of the tensile strength of a 1/4”.
OverEasy wrote: Sat Apr 23, 2022 7:54 pm
It would be a good idea to use a LockTite like compound on the threads though to keep things from backing off.
+1
I’m partial to nylon insert nuts, but locktite or equivalent has its advantages. Nyloc nuts can be retightened at any time, but you probably won’t be retightening these once the sealant sets up. On the other hand, I use a tiny bit of dry-lube on each nut to prevent galling (have had to snap off brand new fasteners a few times before starting this practice) but the liquid locktite would probably eliminate the need for that.
User avatar
kenfyoozed
First Officer
Posts: 234
Joined: Fri Aug 20, 2021 5:19 pm
Sailboat: MacGregor 26D
Location: Mobile, AL

Re: Rub Rail restore or replace?

Post by kenfyoozed »

Wyb2, Thanks for the explanation on the "strengths". This process would be a whole lot easier if I could simply use screws but i don't trust the holding power. I would prefer the holding power of a washer and nut. Galling is the little disaster that I have been keeping in the back of my mind. Im hoping to ignore it, but we all know its going to rear its ugly head.
OverEasy
Admiral
Posts: 2915
Joined: Mon Sep 28, 2020 11:16 am
Sailboat: MacGregor 26X
Location: NH & SC

Re: Rub Rail restore or replace?

Post by OverEasy »

Hi All!

Just a note:
In putting together multiple racing 2-stroke kart engines and hundreds of other projects in aviation and aerospace I’ve found that the SST hardware galling is minimized with the lubricity of the non-hardening Locktite type compounds.
Loctite Threadlocker Blue 242 is designed to lock and seal threaded fasteners and prevent loosening from vibration. Ideal for 6-19mm fasteners, this unique formula is great for small motors, mowers, and power equipment. Loctite Threadlocker Blue 242 protects threads and prevents from leaks, rusting, and corrosion and eliminates the need to stock up on expensive lock nuts and washers. Fast and easy to use, this medium-strength threadlocker sets in just 10 minutes and fully cures in 24 hours. Loctite Threadlocker Blue 242 is particularly suited for applications on less active substrates such as stainless steel and plated surfaces, where disassembly is required for servicing.
Nothing wrong with nylock nuts. I like them and they do last nearly forever. They don’t necessarily help with galling though.
Generally I’ve found that going slowly when tightening or loosening helps. Minimizing tensile loads while tightening obviously helps too!
When I know that there will be tensile loads when tightening SST threads I use a Teflon lube on the threads but that sort of defeats any thread lock compound. In those cases the good old split-lock washer shines through as it actually bites into the nut and washer to hold.

Best Regards
Over Easy 😎😎🐩🐈
fudt
User avatar
kenfyoozed
First Officer
Posts: 234
Joined: Fri Aug 20, 2021 5:19 pm
Sailboat: MacGregor 26D
Location: Mobile, AL

Re: Rub Rail restore or replace?

Post by kenfyoozed »

OverEasy, just to clarify, you are suggesting lock washers over lock nuts? It doesn't matter to me either just want to use what's best. I chose lock nuts to keep from having another step in getting a washer on the bolt in such tight quarters. Ill get pictures tomorrow showing how much room i have to work through.

I had though of a thread locking compound, but again there will not be much space to get a hand up to the bolt to apply. I could apply before I inserted. But inserting the machine screw will have to pass through the wet sealant as well, which I figured would remove the thread locker. I guess i could use a brush once they are inserted.

Keep the ideas coming!
Post Reply