Page 6 of 9

Re: New 26X owner, going to need a lot of help!

Posted: Fri Mar 05, 2021 1:28 pm
by SlowSL
I'm a little confused. is the hole in my picture not standard? I have another hole forward of that which has the steering shaft comin gout with a boot. I tried to google images of the 26x to see how it's configured, but none of the pictures that came up are of the correct angle, or the rudders are in the way.

Re: New 26X owner, going to need a lot of help!

Posted: Fri Mar 05, 2021 5:41 pm
by C Buchs
I've got two. One for the steering and another for the cables. Does yours look like this?

Image

Jeff

Re: New 26X owner, going to need a lot of help!

Posted: Fri Mar 05, 2021 6:30 pm
by Starscream
Mine looks like this:

Image

You can see the Amazon cable gland over top of the original. I added the opening deck-plate just above the cable gland during the installation of the kicker motor.

I've never done a deep dive into the motor wiring and steering. One day I will. All the cables come out the same opening, including the 10gauge wiring for the bimini-mounted solar panels.

Re: New 26X owner, going to need a lot of help!

Posted: Sat Mar 06, 2021 12:29 am
by OverEasy
On the topic of bilge pump discharge line routing....

One of the more common use and well rated bilge pump makers is Jabsco Rule Marine who put out a short video on recommended discharge line routing and how to avoid ‘airlock’ and it’s consequences.

Look on YouTube for:
Explaining an Airlock in a Bilge Hose -Rule Bilge Pumps
Jabsco Rule Marine

Re: New 26X owner, going to need a lot of help!

Posted: Sat Mar 06, 2021 12:43 am
by OverEasy
Does anyone know if ther is a two part or “seamed” split boot available?

Re: New 26X owner, going to need a lot of help!

Posted: Mon Mar 08, 2021 7:40 am
by SlowSL
C Buchs wrote: Fri Mar 05, 2021 5:41 pm I've got two. One for the steering and another for the cables. Does yours look like this?

Image

Jeff
Yes, that is what mine looks like, but it's missing the boot, I didn't know what was supposed to go there, thanks.

Re: New 26X owner, going to need a lot of help!

Posted: Mon Mar 08, 2021 8:42 am
by SlowSL
Here is the floor fitting I mentioned earlier. It does go through the floor, I didn't get inside the boat last night when I snapped the picture to verify, but it appears to be connected to a hose underneath. Because of the location, I'd bet that it was for the outboard control cables/wiring. I'd probably rather have them go into the console and through the floor there rather than having that stick out where foot traffic is.
Image

Image


I also noticed that there is no all around anchor light (just learning about lighting requirements), and no cap on the mast. The radio wire is obviously routed through there. I'm guessing there should be foam plugs on each end of the mast? If there is not, no big deal if I have to add them. I should just be able to make holes for any wires through the foam and seal it back up with silicone, right? I will fabricating a cap with an all around light and mount for the antenna.
Image


I also had noticed that when I'm walking in the cabin, the spot on the floor where the dinette seat corner is, there is noticeable give in the floor when I step there. It's not much at all, but enough that I should question if this is normal or not. I weigh 175lbs, for what it's worth. Also, the rear berth there is a lot of give in the floor where there is little support underneath. Again, is this normal? There currently are no cushions in the rear berth. I've read that there was not foam in that area, but people had mentioned that they had added some. Should I wedge foam pieces under there to firm it up and provide more floatation, or not worry about it?

Re: New 26X owner, going to need a lot of help!

Posted: Mon Mar 08, 2021 9:10 am
by Tomfoolery
SlowSL wrote: Mon Mar 08, 2021 8:42 amI also noticed that there is no all around anchor light (just learning about lighting requirements), and no cap on the mast. The radio wire is obviously routed through there. I'm guessing there should be foam plugs on each end of the mast? If there is not, no big deal if I have to add them. I should just be able to make holes for any wires through the foam and seal it back up with silicone, right? I will fabricating a cap with an all around light and mount for the antenna.
I don't believe any cap was standard on that mast, nor is there an actual need for one.

I made my own from Starboard (HDPE construction 'lumber') and added an anchor light, which is a 2-mile (minimum) all-round white light. I made it from left over parts from a marine pole light, the kind often used on small power boats, and which I replaced with a taller one. The OP used it for an anchor light, but it was too low to get above the bimini, so I bought a longer one and retasked this one to be a permanent anchor light on the mast. If I'm in trawler mode (no mast), it serves as the masthead (steaming) and stern light, as a single all-round white is acceptable on smaller boats. Again, like most small power boats.

The new all-round white pole light came with two lenses, one solid on the bottom so it doesn't blind the skipper, and the other clear on the bottom. I obviously used the clear for the mast anchor light so it's still visible as another boater gets closer, and the solid on the stick at the stern so it doesn't blind me. As intended. 8)


Image

Image

Re: New 26X owner, going to need a lot of help!

Posted: Mon Mar 08, 2021 1:17 pm
by C Buchs
SlowSL wrote: Mon Mar 08, 2021 8:42 am Here is the floor fitting I mentioned earlier. It does go through the floor, I didn't get inside the boat last night when I snapped the picture to verify, but it appears to be connected to a hose underneath. Because of the location, I'd bet that it was for the outboard control cables/wiring. I'd probably rather have them go into the console and through the floor there rather than having that stick out where foot traffic is.
Image

Image
Mine is the same as your pictures. I'm getting water into my aft berth around the pedestal and I'm pretty sure a lot of it is from water getting around the cables in this opening. I'm thinking of running the cables for my new outboard across the cockpit floor and covering them with this thing from BWY. https://shop.bwyachts.com/ProductDetail ... e=4005-1X0

Jeff

Re: New 26X owner, going to need a lot of help!

Posted: Mon Mar 08, 2021 8:33 pm
by pitchpolehobie
SlowSL wrote: Mon Mar 08, 2021 7:40 am
C Buchs wrote: Fri Mar 05, 2021 5:41 pm I've got two. One for the steering and another for the cables. Does yours look like this?

Image

Jeff
Yes, that is what mine looks like, but it's missing the boot, I didn't know what was supposed to go there, thanks.
Do you have any extra pictures of the Bwyachts quick connect install on the 26x? I got mine and am waiting to install it this week

Re: New 26X owner, going to need a lot of help!

Posted: Tue Mar 09, 2021 6:27 am
by Starscream
OverEasy wrote: Sat Mar 06, 2021 12:43 am Does anyone know if ther is a two part or “seamed” split boot available?
Most of them are already seamed, but IIRC the BWY boot wasn't. I ended up not changing the boot, just installing the Amazon boot over top of the original boot.

I'll chime in on bilge-pump piping, maybe showing my ignorance but...
If I understand the flow mechanics correctly, a loop line like the on Jimmy drew is required if a thru-hull is going to be below the waterline at any point. The loop up above the thru-hull prevents water from pouring downward from the thru-hull into the boat. The problem with this loop is that if the pipe is full and its in-the-boat end is below the submerged thru-hull at any time, then it becomes a siphon that will draw the ocean on board, and an anti-siphon fitting at the top of the pipe loop is required to prevent that.

Another problem with a loop up and then back down is that it can lead to vapor-lock. This is where the pump is trying to fill the pipe with water, but air bubbles get trapped at the high point, creating a restriction and reducing the flow of the pump. I'm not sure how Jimmy's arrangement addresses the possibility of vapor-lock. Maybe it doesn't matter: the pump will work anyway regardless of vapor-lock, and if it pushes water faster than the speed at which air rises in the discharge pipe, then the pipe will clear itself out pretty quick. If it can't pump water fast enough to remove the air in the inverted U, then the pump will still work, just at a reduced rate.

So, for my bilge pump, I installed a gradually rising line to a thru-hull that exits the hull as high as possible, under the galley and above the hull chine. No loop, no anti-siphon valve. A self-priming bilge pump should be able to flow water up that pipe (vapor lock is not an issue with this arrangement). I installed the included (cheap) rubber split-cone anti-backflow valve that comes with almost every bilge pump in the discharge pipe. That way, during the rare events when the thru-hull is below the water, not very much water can backflow down the pipe and through the valve. If I'm heeled over that far, the bilge pump and the thru-hull will be pretty close to level anyway, and there won't be that much hydrostatic pressure on the thru-hull to push water against the anti-backflow valve. I don't think I could get the thru-hull more than a couple of inches below the surface anyway, so I'll rely on the cheap rubber valve.

And an anti-critter screen in the thru-hull!

Re: New 26X owner, going to need a lot of help!

Posted: Tue Mar 09, 2021 8:21 am
by OverEasy
Thanks Starscream!

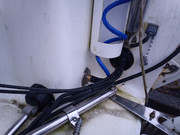
My engine line & control boots seem to be original and a tad short. There is a somewhat annoying puddle in the aft berth area after rain storms.
It seems to be following the cables back in. That and at the base of the pedestal where the engine controls and steering cables feed through.

I'd like to put new longer boots on but would like to avoid having to disconnect everything to sleeve them on if possible.
I replaced a torn boot on my car CV joints and it came in a split seam version that saved HOURs of time.
I just removed what was left of the old boot, wrapped the new one around it, applied an adhesive RTV to the seam and clamped it at either end.
It lasted for at least 8 years as far as I know (I sold the car :-(.....).

I have routed my bilge pump discharge lines up above the chine as far as I can and with as short a run for each as I can figure out.
All are at amidship, one each Port and Starboard of the ballast transfer lines, one centered under the aft dinette seat in the space between the ballast transfer lines. Port discharge line is less than 3 feet and runs up under the galley. Center and Starboard discharge lines are less than 5 feet and run up under the head sink. All are gradual rise without any loops or check valves.

My automatic bilge pumps seem have a turn on/turn off differential float switch which I presume is to reduce cycling.
I didn't install check valves or loops based upon what I have been able to find from bilge pump manufacturers and what I have seen on new "big" boat bilge installations. It seems even the duckbill check valves have a roughly 20% line loss effect and can also result in air locks even if placed right at the pump discharge. the small amount of water that comes back down the discharge hoses also can aid in "clearing potential debris at the pump/screen.

I added a small "weep/bleed" hole to the top of the discharge port on each pump as has been suggested. (Mine didn't come that way). I have seen theses "weep/bleed" holes on the higher end bilge pumps and have also seen these on the newer "big" boat installations. as has been mentioned by others the hole allows air to escape and allows the centrifugal pump to prime. I added a "deflector" over the holes using the hose clamp to keep the little jet of water from A) making a mess and B) from p*ssing into my eyes ( :wink: ) when I check operation.

The discharge head rise is about 2 feet and the smooth inner surface hose results in a calculated 30% discharge rate loss (or less) which is reasonable.
(For those like myself, Centripetal Bilge Pumps are flow rated at "ZERO" head rise to discharge which means that they loose discharge capacity with every foot of rise to the actual discharge height overboard.)

Now the ideaa of a critter guard is intriguing.... we has dem pesky wasps around called "Mud Daubers" which "LOVE" to find and fill-up holes with their larval nests. I have also heard of others (rare) who have had the unfortunate experience of mice getting into their bilge discharge lines from the outside and clogging them. (Yuk! :? ).

To aid in drying the bilge areas I am adding three vacuum lines next to the pumps that I can access from the companionway with a little 1 gallon Wet/Dry Vac.

Gotta get back to the day's tasks!!!

8) 8)

Re: New 26X owner, going to need a lot of help!

Posted: Tue Mar 09, 2021 8:48 am
by C Buchs
pitchpolehobie wrote: Mon Mar 08, 2021 8:33 pm
SlowSL wrote: Mon Mar 08, 2021 7:40 am
C Buchs wrote: Fri Mar 05, 2021 5:41 pm I've got two. One for the steering and another for the cables. Does yours look like this?

Image

Jeff
Yes, that is what mine looks like, but it's missing the boot, I didn't know what was supposed to go there, thanks.
Do you have any extra pictures of the Bwyachts quick connect install on the 26x? I got mine and am waiting to install it this week
I don't have a picture, but I do have a video that I took to show potential buyers that my Honda 50hp actually runs. I moved it to this https://drive.google.com/drive/folders/ ... sp=sharing google folder. Anyone with the link should be able to get in the folder :?

Jeff

Re: New 26X owner, going to need a lot of help!

Posted: Wed Mar 10, 2021 5:45 pm
by pitchpolehobie
Awesome thanks

Re: New 26X owner, going to need a lot of help!

Posted: Thu Mar 11, 2021 5:00 am
by SlowSL
Would someone please send me a couple pictures of their X ice box hatch cover? I measured and made some templates so that I can make some new ones, but I feel like I don't have my ice box cover correct. I feel like there is too much space not covered between my template edge and the edge of the fiberglass before the recessed part for the table. In particular, a clear shot of the front edge to show how close it is to the edge of the molded fiberglass. I can PM anyone my cell # so that the pictures can be sent easier if that works, I'd really appreciate it.