Page 1 of 1
daggerboard check
Posted: Tue Jun 09, 2009 5:25 pm
by tangentair
As part of the yearly commissioning and perhaps once or twice during the season, I would recommend that you pull your daggerboard and check its leading and trailing surfaces. Other posts have discussed what happens when you run aground or hit something hard but I haven't really hit anything that made me wonder if mine was OK or not. Instead I pulled it to make a template for a new weighted DB. Still a picture is worth a thousand words....
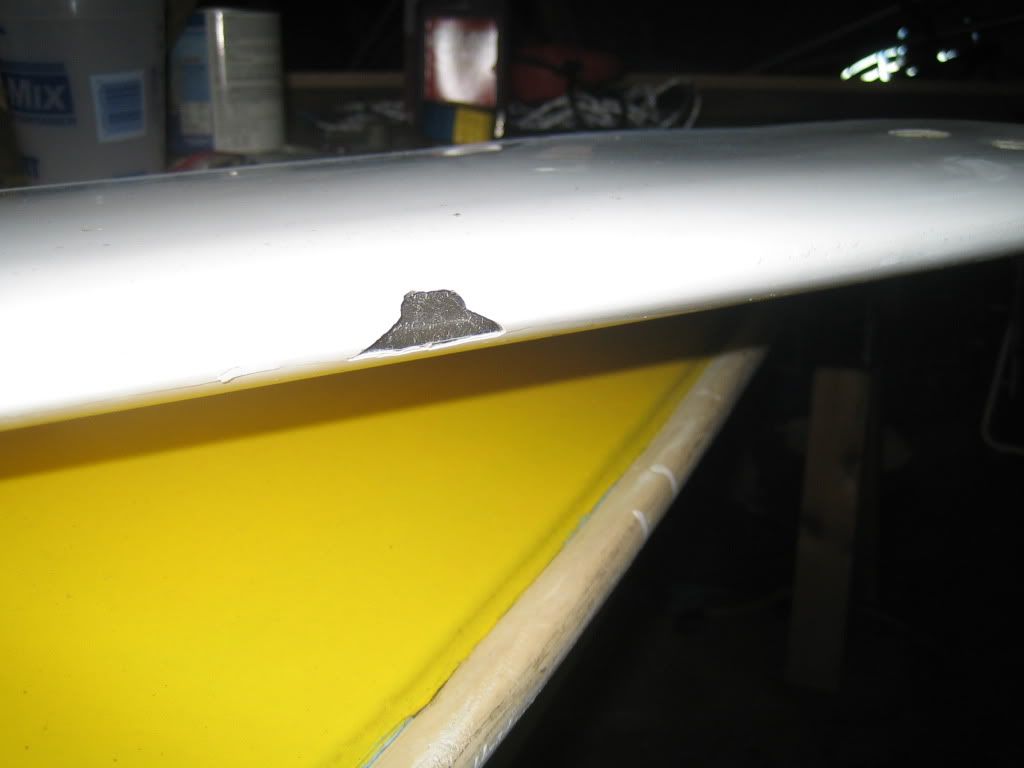
It only takes a few moments to move the mast off to the side and untie a couple of knots, you might be surprised at what you see. There is also some scuffing of the trailing edge but it doesn't show up in a picture.
Re: daggerboard check
Posted: Tue Jun 09, 2009 7:33 pm
by Currie
Wise words, Tangent.
I had never checked my daggerboard after I bought it late in 2007. I sailed it all 2008 and at the end of the season, when I finally pulled it, I found four or five nasty chips out of the back edge. I can admit to making one at the board-full-down-position

, but I'm pretty sure the others were there when I bought it. I did a repair by cutting away the loose material and cutting a groove into the board with a Dremel (to make a kind of mini-tongue-and-groove joint). I repaired it with MarineTex. I hope it holds up - I'll let you know at the end of the season.
~Bob
Re: daggerboard check
Posted: Tue Jun 09, 2009 7:52 pm
by Y.B.Normal
I had the same damage after I was attacked by "rock sharks". I had damage to the leading edge where I hit the rock, and the trailing edge where the board hit the daggerboard well.
I fabricated aluminum reinforcements which I glassed over. Last year when I pulled the board I had some damage to the patch, but no further damage to the board. This Spring I added the plastic tubing to the trailing edge per another owners' mod. I'll see how it works this Summer.
As per earlier posts, the board is rather fragile. I wonder if kevlar reinforcements would help? It's a question of do you want to let the board get dinged, or transfer the damage to the daggerboard well.
Some days I want my old swing keel back!
Re: daggerboard check
Posted: Wed Jun 10, 2009 1:29 am
by Morwenna
I had the shock of my (sailing) life when I checked my dagger board recently:
http://www.sailblogs.com/member/morwenn ... pid=101678
We had a gentle grounding onto a sloping sandy beach when approaching to anchor but it obviously wasn't as gentle as I had thought. This will be a definite check point for the future. Although the daggerboard does seem to be easily damaged it is (relatively) inexpensive and I would rather it crumpled than tearing the trunk out of the hull.
Regards
Nevil
"Morwenna"
Re: daggerboard check
Posted: Wed Jun 10, 2009 9:03 am
by Russ
Morwenna wrote:I had the shock of my (sailing) life when I checked my dagger board recently:
http://www.sailblogs.com/member/morwenn ... pid=101678
We had a gentle grounding onto a sloping sandy beach when approaching to anchor but it obviously wasn't as gentle as I had thought. This will be a definite check point for the future. Although the daggerboard does seem to be easily damaged it is (relatively) inexpensive and I would rather it crumpled than tearing the trunk out of the hull.
Regards
Nevil
"Morwenna"
Wow! You wouldn't expect that on the trailing edge. Looks like a shark took a bite out of it.
From what I understand, the daggerboard trunk is surrounded (reinforced) by all that resin to create the permanent ballast so I doubt it could be damaged.
I've only grounded once in a soft bottom at a VERY low speed, but now I'm gonna go pull that thing and examine it.
Re: daggerboard check
Posted: Wed Jun 10, 2009 9:54 am
by Hardcrab
I've never hit anything with my board and the very thin trailing edge had damage.
The bite was about 3.5-4" tall and about 1/2" deep.
Looked very much like a " ( " right at were the board exits the hull bottom.
I think it's due to the slop in the board versus the size of the trunk.
Underway, the board pivots somewhat as the extended section is forced aft while the top of the board is still in the trunk.
The thick leading edge up in the trunk is hard against the forward interior of the trunk and the thin aft edge is pressed against the aft hull opening.
The thin edge will break away easily until it becomes thick enough to spread this force over a larger board area, and the damage seems stop at that point/thickness.
At least that's my theory for a board never grounded.
I'm not convinced it needs "fixing", in that the damage is somewhat self-limiting, at least in my case and theory.
My boards damage only went 1/2" deep after over 2,500 nm under the hull. ( I keep a GPS log)
I can't imagine it being any weaker to speak of and the same for any performance hits.
I did put a small section of 1/2" PVC pipe cut lenghtwise to slip over the trailing edge/damage and screwed it in place.
Done mostly to stop the cluncking while on the hook, but it also spreads the forces in a more controlled fashion.
Do this work while floating so that the OD of the pipe can be checked at full drop for any friction hangups between the trunk and the PVC.
You might have to slightly shave to PVC O.D. to get the board to fully drop.
Re: daggerboard check
Posted: Wed Jun 10, 2009 10:14 am
by pokerrick1
Re: daggerboard check
Posted: Wed Apr 14, 2010 12:40 pm
by Threms
Morwenna wrote:I had the shock of my (sailing) life when I checked my dagger board recently:
http://www.sailblogs.com/member/morwenn ... pid=101678
We had a gentle grounding onto a sloping sandy beach when approaching to anchor but it obviously wasn't as gentle as I had thought. This will be a definite check point for the future. Although the daggerboard does seem to be easily damaged it is (relatively) inexpensive and I would rather it crumpled than tearing the trunk out of the hull.
Regards
Nevil
"Morwenna"
looks just like mine, we also hawe "groundsharks" in Denmark.
I send it to a proff, he will fix it, cost 120 USD. I could try my self, but i wouldt recomend it to others, im not sharp in epoxy.
So the status after i got the

=
Boat: 50.000 USD
sailing gear 1.000 USD
New Genua: 900 USD
Oil heater system 1.000 USD
A new car to pull the trailer 120.000 USD ( in Denmark you pay 180% reg. tax + 25% sales tax on a car, its only a opel antara cosmo)
To sail in the sun whith my whife and best friends = priseless,,,,,,,,,
Re: daggerboard check
Posted: Thu Apr 15, 2010 7:34 am
by Terry
Well, I went out aand checked mine pronto and low and behold mine also has a shark bite in it. Can anyone describe a procedure for repair? Yowser!

Re: daggerboard check
Posted: Thu Apr 15, 2010 7:49 am
by ralphk
Great Advice
It only takes a few moments to move the mast off to the side and untie a couple of knots, you might be surprised at what you see. There is also some scuffing of the trailing edge but it doesn't show up in a picture.
This must be true of "M"s only
I tried removing the centreboard on my '97X several years ago.
to the best of my knowledge it has never been released.
I wrestled with it for about an hour and a half and finally gave up.
The vertical threaded rod is held in place by great gobs of 5200 and I was afraid to pound on it anymore with the really big hammer.
The aircraft cable is starting to fray, topside where cable turns 90 deg. so I really must perform this chore this spring.
Any advice out there, to remove an old X swingkeel?
Ralph k.
Re: daggerboard check
Posted: Thu Apr 15, 2010 8:18 am
by parrothead
A major design flaw in the
board is that it tapers to a very thin edge throughout its entire length. Only the lower 57" of board is ever exposed and in need of being sharply tapered. The top portion of the board, which never leaves the daggerboard trunk, should have been molded with a rounded trailing edge that matches the interior profile of the rear of the trunk.
An easy fix involves cutting a slot in a length of 1/2" CPVC pipe and bonding the pipe to the upper portion of trailing edge of the daggerboard with Marine-Tex, thus encapsulating the thin [probably already damaged] factory edge. The 5/8" outside diameter surface of the CPVC pipe fits perfectly against the half-round interior surface of the rear of the daggerboard trunk, acting as a bearing surface and more widely distributing any rearward loads on the board. CPVC [the cream-colored material] is significantly less brittle than white PVC. This cure for the chunking problem on the aft edge of the board also reduces damage to the top corner of the leading edge, by limiting the board's ability to pivot fore/aft within the trunk.
See some photos at
http://www.macgregorsailors.com/modt/in ... ?view=1095
Re: daggerboard check
Posted: Thu Apr 15, 2010 11:35 am
by Stefan
I recently pulled the daggerboard with an idea to add some weight, but was surprised to see some damage starting to build up in the area where the board contacts the hull when fully down. There was even damage inside the trunk, front part 2 to 5 inches down from the top, I suppose it was from the loose board banning against it when fully up. Although I only used my 2009 boat less then 10 times last season. After analyzing the situation further and consulting to professionals, we realized that the trunk is too big for the board, at least 5 mm can be added all around the board to make it thicker, providing a better fit. This is essential before adding more weight to the board, otherwise the damage would just accelerate.
So, right now the board is in the shop, we are adding about 5 layers of fiberglass all around of it, it should become 5-6 mm thicker after all work is done, and the gelcoat is re-applied.
After that there should be no problem adding lead shots, I am told the board would be as strong as the boat's deck.
Re: daggerboard check
Posted: Thu Apr 15, 2010 1:14 pm
by 40Toes
I tried removing the centreboard on my '97X several years ago.
to the best of my knowledge it has never been released.
I wrestled with it for about an hour and a half and finally gave up.
The vertical threaded rod is held in place by great gobs of 5200 and I was afraid to pound on it anymore with the really big hammer.
The aircraft cable is starting to fray, topside where cable turns 90 deg. so I really must perform this chore this spring.
Any advice out there, to remove an old X swingkeel?
I have a 2000 so I am not sure if there is any change in the way the CB is constructed however this is how I remove mine: unscrew the nut on the bracket and remove all the 5200 using a utility knife with the blade extended out, once cleared I put the nut back - screwed on just a little so the CB won't drop. Get under the boat and have a look at the forward put of the CB, there should be a notch there that you can get a piece of wood into to lever it. This should break the 5200. The rest is simple.
Rod