Page 1 of 3
Ballast valve replacement
Posted: Mon Sep 15, 2014 11:16 am
by richter372001
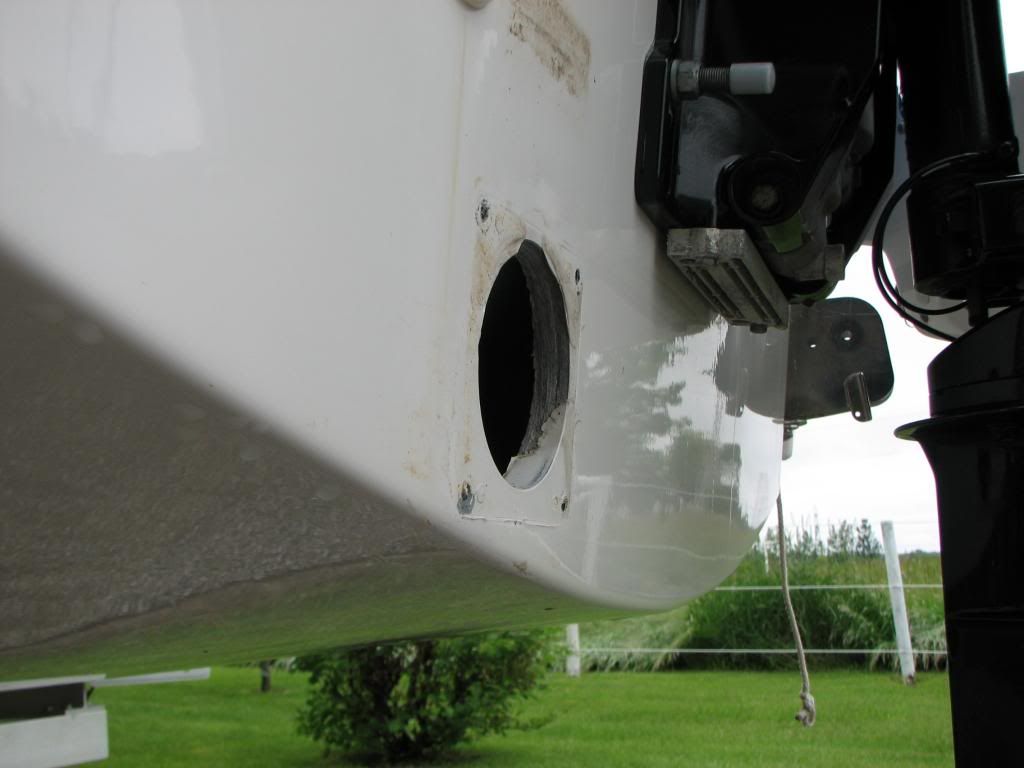
So, I got the new water ballast valve to replace the old, stuck one (handle pulls up, the gate stays closed)
How do I go about changing it?
It looks like the screws have to be replaced with longer ones, that will reach the hull. Or?
So, the sealant goes between the valve and the hull? That all?
What kind of sealant, btw?
Another issue - the ballast is full, the old valve is stuck.
1. How do I open it? Stick a flat screwdrive at the bottom, push it up?
2. I think I must open it, rather than unscrew the old valve, because I am afraid the water pressure from the inside will blow it off the hull, destroying
fiber glass and ripping out the screws with it. Am I being paranoid?
Re: Ballast valve replacement
Posted: Mon Sep 15, 2014 11:31 am
by Russ
I would use 3M 4200 sealant between valve and hull. Maybe resuse the old screws or at least know what size you will need.
You probably want to be careful opening that thing. All that water gushing out fast.
I would try prying it open. You are going to replace it anyway, so you can't break it any more than it is. If that doesn't work, maybe drill a small hole so you can poke something in there to lift it up.
Re: Ballast valve replacement
Posted: Mon Sep 15, 2014 12:25 pm
by seahouse
Or you could undo (diagonally) the four screws about 3/8" or so and lift the valve away from the transom enough to let most of the water drain out, then undo them the rest of the way to remove it. (?)
Re: Ballast valve replacement
Posted: Mon Sep 15, 2014 1:25 pm
by Hamin' X
I think that I would drill a big hole in the middle of the stuck gate; then go have a couple of beers while it drains.

Re: Ballast valve replacement
Posted: Mon Sep 15, 2014 3:34 pm
by richter372001
Ok, I think "prying" it up wins, with the "drill a hole in it" a close second.
The other options either carry some danger for the fiberglass or are a little more complicated.
And I will use the sealant, thanks. I thought there might be other parts that need to be used, but
if beside the valve kit, some sealant and either the old or newer screws, I do not need anything else,
I think I can do it.
Thank you all!
Re: Ballast valve replacement
Posted: Mon Sep 15, 2014 5:17 pm
by Tomfoolery
There actually isn't much pressure against it, since the water level isn't very high above it, but it's large size makes for a lot of force. So prying it open, or drilling a hole, or carefully backing the screws out a bit until it leaks, isn't going to cause a firehose stream.
Re: Ballast valve replacement
Posted: Mon Sep 15, 2014 5:38 pm
by Russ
Tomfoolery wrote:There actually isn't much pressure against it, since the water level isn't very high above it, but it's large size makes for a lot of force. So prying it open, or drilling a hole, or carefully backing the screws out a bit until it leaks, isn't going to cause a firehose stream.
If you say so.
I had a drain clog. Went into the crawlspace and opened the clean out port. I watched as I slowly unscrewed it and then suddenly was drenched in drain ooze. All over me. What a mess.
Slow release for me from now on.
--Russ
Re: Ballast valve replacement
Posted: Mon Sep 15, 2014 8:10 pm
by seahouse
Well I'm clearly the lazy bones in the group – I just don't like doing unnecessary work.

Backing out the screws is something you will have to do anyway, and it will spray sideways and down, not directly outwards. Sorry, I didn't recognize this as a “make work” question

.
Or a maybe it's “save time by taking a shower at the same time”? (Yup, sarcasm - the lowest form of humour).

If you must drill a hole, punch the drill through a heavy paper plate, or bucket lid or something first; even if you are using a cordless drill, to keep the drill and other things drier if you're worried about pressure.
Or just lower the trailer tongue as low as you can before you start the project


. That will lower the head, in more ways than one.
-B.

(Yup, I am being facetious. In places).
Re: Ballast valve replacement
Posted: Mon Sep 15, 2014 11:16 pm
by richter372001
Ok, if the vent hole is closed and the level above the valve level, theoretically, the water should not rush out, but my fear is that if it does, the screws will be ripped out, and I would hate to inflict any kind of damage to the hull below the waterline.
Re: Ballast valve replacement
Posted: Tue Sep 16, 2014 6:26 am
by Tomfoolery
richter372001 wrote:Ok, if the vent hole is closed and the level above the valve level, theoretically, the water should not rush out, but my fear is that if it does, the screws will be ripped out, and I would hate to inflict any kind of damage to the hull below the waterline.
If the water depth is 9" (a guess), the pressure at the bottom of that 9" is about .33 psi. It's less at the top of the gate valve, since pressure varies linearly with depth, but it makes no difference whatsoever how long and/or wide the tank is, or what shape it is - only the depth from the free surface of the water, wherever that is. That's pretty low. With a 4" round valve gate, the area of the valve is around 12.5 square inches. .33 lb/in^2 * 12.5 in^2 = 4.1 lb of force (assuming the full .33 psi bottom pressure over the entire valve, though it actually decreases as you go up). So there's not a lot of force on that valve, and certainly not a lot of pressure. It won't spray like pipe flange joints busting their bolts in submarine movies when they go too deep. But you are likely to get wet.
Re: Ballast valve replacement
Posted: Tue Sep 16, 2014 11:31 am
by paul I
richter372001 wrote: I think I must open it, rather than unscrew the old valve, because I am afraid the water pressure from the inside will blow it off the hull, destroying fiber glass and ripping out the screws with it. Am I being paranoid?
You are being paranoid. The tank is not pressurized. If it were pressurized enough to blow the gate off the hull, how would it stay on under normal conditions? If anything you'll have a vacuum condition. Leave the vent plug in until you finish prying. drilling, or loosening and you will minimize the water flow. Be sure to remove the vent plug to fully drain the ballast tank.
When I changed mine it seemed the mounting screws were threaded right into the fiberglass. No nuts. Or if there were any, they were imbedded in the fiberglass or bonded to the inside. So, if you use new bolts be sure to get the same length. I also recommend the 4200 sealant.
Re: Ballast valve replacement
Posted: Tue Sep 16, 2014 5:39 pm
by Crikey
Not a big deal. As previously stated, the actual amount of water pressure behind the valve is insignificant, and you can easily hold it in place with your hand while un-screwing all the hardware. After that just let it pop off!
I've used 5200 on my changeover but 4200 would work easily as well.

R.
Re: Ballast valve replacement
Posted: Thu Sep 18, 2014 12:06 am
by richter372001
Alright! Actual pics, calculations and advice!!
Thank you all!
So, leave the vent cap in, unscrew carefully and all will be good.
Forgive my laymanship - squirt the sealant into the screwholes? Anywhere else?
Do I apply it also between the gate and the hull as well?
Regards,
Srdjan
p.s. about 7-8 more days of sailing season in Croatia - at least for me. So, the valve swap will happen soon and I will take some pics for the posterity.
Is there an archive to which these can be uploaded/stored for all on the forum to see?
Re: Ballast valve replacement - different sealants
Posted: Thu Sep 18, 2014 7:05 am
by richter372001
A little clarification on the difference between the two sealants:
4200 or 5200? What should you use?
For anyone who has ever installed a piece of hardware on a sailboat or powerboat, you know the first thing you grab for is a tube of either 3M 4200 or 3M 5200. The purpose of this material is to provide a sealant against moisture and in some cases, using the adhesion properties to help strengthen the connection between parts. But do you know which one to use?
First step: STOP! Before you install that new hardware or think of sealing up that piece of equipment, you need to think of which bedding compound you should be using. There is a significant difference between 3M 4200 and 5200. Using the wrong material could make you life MUCH more difficult in the future!
On 3M’s website, they give you some clues:
From the 3M 4200 page:
"…Forms a watertight seal on joints and boat hardware above and below the waterline. Formulated to allow for disassembly of parts."
Notice the text “disassembly of parts”. If you ever plan on taking that hardware off of your boat, use 4200. Even if that means 5 years in the future you MIGHT want to pull that part off, 4200 is still the appropriate sealant.
From the 3M 5200 page:
"…The adhesive sealant is extremely strong, retains its strength above or below water line. Stays flexible too - allows for structural movement."
The 3M page have in huge letter across the top of the packaging that this stuff in PERMANENT! If you use 5200, you need to plan on never taking that piece off ever again. In most cases when you try to pull apart pieces bonded with 5200, the material you bonded to (fiberglass, wood, etc.) will structurally fail before the 5200 does. This will make you life so much harder if you need to work on something sealed with 5200.
The big advantage of 5200 is it works below the waterline and has excellent resistance to salt water. If you have parts that live under water and you don’t want to worry about them working loose, 5200 is your answer.
For anyone who is installing anything to their deck (stanchions, clutches, cam cleats, etc.), use 4200. Even if it doesn’t move for 10 years, you will be much happier in the long run when you have to replace the stanchion that bent or the clutch that has finally worn out. You won’t have to rip up your deck and damage your gel coat if you use 4200.
As far as the best application method for 4200:
First, I recommend you dry fit your part. Then put blue painters tape around the deck right up the edge of the part as it sits on the deck. This will keep the 4200 from getting on the gel coat you don’t want it to.
Pull the part off and make sure to clean the area where the 4200 will sit between the part and the deck. Now the trick is, apply a liberal amount of 4200 on the bottom of the part and install it with the supplied screws or bolts BUT don’t tighten is down hard. Make sure it has a tiny bit of play, but that you have full contact adhesion with the 4200.
Now let the part set up. Basically what you are doing is creating a gasket between the part and the deck. Once it cures (in 24 to 48 hours), you can trim the excess sealant and with a light enough touch, you won’t scratch the gel coat because the tape will protect the deck. Then you tighten down the part to where you want it. This will squeeze down on the gasket of 4200 and make a great looking seal that won’t allow water in.
Be sure to not leave too much space between the part and the deck. 4200 will pick up dirt fairly easily and is hard to clean, so if you want your boat looking nice, only have the small amount of 4200 showing after you are finished to keep everything neat and tidy.
Re: Ballast valve replacement - choice of sealants
Posted: Thu Sep 18, 2014 7:23 am
by richter372001
Here is some info from the horse's mouth:
Product Description
Cures fast and forms a watertight seal between joints and hardware
One-part, all-purpose sealant chemically reacts with moisture and forms flexible, watertight, weather-resistant seals on joints and hardware. Can be used above or below the waterline; approximately half the strength of 3M's 5200, which allows for eventual dissasembly of parts. Note: Can be softened by some teak cleaners and sealers and is not recommended for sealing teak decks.
•Formulation: One-part fast-cure polyurethane adhesive/sealant
•Recommended Usage: Fiberglass, wood, metal, some plastics, above or below water
•Material Incompatibilities: Acrylics ABS, Lexan
•Cure Time: Tack free: 2 hrs; complete cure: 24 hrs
•Cleanup: Mineral spirits or kerosene
•Removal: Mechanical removal
•Tensile strength: 300psi
Since my new valve gate clearly states that it is made of ABS, would that not make the 4200 incompatible for this purpose?

