Modification to 12 gallon tanks on a Mac26X
Posted: Fri Mar 26, 2021 11:16 pm
It was suggested that we share our experience in modifying our 2001 Mac26X to incorporate a pair of 12 gallon Moeller fuel tanks.
Our objective is to prepare Over Easy and ourselves for extended cruising of the Atlantic Intra-Coastal Waterway in 2022.
Given the remoteness, narrowness and lengths of many of the waterways we feel that a good portion will be done motoring rather than sailing. There are also tides and river currents to contend with. An adage from my flying days says one of the most useless things in life is fuel not with you when you need it.
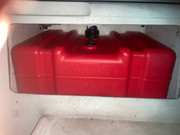
Over Easy came with 2 serviceable 9 gallon tanks and we wanted to improve upon that. After looking and evaluating additional auxiliary tanks we decided it would be better for us to accomplish that with a pair of new 12 gallon tanks. We felt it a was neater, cleaner, less obtrusive and easier to use option to pursue.
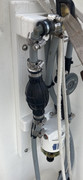
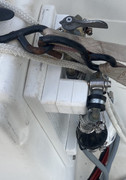
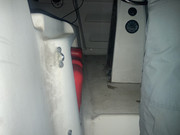
The Moeller low profile 12 gallon tanks fit within the existing fuel locker cubbies on our Mac26X. The flanged opening width was our only preliminary limitation.
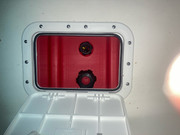
We also didn’t want to be pulling out the tanks to open vents and refuel so we decided to add rectangular top hatches to the benches over the cubbies.
Widening of the cubbie flange pending was accomplished using a Ryobi 18V cordless trim router with a carbide laminate edge trim bit with a slightly oversized roller bearing. This helped keep us from inadvertently crashing into the cubbie side walls as we trimmed back the flange width. We left the top and bottomcubbie flanges alone as the vertical opening was already sufficient to fit the tanks.
We will latter dress the exposed fiberglass flange edge exposed with touch-up gel coat.
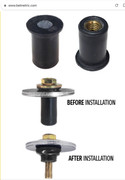
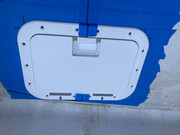
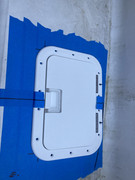
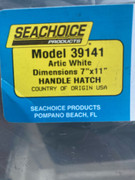
We decided upon a pair of nice large rectangular non-locking tool-free hatches for easy access to each of the tanks though the cockpit benches. The hatches selected appear to be strong enough to stand upon if need be ( we already have done so several times), low profile without sharp edges or protrusions so the are comfortable to sit upon, textured for grip. Given the fuel cubbies are open to the cockpit and the tank surfaces are sloped to cockpit center we were not concerned with having a hard latch, locks, etc. The hatches have a roller detent closure and a lift lever handle to facilitate easy toolless access from the helm seat. The opening allows easy access for institutional refueling, tank gauges, line connection and vent.
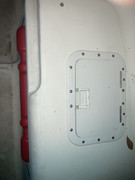
We centered the hatches over the cubbies and outboard toward the port and starboard at the edge of the bench diamond pattern texture but still parallel to the bench edges. We laid out the openings to be cut with blue painters tape. Holes though the bench surface into the cubbies (through a channel reinforcement of about 2 inches thick) with a drill at the corners were made. Cutting was done with a Ryobi 18v jigsaw and a long down stroke cut blade that we expected would be of limited use afterwards ( fiberglass is tough on non-carbide blades). This Bosch blade held in there to complete the cutout for both hatches but was useless afterwards. Blade cost was about $1.50 and a good investment.
After dry fitting the hatches and demurring the edges we found the the original manufacture of the interior ceiling piece within the cubbies had over a 1/2 gap all around the interior at the cubby wall interface. This had allowed wasps into the bench reinforcement thickness as evidenced by a couple nests found on each side. We chose to seal up all the edges with water proof expanding foam as well as all the channels exposed in cutting the hatch holes. The hatches mounting screw holes were predrilled undersize.
Before finally mounting of the hatches the perimeter of the hatch was trimmed into the blue painters tape and the interior portions were removed leaving the exterior portion in place. Then an appropriate bead of marine sealant was applied to the under flange of the hatch and it was then mounted and screwed in place ensuring an adequate squeeze out of sealant around the outer perimeter. This was left alone for 2 days to set the adhesive. A sharp trim knife was used to trim the sealant at the perimeter of the flange. The excess sealant was then removed by pulling up the remaining perimeter blue tape making a nice neat installation.
Photos below:


So much for our modification to install a pair of 12 gallon low profile Moeller fuel tanks.
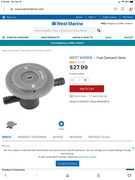
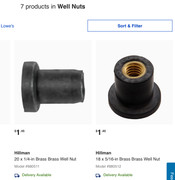
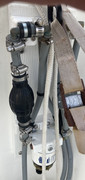
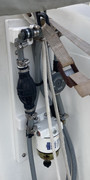
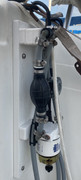
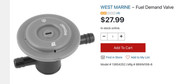
Still to be done is the installation of a true 4 way (Tank A/Tank B/ Tanks A&B/Off) and an inline spin-on fuel filter/water separator.
Total man hours was roughly 4 hours (5 if you include lunch ) so far.
We like what we have accomplished so far and feel comfortable with using it.
We would definitely do this again to increase our fuel capacity and make it more convenient for what we plan to do now and in the future.
Hope this post has been helpful to those interested in making this modification.
Best Regards from Over Easy!

Our objective is to prepare Over Easy and ourselves for extended cruising of the Atlantic Intra-Coastal Waterway in 2022.
Given the remoteness, narrowness and lengths of many of the waterways we feel that a good portion will be done motoring rather than sailing. There are also tides and river currents to contend with. An adage from my flying days says one of the most useless things in life is fuel not with you when you need it.
Over Easy came with 2 serviceable 9 gallon tanks and we wanted to improve upon that. After looking and evaluating additional auxiliary tanks we decided it would be better for us to accomplish that with a pair of new 12 gallon tanks. We felt it a was neater, cleaner, less obtrusive and easier to use option to pursue.
The Moeller low profile 12 gallon tanks fit within the existing fuel locker cubbies on our Mac26X. The flanged opening width was our only preliminary limitation.
We also didn’t want to be pulling out the tanks to open vents and refuel so we decided to add rectangular top hatches to the benches over the cubbies.
Widening of the cubbie flange pending was accomplished using a Ryobi 18V cordless trim router with a carbide laminate edge trim bit with a slightly oversized roller bearing. This helped keep us from inadvertently crashing into the cubbie side walls as we trimmed back the flange width. We left the top and bottomcubbie flanges alone as the vertical opening was already sufficient to fit the tanks.
We will latter dress the exposed fiberglass flange edge exposed with touch-up gel coat.
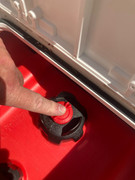
We decided upon a pair of nice large rectangular non-locking tool-free hatches for easy access to each of the tanks though the cockpit benches. The hatches selected appear to be strong enough to stand upon if need be ( we already have done so several times), low profile without sharp edges or protrusions so the are comfortable to sit upon, textured for grip. Given the fuel cubbies are open to the cockpit and the tank surfaces are sloped to cockpit center we were not concerned with having a hard latch, locks, etc. The hatches have a roller detent closure and a lift lever handle to facilitate easy toolless access from the helm seat. The opening allows easy access for institutional refueling, tank gauges, line connection and vent.
We centered the hatches over the cubbies and outboard toward the port and starboard at the edge of the bench diamond pattern texture but still parallel to the bench edges. We laid out the openings to be cut with blue painters tape. Holes though the bench surface into the cubbies (through a channel reinforcement of about 2 inches thick) with a drill at the corners were made. Cutting was done with a Ryobi 18v jigsaw and a long down stroke cut blade that we expected would be of limited use afterwards ( fiberglass is tough on non-carbide blades). This Bosch blade held in there to complete the cutout for both hatches but was useless afterwards. Blade cost was about $1.50 and a good investment.
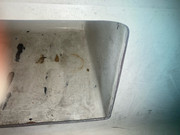
After dry fitting the hatches and demurring the edges we found the the original manufacture of the interior ceiling piece within the cubbies had over a 1/2 gap all around the interior at the cubby wall interface. This had allowed wasps into the bench reinforcement thickness as evidenced by a couple nests found on each side. We chose to seal up all the edges with water proof expanding foam as well as all the channels exposed in cutting the hatch holes. The hatches mounting screw holes were predrilled undersize.
Before finally mounting of the hatches the perimeter of the hatch was trimmed into the blue painters tape and the interior portions were removed leaving the exterior portion in place. Then an appropriate bead of marine sealant was applied to the under flange of the hatch and it was then mounted and screwed in place ensuring an adequate squeeze out of sealant around the outer perimeter. This was left alone for 2 days to set the adhesive. A sharp trim knife was used to trim the sealant at the perimeter of the flange. The excess sealant was then removed by pulling up the remaining perimeter blue tape making a nice neat installation.
Photos below:
So much for our modification to install a pair of 12 gallon low profile Moeller fuel tanks.
Still to be done is the installation of a true 4 way (Tank A/Tank B/ Tanks A&B/Off) and an inline spin-on fuel filter/water separator.
Total man hours was roughly 4 hours (5 if you include lunch
We like what we have accomplished so far and feel comfortable with using it.
We would definitely do this again to increase our fuel capacity and make it more convenient for what we plan to do now and in the future.
Hope this post has been helpful to those interested in making this modification.
Best Regards from Over Easy!