
Looking forward to this year's activities..... waiting for the word from the Founding Fathers.
Ross


That would be me. I still haven't gotten up the nerve to replace the impellerTomfoolery wrote:Post some pics when you do it, Ross. Maybe other folks with a similar engine can derive some inspiration from them.
OK, so I want to see what it looks like in there, too. ;^)
It was easier to do than I thought it would be, but there are a couple of tricks to it. If you want, I'll send you the service manual page that has the exploded view, reassembly bolt torques, where to apply grease, and so on.frede wrote:That would be me. I still haven't gotten up the nerve to replace the impellerTomfoolery wrote:Post some pics when you do it, Ross. Maybe other folks with a similar engine can derive some inspiration from them.
OK, so I want to see what it looks like in there, too. ;^)
This one?Tomfoolery wrote:It was easier to do than I thought it would be, but there are a couple of tricks to it. If you want, I'll send you the service manual page that has the exploded view, reassembly bolt torques, where to apply grease, and so on.frede wrote:That would be me. I still haven't gotten up the nerve to replace the impellerTomfoolery wrote:Post some pics when you do it, Ross. Maybe other folks with a similar engine can derive some inspiration from them.
OK, so I want to see what it looks like in there, too. ;^)
That's even better than what's in the service manual, which appears to be written for experienced and/or trained service personnel. No real text to speak of, and no stet-by-step instructions.frede wrote:This one?
http://cdn.powerequipment.honda.com/pe/ ... 307pdf.pdf
I just changed the impeller on my BF-50 a few weeks ago. It is fairly easy. With regard to the shift shaft adjustment, all I did was note how many threads were showing after the lock nut and re-assemble it the same way. It shifts as good as it ever has. There were pieces of missing impeller I never did find. I don't know if they just wore away as tiny fragments or if they broke off as larger pieces. At any rate, there are no overheating issues going on.frede wrote:I also found this on the web. The part about the "the shift shaft adjusted to the proper length" is what worries meIf it ain't broke, don't fix it
"When removing the lower you must remove the zinc trim tab and under it is another bolt holding the lower unit on. The shift shaft is two piece and is seperated just above the lower unit where it is exposed. There is an "adjusting nut" which is a long nut on the top half of the shaft. The bottom half of the shift shaft has a "lock nut" which is a regular size nut. To disconnect the two and remove the lower unit you unscrew the "adjusting nut". When replacing the lower unit you must have the shift shaft adjusted to the proper length. To do this you first run the "adjusting nut" on the top portion of the shift shaft all the way up. Before placing the lower unit on the engine you now adjust the "lock nut" on the lower portion of the shift shaft so the distance between the top of the nut to the top of the bottom half of the shift shaft is 8 mm or .3 inch. When you place the lower unit on the engine you run the top "adjusting nut" down until it hits the "lock nut" then you tighten the "lock nut" and "adjusting nut" together. May sound complicated but it is extremely simple in operation."

I gotta say, I never noticed any water from those drains either. In fact I never noticed the drains were even there. When I tested my install, I used the "Honda Recommended" method of connecting a hose to the water clean out hole and covering the water inlets with duct tape. The only leakage I saw was squirting out of the seal the tape was attempting to make.Azzarac wrote:Hey Tom,
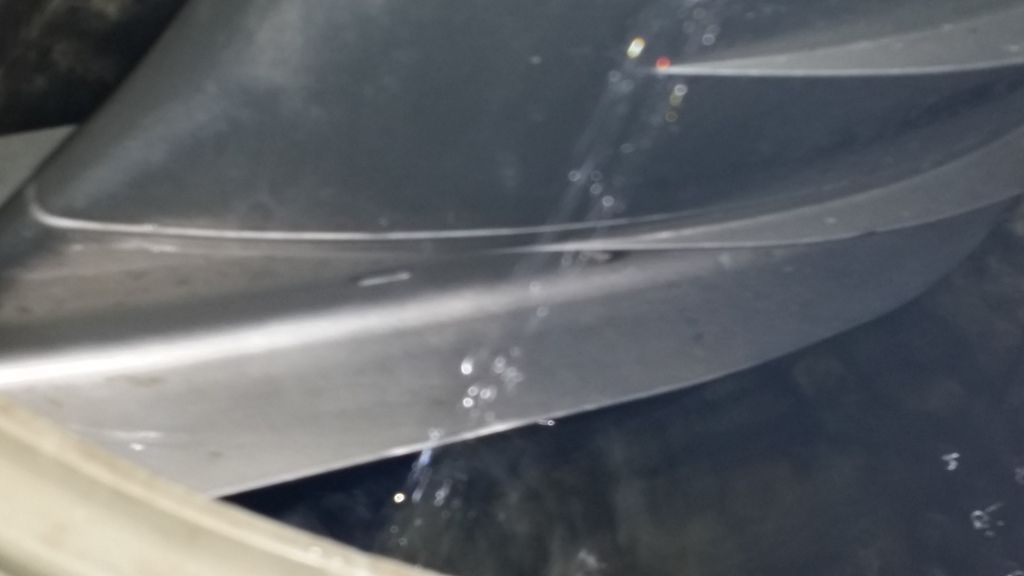
I just finished testing my 97 BF50 pump installation a few minutes ago and noticed absolutely no water discharge from the drain holes you are experiencing. I'm wondering if by using the muffs you are inducing too much pressure/quantity of water into the motor. I tested mine in a barrel and had a strong indicator stream, but not a drop from the drains. The picture below is running at about 2k rpm after about 5 minutes.
Per the article, it sounds more complicated than it really is. You just shift into reverse so you can get good access to the coupling, back off the lock nut, and use your fingers to run the coupling nut up high enough to disengage the lower half of the shaft. Then pull the lower bolts and lower unit. Do the reverse to put it back.frede wrote:I also found this on the web. The part about the "the shift shaft adjusted to the proper length" is what worries me
That's why I tried it, in the video, both with muffs, and in a storage container filled to cover the top inlet. Still got water out those holes, as you can see in the last part of the video, where I rev it up.Azzarac wrote:Hey Tom,
I just finished testing my 97 BF50 pump installation a few minutes ago and noticed absolutely no water discharge from the drain holes you are experiencing. I'm wondering if by using the muffs you are inducing too much pressure/quantity of water into the motor. I tested mine in a barrel and had a strong indicator stream, but not a drop from the drains. The picture below is running at about 2k rpm after about 5 minutes.