

Cockpit table with a post?
-
Sheppie62
- First Officer
- Posts: 351
- Joined: Thu Sep 28, 2017 1:04 pm
- Sailboat: MacGregor 26X
- Location: Mission Bay San Diego
Re: Cockpit table with a post?
I would want a raised filler tube to the side, so an option would be to make the tank raised all the way under the seat, making say a 4” wide wall, with the filler on the back side. Would increase capacity a bit and make a solid divider, would need to allow for drainage. Maybe on sides/ round holes thru it.would simply step over it. Is the back supposed to drain rapidly in case of capsizing? Blocking that too much would possibly make water go into the cabin? I don’t like the plastic gas tanks, especially the new 6 gallon specters with the handles, I’m going to try to take them back. You cannot fill them up all the way (because gas tank area tilts toward the filler), so they are more or less 5 gallon tanks. And they expand in the heat. Handles stick out too much etc. but having at least one of those cabins open would be nice. Two would be great.
-
OverEasy
- Admiral
- Posts: 2890
- Joined: Mon Sep 28, 2020 11:16 am
- Sailboat: MacGregor 26X
- Location: NH & SC
Re: Cockpit table with a post?
Hi Sheppie62!
Yes some of the tanks have the fill neck at the lower level of the molded in stiffening ribs along with the output and gauge connections. We can attest that can make for a mess, especially with the non pressure venting tanks. The vapor pressure builds and leaks from the fittings!
The fix used to be a pressure relief valve but they frown on that nowadays.
Now you have to seal all the fittings and put a shut off valve in-line to prevent sending pressurized fuel to the engine which screws up the carbs and diaphragm fuel pumps on pre-fuel-injection engines.
Difference story and problem…sorry for the digression.
While in the past I’ve made fuel tanks from aluminum I also had access to heliarc AC TIG welding equipment.
That allowed welding of reasonable thinner gage sheet stock with enough weld integrity to meet the various regulator requirements for fuel transportation. One can reasonably make a tank with thicker plate aluminum and weld it with an aluminum MIG gun setup.
Stainless steel is a bit heavier by weight but thinner gages can be welded with DC TIG which many existing stick welders can be adapted to with a kit and gas supply.
The layout, bending, forming, welding and pressure/vacuum testing to make a fuel tank can be a challenge.
For that size tank one should plan on internal ribs and baffles for structural strength and slosh control.
I’ve also made fuel tanks using fuel resistant epoxy fiberglass with an internal fuel resistant polymer “sloshed in” liner coating.
The epoxy fiberglass route allows for complex geometry and seamless construction but generally requires making inner and outer half shell molds for each half section which are then joined with a glassed band. Still not a walk in the part but still doable. Sanding and finishing are additional issues and efforts.
There are also some individuals who have made blow molded, vacuum molded and roto-molded custom poly fuel tanks.
It’s all about trade-offs and design compensation to achieve the right durable solution for the application….(and how many boat bucks they want/can spend
 )
)
Not sure how I’d go about it but I think I’d be tempted to start with the fiberglass approach making it using the exiting foot well area as the male mold surface. Hot melt glue in what ever additional form wall needed and fillet the edges where it meets the existing structure generously. Once the form is settled then coat it with silicone mold release or mold release wax. To make this work the left and right sides must mirror each other from center line.
Lay up the fiber glass bottom shell with the fuel resistant epoxy and glass about 1/4 inch or more thick. Let it harden then pop it out without damaging the mold form.
Then make off a height from bottom all the way around the interior of the mold to make the top section half.
Lay in the fuel resistant epoxy and fiberglass to the same thickness. Let it harden then pop it out. At this point the form can be removed and the boat surfaces cleaned up.
Carefully trim the vertical side walls of the first piece (the bottom) made to a desired uniform height.
Carefully trim the vertical side walls of the second piece (the top) made to a desired uniform height.
Add any interior stiffening structure to support future foot traffic treading across the tank.
Cut and glass in any vent, fill or gauge probe ports into the top section.
Add anti slosh fuel foam to fit between the shell interior or add baffles to the interior.
Invert the top shell and rotate to match up with the bottom shell.
Rough the outer vertical walls of both sections and apply a bonding band of fuel resistant epoxy and fiber glass to join the two shell sections together (with some epoxy and fiberglass to make a good edge to edge bond between the shells). Attention would need to be paid to making the bonding band structurally thick enough but not so thick as to prevent the completed assembly from fitting back in place!

Sand and finish the exterior of the tank as appropriate.
Then get some of that fuel tank liner slosh stuff and throughly coat the interior a couple layers to ensure a sealed tank.
Next comes the process of mounting the tank with padding and straps to keep it in place with about 100+lbs of fuel sloshing about.
Just one way suggested way to get there. There are bound to be other, better ways depending on skills, shops, personal experience and materials available.
Best Regards,
Over Easy


fudt
.
Yes some of the tanks have the fill neck at the lower level of the molded in stiffening ribs along with the output and gauge connections. We can attest that can make for a mess, especially with the non pressure venting tanks. The vapor pressure builds and leaks from the fittings!
The fix used to be a pressure relief valve but they frown on that nowadays.
Now you have to seal all the fittings and put a shut off valve in-line to prevent sending pressurized fuel to the engine which screws up the carbs and diaphragm fuel pumps on pre-fuel-injection engines.
Difference story and problem…sorry for the digression.
While in the past I’ve made fuel tanks from aluminum I also had access to heliarc AC TIG welding equipment.
That allowed welding of reasonable thinner gage sheet stock with enough weld integrity to meet the various regulator requirements for fuel transportation. One can reasonably make a tank with thicker plate aluminum and weld it with an aluminum MIG gun setup.
Stainless steel is a bit heavier by weight but thinner gages can be welded with DC TIG which many existing stick welders can be adapted to with a kit and gas supply.
The layout, bending, forming, welding and pressure/vacuum testing to make a fuel tank can be a challenge.
For that size tank one should plan on internal ribs and baffles for structural strength and slosh control.
I’ve also made fuel tanks using fuel resistant epoxy fiberglass with an internal fuel resistant polymer “sloshed in” liner coating.
The epoxy fiberglass route allows for complex geometry and seamless construction but generally requires making inner and outer half shell molds for each half section which are then joined with a glassed band. Still not a walk in the part but still doable. Sanding and finishing are additional issues and efforts.
There are also some individuals who have made blow molded, vacuum molded and roto-molded custom poly fuel tanks.
It’s all about trade-offs and design compensation to achieve the right durable solution for the application….(and how many boat bucks they want/can spend
Not sure how I’d go about it but I think I’d be tempted to start with the fiberglass approach making it using the exiting foot well area as the male mold surface. Hot melt glue in what ever additional form wall needed and fillet the edges where it meets the existing structure generously. Once the form is settled then coat it with silicone mold release or mold release wax. To make this work the left and right sides must mirror each other from center line.
Lay up the fiber glass bottom shell with the fuel resistant epoxy and glass about 1/4 inch or more thick. Let it harden then pop it out without damaging the mold form.
Then make off a height from bottom all the way around the interior of the mold to make the top section half.
Lay in the fuel resistant epoxy and fiberglass to the same thickness. Let it harden then pop it out. At this point the form can be removed and the boat surfaces cleaned up.
Carefully trim the vertical side walls of the first piece (the bottom) made to a desired uniform height.
Carefully trim the vertical side walls of the second piece (the top) made to a desired uniform height.
Add any interior stiffening structure to support future foot traffic treading across the tank.
Cut and glass in any vent, fill or gauge probe ports into the top section.
Add anti slosh fuel foam to fit between the shell interior or add baffles to the interior.
Invert the top shell and rotate to match up with the bottom shell.
Rough the outer vertical walls of both sections and apply a bonding band of fuel resistant epoxy and fiber glass to join the two shell sections together (with some epoxy and fiberglass to make a good edge to edge bond between the shells). Attention would need to be paid to making the bonding band structurally thick enough but not so thick as to prevent the completed assembly from fitting back in place!
Sand and finish the exterior of the tank as appropriate.
Then get some of that fuel tank liner slosh stuff and throughly coat the interior a couple layers to ensure a sealed tank.
Next comes the process of mounting the tank with padding and straps to keep it in place with about 100+lbs of fuel sloshing about.
Just one way suggested way to get there. There are bound to be other, better ways depending on skills, shops, personal experience and materials available.
Best Regards,
Over Easy


fudt
.
-
Sheppie62
- First Officer
- Posts: 351
- Joined: Thu Sep 28, 2017 1:04 pm
- Sailboat: MacGregor 26X
- Location: Mission Bay San Diego
Re: Cockpit table with a post?
Thanks Overeasy, I seem to be fiberglass intolerant. I keep trying, (and getting a little better), but far from ability to make a fiberglass/ epoxy tank. I would use aluminum (seems to be what works best for me). As far as mounting/ securing the tank, it is in a mostly confined space, with walls on 3 sides, and motor well in the back, think (4) connections to the walls would be sufficient . I think making a removable top on the tank with flange going out (with a gasket, like a fuel cell), might be useful for repairs, and covering edge to edge with the curving bottom edges/ slightly tilting walls.
-
Sheppie62
- First Officer
- Posts: 351
- Joined: Thu Sep 28, 2017 1:04 pm
- Sailboat: MacGregor 26X
- Location: Mission Bay San Diego
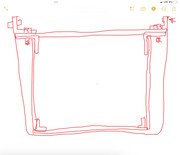
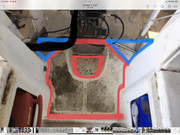
Tank design
Baffles not shown. I could screw most of it together first (except top angle ring) and test fit it/ send to professional welder if desired.
-
OverEasy
- Admiral
- Posts: 2890
- Joined: Mon Sep 28, 2020 11:16 am
- Sailboat: MacGregor 26X
- Location: NH & SC
Re: Cockpit table with a post?
Hi Sheppie62!
Not a bad approach at all going with aluminum and an access plate.
To reduce some of the welding you might want to consider looking at making gentle 1/2 or 1 inch radius bends for the corners to make a hoop for the side walls with the seam weld in the middle of one of the sides. (Instead of multiple plates and angle pieces overlapped) Then weld on the top and bottom plates which would have the beans mounting ears. Baffles could rest on bottom surface plate to be welded in place while top edge could be tabbed through the top plate and then welded from on top to seal up the tank.
If the bottom plate extends over the engine well that could be a good location for the fuel drain port to feed fuel to the engine as it would be the lowest point and get you the most fuel useable. Just make sure the connection is flush on the interior otherwise you won’t get all the fuel. (Your larger fuel filter/ water separator will take care of any crud which you don’t want left in the tank anyway.) Otherwise a siphon line tube from the top plate to the bottom of the tank into a rear corner would also work nicely too!
The top plate would have your filler neck arrangement. Again you might want to keep the filler neck tube flus with the underside surface of the top plate to get the max fill. It would be a good idea to allow enough filler neck to act as an expansion chamber as fuel swells when heated and can generate pressure. I wouldn’t want to have a solid liquid volume without a place it can expand into in a controlled fashion.
Might be a cleaner design, easier to fabricate, with a lot less welding or potential for leaks.
Just a suggestion….
Best Regards
Over Easy
fudt

Not a bad approach at all going with aluminum and an access plate.
To reduce some of the welding you might want to consider looking at making gentle 1/2 or 1 inch radius bends for the corners to make a hoop for the side walls with the seam weld in the middle of one of the sides. (Instead of multiple plates and angle pieces overlapped) Then weld on the top and bottom plates which would have the beans mounting ears. Baffles could rest on bottom surface plate to be welded in place while top edge could be tabbed through the top plate and then welded from on top to seal up the tank.
If the bottom plate extends over the engine well that could be a good location for the fuel drain port to feed fuel to the engine as it would be the lowest point and get you the most fuel useable. Just make sure the connection is flush on the interior otherwise you won’t get all the fuel. (Your larger fuel filter/ water separator will take care of any crud which you don’t want left in the tank anyway.) Otherwise a siphon line tube from the top plate to the bottom of the tank into a rear corner would also work nicely too!
The top plate would have your filler neck arrangement. Again you might want to keep the filler neck tube flus with the underside surface of the top plate to get the max fill. It would be a good idea to allow enough filler neck to act as an expansion chamber as fuel swells when heated and can generate pressure. I wouldn’t want to have a solid liquid volume without a place it can expand into in a controlled fashion.
Might be a cleaner design, easier to fabricate, with a lot less welding or potential for leaks.
Just a suggestion….

Best Regards
Over Easy
fudt
-
ris

- Captain
- Posts: 705
- Joined: Sat Feb 28, 2015 4:27 pm
- Sailboat: MacGregor 26X
- Location: Frostproof Florida
Re: Cockpit table with a post?
Not sure about building fuel tanks to hold gas, sounds kind of unneeded. We have two 12 gallon tanks, that fit each side of the cockpit and can carry two 5 gallon cans under the seat. This gives us at least 30 gallons. at 8 miles to the gallon at 8mph that is 240 miles. You can find a lot of marinas in 240 miles in most places in the US and Canada. If we slowed to 6.5 miles an hour this would give us a range of 300 miles. I think Chinook bought two 17 gallon tanks for his X from Blue Water Yachts.
Richard
Richard
-
Sheppie62
- First Officer
- Posts: 351
- Joined: Thu Sep 28, 2017 1:04 pm
- Sailboat: MacGregor 26X
- Location: Mission Bay San Diego
Re: Cockpit table with a post?
Thanks Ris and Overeasy for ideas. The rear deck area is is such a complex shape I think rounding the corners would be beyond my skill/ tools I have. I think sealing seams with Por-15 for safety would make construction a bit easier/ welds less critical. But yes it would take a lot of welding, the mig gun is quite fast. Heat/ warping is limiting issue with it. As far as needing the tank, the idea is to remove the other plastic tanks and free up the old tank area for topside storage (table etc). Could add a plastic tank(s) as needed for the trip. And the other idea is to make a flat rear deck level with the cockpit floor. I have a 10” setback on the motor, with the steering tie rod reversed, and can move hydraulic steering lines to most rear control line access hole. So I have a large area that’s available for the tank. It would be a lot easier to fill tank back there and It is substantial lower than original tank and centered, so should help side to side stability a bit. But it is further back, so that would need to be offset with weight in the front of the boat. The tank lid could even extend over the tie rod/ rudder connections all the way to the transom (no gas tank under that area) blue area. Making entire area usable/ walkable.
-
OverEasy
- Admiral
- Posts: 2890
- Joined: Mon Sep 28, 2020 11:16 am
- Sailboat: MacGregor 26X
- Location: NH & SC
Re: Cockpit table with a post?
Hi Sheppie62!
Questions:
A) How thick were you considering making the tank side walls?
B) How thick were you considering making the tank bottom plate?
C) How thick were you considering making the tank top plate?
D) Were you considering the tank top plate to be the final walking surface or were you considering a different material for that surface to be added on top of it?
E) Were you planning on recessing the tank into the engine well? (Just a thought as I started wondering about engine tilt up space…after posting last night…)
I have a simple wooden bending rig I make when the need arises from dimension lumber a pipe and a pair of strap hinges to bend sheet aluminum. I use it on the edge of my work bench. I’ve used it on material up to 3/16 inch thick. (Just haven’t needed to use it on thicker stock as yet but it should handle 1/4 inch thick stock though. ...) I could sketch out for you if desired.
Just a thought….
Hi Ris,
Yes, the two 12 gallon tanks on Over Easy give us a 24 gallon capacity.
With the existing vintage 2001 2-stroke Tohatsu 50hp that gives us about 6+ hrs run time.
Once we get the new 4-stroke Suzuki DF60AV installed this summer that should improve dramatically (at least that’s the hope ) to 10+ hours… which should cover a reasonable distance.
One concern with the additional extended range tanks under the seat we have is that is the proposed location for a 2000 watt inverter generator when cruising in southern waters…. The additional higher up weight is also a concern.
Right now with just the two 12 gallon tanks we can see the weight effect when one tank is empty. Yes we do regularly switch between tanks but we wanted to test a worse case just to understand it last fall.
The aft footwell tank, even if simplified to a 24x30x4 inch size gives about 12 gallons with a flush surface to the cockpit.
Raising it 4 inches to 24x30x8 for a slight step up tank doubles the capacity to roughly 24 gallons and lowers the center of gravity omen the arm about 8 to 10 inches while centering the weight along the amidship axis. Space in what is now a relatively unused footwell becomes potentiall more functional.
If the larger step up tank was to replace the two existing 12 gallon tanks the combined 252 lbs [2x12x(6 lb/gal)] would move aft about 36 inches. Currently not sure what that would do to the fore/aft balance of the boat at this time. It’s something to look into though.
This central tank could now be the primary tank and the two 12 gallon tanks the long distance auxiliaries gravity feeding the main tank when desired. Otherwise they could be removed and the fuel cubbies become available for protected in cockpit exterior to the cabin storage.
From a rough approximation, given the working walking load is vertical and the fuel load is distributed, if making this central tank from metal ( epoxy fiberglass is my first choice) I’d probably consider making it from SST. That way I could make it from 10 gage sheet stock (plenty strong for SST but aluminum would be better at 3/16 or 1/4 inch thickness, especially for the top plate if that is to be walked on directly) with coarse egg rate or vertical honeycomb crossed baffle interior support structure. An oiled teak board top deck piece for the actual walking surface would look nice…
Mind you, this is currently only a simple thought exercise right now to flesh-out a potential concept. For Over Easy there are several more pressing and desirable mods we would want to undertake first….
We also have a weight and balance concern based on comments elsewhere on the forum for Mac26X ( Thanks Starscream, Russ & others, to let us know we are not alone with this issue ). It seems with our dual batteries (port side galley seat), our galley mod (port side galley area) and Air Conditioning mod ( port side aft of galley seat) we are listing a bit to port before I get on board . So either move the AC unit to starboard, or the existing batteries to starboard, add additional battery capacity to starboard or some combination of them.
(Note: A special Thank you to Starscream for alerting us to the potential funky bow flotation space issue. Getting that opened up, cleaned up and redone is now high on the TO-DO LIST! Yep a good cleaning, white wash and refill with sealed HD water bottles is in our future for that area as well as making allowance for a battery compartment for when we get to adding a drum type anchor winch.)
But it is interesting!
Best Regards
Over Easy
fudt
Questions:
A) How thick were you considering making the tank side walls?
B) How thick were you considering making the tank bottom plate?
C) How thick were you considering making the tank top plate?
D) Were you considering the tank top plate to be the final walking surface or were you considering a different material for that surface to be added on top of it?
E) Were you planning on recessing the tank into the engine well? (Just a thought as I started wondering about engine tilt up space…after posting last night…
)I have a simple wooden bending rig I make when the need arises from dimension lumber a pipe and a pair of strap hinges to bend sheet aluminum. I use it on the edge of my work bench. I’ve used it on material up to 3/16 inch thick. (Just haven’t needed to use it on thicker stock as yet but it should handle 1/4 inch thick stock though. ...) I could sketch out for you if desired.
Just a thought….
Hi Ris,
Yes, the two 12 gallon tanks on Over Easy give us a 24 gallon capacity.
With the existing vintage 2001 2-stroke Tohatsu 50hp that gives us about 6+ hrs run time.
Once we get the new 4-stroke Suzuki DF60AV installed this summer that should improve dramatically (at least that’s the hope
 ) to 10+ hours… which should cover a reasonable distance.
 One concern with the additional extended range tanks under the seat we have is that is the proposed location for a 2000 watt inverter generator when cruising in southern waters…. The additional higher up weight is also a concern.
Right now with just the two 12 gallon tanks we can see the weight effect when one tank is empty. Yes we do regularly switch between tanks but we wanted to test a worse case just to understand it last fall.
The aft footwell tank, even if simplified to a 24x30x4 inch size gives about 12 gallons with a flush surface to the cockpit.
Raising it 4 inches to 24x30x8 for a slight step up tank doubles the capacity to roughly 24 gallons and lowers the center of gravity omen the arm about 8 to 10 inches while centering the weight along the amidship axis. Space in what is now a relatively unused footwell becomes potentiall more functional.
If the larger step up tank was to replace the two existing 12 gallon tanks the combined 252 lbs [2x12x(6 lb/gal)] would move aft about 36 inches. Currently not sure what that would do to the fore/aft balance of the boat at this time. It’s something to look into though.
This central tank could now be the primary tank and the two 12 gallon tanks the long distance auxiliaries gravity feeding the main tank when desired. Otherwise they could be removed and the fuel cubbies become available for protected in cockpit exterior to the cabin storage.
From a rough approximation, given the working walking load is vertical and the fuel load is distributed, if making this central tank from metal ( epoxy fiberglass is my first choice) I’d probably consider making it from SST. That way I could make it from 10 gage sheet stock (plenty strong for SST but aluminum would be better at 3/16 or 1/4 inch thickness, especially for the top plate if that is to be walked on directly) with coarse egg rate or vertical honeycomb crossed baffle interior support structure. An oiled teak board top deck piece for the actual walking surface would look nice…
Mind you, this is currently only a simple thought exercise right now to flesh-out a potential concept. For Over Easy there are several more pressing and desirable mods we would want to undertake first….
We also have a weight and balance concern based on comments elsewhere on the forum for Mac26X ( Thanks Starscream, Russ & others,
(Note: A special Thank you to Starscream for alerting us to the potential funky bow flotation space issue. Getting that opened up, cleaned up and redone is now high on the TO-DO LIST! Yep a good cleaning, white wash and refill with sealed HD water bottles is in our future for that area as well as making allowance for a battery compartment for when we get to adding a drum type anchor winch.)
But it is interesting!
Best Regards
Over Easy
fudt
-
Sheppie62
- First Officer
- Posts: 351
- Joined: Thu Sep 28, 2017 1:04 pm
- Sailboat: MacGregor 26X
- Location: Mission Bay San Diego
Re: Cockpit table with a post?
Hi overeasy , I was thinking 3/16’ 6061 for the bottom and sides, 1/4” diamond plate for top. I was planning on using the motor tilt recess for additional storage.
-
Sheppie62
- First Officer
- Posts: 351
- Joined: Thu Sep 28, 2017 1:04 pm
- Sailboat: MacGregor 26X
- Location: Mission Bay San Diego
Re: Cockpit table with a post?
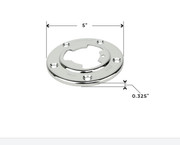
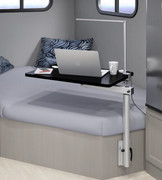
I found a table leg system that doesn’t need a big hole drilled for the post base. I would need screw holes to mount it, but those are easier to fill.I actually saw this in person and it looked very strong. Apparently the post kit comes with an aluminum base, stainless bases are extra $


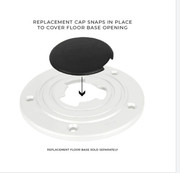
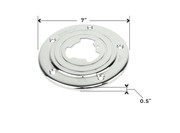
And an adjustable table leg system
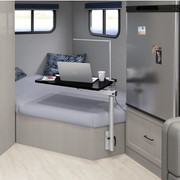
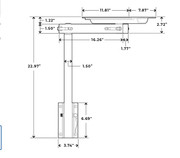
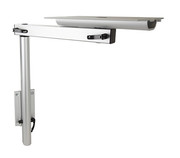
And an adjustable table leg system
-
OverEasy
- Admiral
- Posts: 2890
- Joined: Mon Sep 28, 2020 11:16 am
- Sailboat: MacGregor 26X
- Location: NH & SC
Re: Cockpit table with a post?
Hi Sheppie62!
Whoa!
I like the table stand leggy thingy!
Why even bother with the floor mount at all!
Side mount it to the beach and you get all the benefits of a multi position table AND get to swing it out of the way to get in/out of the cockpit! That looks like a great option!
Your boat, Your mods!
Best Regards
Over Easy
fudt