

Shortly after I bought my 26S in August of 2020, I installed a deep cycle battery and kept it charged using a charger designed for that purpose. The battery was used to start the kicker, power the running lights, and provide power to the inverter which was used occasionally to power a 50 amp mini crock pot and a small fan. In the summer or 2021 I added a second battery, same make and model, wired in parallel to keep the voltage at 12 volts but increase the storage life. I would always leave the charger attached
Over the last month the storage capacity diminished to the point I could not start the kicker. Both batteries appear to have failed, and I am wondering what I may have done wrong and what I should do next.
I don't want to depend on just one battery for our camping trips, so I plan to replace them both. At this point my plan is to keep the batteries wired in parallel, keep them on the original charger like before (it appears to be working properly), and test them individually from time to time.
My question is this: For someone who uses the battery mostly to start the kicker, but needs greater capacity for one or two nights without the opportunity to recharge, is there a better approach?
Thanks!
Battery installation guidance
-
Stickinthemud57

- Captain
- Posts: 786
- Joined: Thu Nov 12, 2020 7:50 am
- Sailboat: MacGregor 26S
- Location: Grapevine, Texas
- Contact:
Battery installation guidance
The key to inner peace is to admit you have a problem and leave it at that.
-
kmclemore

- Site Admin
- Posts: 6255
- Joined: Sun Feb 08, 2004 9:24 am
- Sailboat: MacGregor 26X
- Location: Ambler, PA -- MACX2018A898 w/ Suzuki DF60AV -- 78 BW Harpoon 4.6 -- 2018 Tahoe 550TF w/ 150 Merc
Re: Battery installation guidance
I do wonder if using that 50W crock pot on the inverter may have toasted the batteries? I am by no means a battery expert, but that seems to be an awfully high drain on the system, and perhaps it warped the batteries' plates, or boiled the electrolyte?
-
pitchpolehobie

- Captain
- Posts: 592
- Joined: Wed Dec 18, 2019 8:46 pm
- Sailboat: MacGregor 26X
- Location: USA, OH
Re: Battery installation guidance
I believe if you're going to charger 2 batteries in parallel it is important to make sure they're about the same age. The charge controlled will output only 1 voltage and it can Fry older batteries. 50w should really only be about 4AMP which would be fine. I would defer to someone with more knowledge.
2002 MacGregor 26X: Remedium
Tohatsu 25HP
Cruising Area: Inland Ohio, Lake Erie
Tohatsu 25HP
Cruising Area: Inland Ohio, Lake Erie
-
Interim
- First Officer
- Posts: 296
- Joined: Thu May 08, 2014 7:31 am
- Sailboat: MacGregor 26S
- Location: Great Plains
Re: Battery installation guidance
Do you have a battery selector, so you can preserve one battery for staring the engine and the other runs the "house"?
--interim
--interim
-
Be Free

- Admiral
- Posts: 1889
- Joined: Fri Nov 23, 2012 6:08 pm
- Sailboat: MacGregor 26X
- Location: Steinhatchee, FL
Re: Battery installation guidance
This is probably the source of your problem. Parallel batteries should be as close to identical as you can make them. They should be the same make, model, and as close to the same age as possible. It's likely that the older battery failed and pulled the new battery down with it.pitchpolehobie wrote: ↑Thu Oct 20, 2022 6:00 am I believe if you're going to charger 2 batteries in parallel it is important to make sure they're about the same age. The charge controlled will output only 1 voltage and it can Fry older batteries. 50w should really only be about 4AMP which would be fine. I would defer to someone with more knowledge.
You may consider putting in a pair of true deep cycle batteries in place of the "marine" deep cycle. Two 6V deep cycle batteries in series would give you more available power for your house bank and would start the kicker just fine. Before I put in a dedicated start battery I used a pair of 6V batteries to start my 40HP engine without any problems.
Bill
2001 26X Simple Interest
Honda BF40D
"If I were in a hurry I would not have bought a sailboat." Me
2001 26X Simple Interest
Honda BF40D
"If I were in a hurry I would not have bought a sailboat." Me
-
Wyb2

- Engineer
- Posts: 170
- Joined: Tue Jul 06, 2021 8:02 pm
- Sailboat: MacGregor 25
- Location: Northeast US
Re: Battery installation guidance
What size (amp-hours) batteries? Deep cycle or ‘dual purpose’? What size (amps) charger?
If these are large (100+ ah) batteries and a small (4-5 amp) charger, it may be incapable of fully charging the batteries. The charger should have an absorption stage, but if it can’t provide enough amps relative to the size of the battery, it will never be able to finish that last stage of charging.
Your crock pot is 500 W and drawing close to 50 amps from the batteries, or 50 W and drawing closer to 5 amps? The latter numbers seem small. And how long do you run it for? Crock pot makes me think slow cooking that goes on for hours, this might be too much for the batteries. If you pull lead-acid batteries down close to dead on a semi-regular basis, it will reduce their life quite a bit. The goal should be to never go below 50%, but knowing where that is is hard without a battery monitor that tracks it for you.
-
Stickinthemud57
- Captain
- Posts: 786
- Joined: Thu Nov 12, 2020 7:50 am
- Sailboat: MacGregor 26S
- Location: Grapevine, Texas
- Contact:
Re: Battery installation guidance
Thanks for these responses. I now have a list of suspects and a plan of action.
In fact, the batteries were purchased about a year apart, so the cascading failure theory makes sense.
There are no amp-hour specs on the batteries. 685 cranking amps, 140 reserve capacity.
The charger claims to be a ten-amp model, with an "auto" and "manual" mode. It is pretty old, and I probably should replace it.
I need to re-check the specs on the mini Crock Pot. It is very small (billed as a lunch warmer) and draws either 50 watts or 50 amps. At this point I'm pretty sure that is watts, but I will have to double-check that later today. I run it through a small inverter with a 200-watt capacity and I typically run it for only an hour or two, so I doubt that using it damaged the batteries. I need to do a little more research and get my amps and watts straight.
I have concluded that having these hooked up in parallel can result in a failure I did not see coming. I think what I will do is get an A-B switch, use one as the active battery and keep the other one in reserve.
My inverter display provides battery voltage and amperage draw information, so I think if I pay proper attention (i.e. watch how quickly the battery voltage is dropping), I can tell if I am demanding too much from the battery.
The key to inner peace is to admit you have a problem and leave it at that.
-
Be Free
- Admiral
- Posts: 1889
- Joined: Fri Nov 23, 2012 6:08 pm
- Sailboat: MacGregor 26X
- Location: Steinhatchee, FL
Re: Battery installation guidance
If your battery does not list an AH rating then it is most certainly not a deep-cycle battery in any meaning of the word.
A typical "marine deep cycle" battery will usually be 75-100 AH. A "dual purpose marine battery" is 60-100 AH (generally). True deep-cycle batteries will run 150-235 AH. The AH rating will be prominently displayed on the battery.
All of the AH ratings above are the "20 hour" rate. That is the industry standard. I have seen "deep cycle" batteries in one of the big-box stores that was marked "101 AH @ 1A". I've seen some that give the same as the "100 hour rate". This is misleading marketing. I would rank it right up there with advertising milk as gluten free. It is technically true but not relevant in any meaningful way. This battery would be closer to 5 AH and should not be considered "deep cycle" under any meaning of the word.
The dual-purpose and marine versions may also have a CA, MCA, or occasionally CCA ratings as well. For starting a "kicker" I can't imagine a battery that would not do the job.
Bill
2001 26X Simple Interest
Honda BF40D
"If I were in a hurry I would not have bought a sailboat." Me
2001 26X Simple Interest
Honda BF40D
"If I were in a hurry I would not have bought a sailboat." Me
-
Be Free
- Admiral
- Posts: 1889
- Joined: Fri Nov 23, 2012 6:08 pm
- Sailboat: MacGregor 26X
- Location: Steinhatchee, FL
Re: Battery installation guidance
On another note: there is no way your crock pot is 50A (unless it has a 4-wire plug) 
If your charger is permanently installed on your boat, please consider an ignition safe marine version that is permanently attached to the battery with nuts and lock washers (not wing nuts or clips). You can get one that will simultaneously charge two (or more) batteries. Make sure the charger matches the chemistry of the battery as well. AGM batteries prefer a different charge profile than FLA (traditional) batteries.
If your charger is permanently installed on your boat, please consider an ignition safe marine version that is permanently attached to the battery with nuts and lock washers (not wing nuts or clips). You can get one that will simultaneously charge two (or more) batteries. Make sure the charger matches the chemistry of the battery as well. AGM batteries prefer a different charge profile than FLA (traditional) batteries.
Bill
2001 26X Simple Interest
Honda BF40D
"If I were in a hurry I would not have bought a sailboat." Me
2001 26X Simple Interest
Honda BF40D
"If I were in a hurry I would not have bought a sailboat." Me
-
OverEasy
- Admiral
- Posts: 2873
- Joined: Mon Sep 28, 2020 11:16 am
- Sailboat: MacGregor 26X
- Location: NH & SC
Re: Battery installation guidance
At 115 VAC and 50 Amps yergonna draw more than a MIG welder
Batteries hate to charge in parallel!
No two batteries will ever “match” each other even if they were bought on the same day with the same date code. Over time they will inevitably diverge from each other.
The weaker battery will draw more (and more) of the charger current while also attempting to draw down the stronger battery. The “tetter-totter” effect gets worse as time goes on. The higher draw weak battery will also tend to heat up making it even less efficient at getting charged.
In our RV days we had a ALFA factory professional dual battery system but after having a pair of new date code matched deep cycle batteries 🪫 crap out I dug out my tools, books and meters.
I then ripped out the existing charger system and went with a pair of A/B/All/Off battery selector switches.
>We would only ‘shore charge’ one battery at a time.
>We would only ‘use’ one battery (the one NOT being charged) at a time.
On average over the next 20+years our batteries lasted 8 years before needing to be replaced.
Separating the batteries allowed me to check the actual voltage of each battery by itself while “in use” which helped us stay above the 50% capacity level. For all practical purposes 12.66 VDC is fully charged vs. 11.89 VDC is fully discharged. So when the ‘use’ battery dropped to 12.28 VDC we’d change over to the other battery.
We installed the same system on Over Easy.
Doing this approach basically negated the concern of what vintage date code a battery was as each charged independently of the other.
We use Marine Start/Store glass mat batteries each capable of starting the engine independently.
When each battery is fully charged and we are going to start the engine we set the ‘use’ selector to the “ALL” position. We also set the ‘shore charge’ selector to “OFF” as we are
After the engine has started we change the ‘use’ selector to our strongest (newest) battery first to ensure that it gets back up to full capacity first. Then change the selector to the weaker (older) battery while cruising to bring it back to full charge.
This works while the engine is running and generating electrical power that is being fed back thru the ‘use’ selector switch.
When on “shore power” or “on the hook” We tend to use our weaker battery first.
When “on the hook” We NEVER use our stronger battery so that we can always have the means to start the engine.
(Replacement of the weaker battery will be when it no longer has the capability of cold starting the engine 3 times with 30 seconds between starts.)
Eventually we’d like to up our battery count to three or four when we get to longer distance cruising at which time I’ll have to expand the capabilities of the selector switches.
There are also newer integrated circuit multi battery charge controllers that purport to have capability to select and charge one battery at a time. The ones I’ve looked at don’t seem to have the capability to “lock-on” to a given battery until fully charged though. The controller appear to flip/flops back and forth between the batteries and charges which ever battery happens to have the lesser charge. This effectively raises both batteries up incrementally simultaneously. Not sure how these charge controllers ‘know’ if a particular battery has gone bad (will never get to full charge voltage). Its possible that it is within the controller’s software but I haven’t had the opportunity to look further as yet.
One draw back to the automatic charge controllers is that it seems that when charging, if one wants to use battery electrical power, the batteries are basically being used in parallel rather than independently. This could potentially result in inadvertently running a dual battery system flat.
Note: We have a resettable circuit breaker on the ‘use’ selector positive output which is within less than a foot of each of the battery positive terminals.
For now I am more comfortable with the fairly straight forward manually monitored system.
I believe I posted this system in the MODS section.
Hope this helps.
Best Regards
Over Easy


-
Stickinthemud57
- Captain
- Posts: 786
- Joined: Thu Nov 12, 2020 7:50 am
- Sailboat: MacGregor 26S
- Location: Grapevine, Texas
- Contact:
Re: Battery installation guidance
OK, everything shook out as follows:
I learned to my chagrin that both batteries were bad. They were purchased a year apart, so the one bad battery ruined the good one theory makes the most sense.
I definitely wanted two working batteries for camping and after weighing the options decided to go with the 1,2,OFF, or BOTH switch option. I wanted a hook-up-and-forget battery charger and bit the bullet, choosing this one:
This model manages two batteries. They make some that manage more.
I mounted them both to a peice of 1/2" plywood which I mounted on hinges underneath the galley so that it could swing down for full visual/access. I added a small gate bolt to hold it up out of the way the rest of the time.
Down in view mode
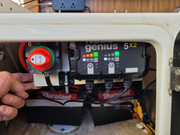
Up in storage mode
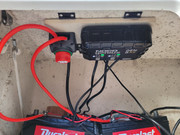
The charger provides a battery status readout, and my voltage inverter also tells me the actual voltage of the battery selected. The "1&2" setting hooks everything up in parallel, but I will probably just switch back and forth between the batteries and avoid the parallel setting.
BTW, my "Lunch Warmer" Crock Pot draws 50 watts (not amps). Tests indicate that the batteries can handle that just fine. Just don't leave it plugged in overnight!
Thanks for the insights!
I learned to my chagrin that both batteries were bad. They were purchased a year apart, so the one bad battery ruined the good one theory makes the most sense.
I definitely wanted two working batteries for camping and after weighing the options decided to go with the 1,2,OFF, or BOTH switch option. I wanted a hook-up-and-forget battery charger and bit the bullet, choosing this one:
This model manages two batteries. They make some that manage more.
I mounted them both to a peice of 1/2" plywood which I mounted on hinges underneath the galley so that it could swing down for full visual/access. I added a small gate bolt to hold it up out of the way the rest of the time.
Down in view mode
Up in storage mode
The charger provides a battery status readout, and my voltage inverter also tells me the actual voltage of the battery selected. The "1&2" setting hooks everything up in parallel, but I will probably just switch back and forth between the batteries and avoid the parallel setting.
BTW, my "Lunch Warmer" Crock Pot draws 50 watts (not amps). Tests indicate that the batteries can handle that just fine. Just don't leave it plugged in overnight!
Thanks for the insights!
The key to inner peace is to admit you have a problem and leave it at that.
-
Wyb2
- Engineer
- Posts: 170
- Joined: Tue Jul 06, 2021 8:02 pm
- Sailboat: MacGregor 25
- Location: Northeast US
Re: Battery installation guidance
Looks good, getting a charger than manages the batteries separately was smart.
I’d highly recommend covering the positive battery terminals, any stray wire or metal object that shorts the terminals will create a little welding arc and has a decent chance of starting a fire. Terminal covers are cheap, even electrical tape is a lot better than nothing.
I’d also recommend fusing the heavy gauge red wires for the same basic reason. You can get battery terminal fuse holders that place the fuse right on the terminal without having to do any extra wiring.
Edit: trying to get my Amazon link to show up the fancy way
-
kmclemore
- Site Admin
- Posts: 6255
- Joined: Sun Feb 08, 2004 9:24 am
- Sailboat: MacGregor 26X
- Location: Ambler, PA -- MACX2018A898 w/ Suzuki DF60AV -- 78 BW Harpoon 4.6 -- 2018 Tahoe 550TF w/ 150 Merc
Re: Battery installation guidance
Good choice on the NOCO charger/maintainer. I use them for my boats and my antique car collection and they work very nicely.
-
Stickinthemud57
- Captain
- Posts: 786
- Joined: Thu Nov 12, 2020 7:50 am
- Sailboat: MacGregor 26S
- Location: Grapevine, Texas
- Contact:
Re: Battery installation guidance
All my positive conductors and/or devices are fuse-protected with the exception of my kicker motor starter circuit. It is a Tohatsu 2-stroke 8 HP. The manual specifies a 15-amp fuse. Is that really going to be big enough? Any suggestions on size and type?
Thanks!
Thanks!
The key to inner peace is to admit you have a problem and leave it at that.