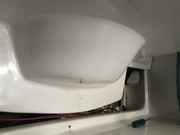
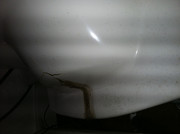
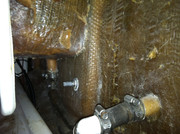
Going through my newly acquired 26x and noticed an odd crack and apparent leak (when raining). It looks to be on the inner lining right below the engine sump. There are no cracks or holes in the sump so this is only on the Fiberglas lining. It appears to have bulged out/down.
Could this be water that has leaked from pedestal area and collected in this otherwise sealed cavity and frozen/expanded to create crack? (I know an odd concept but it is from New England)
If I repair this area where will the leak travel to? Perhaps repair and put a small vinyl drain hose to connect to motor sump drain inside stern plumbing?
Anyone else seen this before?
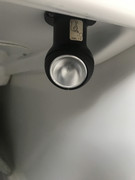
Also... how the heck do you replace the bulbs in these gimbal lights?
Those gimbal lights are aftermarket, so...no idea, sorry.
My X has lived farther north than yours for its whole life, and there is no sign of that kind of cracking, although there have been plenty of leaks over the years. If the sump is in good condition from the outside, then I'm inclined to agree with you that the damage is freeze/thaw of a pooled collection of water.
I don't think draining it is the right thing to do. Trackdown the source. My X is pretty much leak-free now, after the following work:
1) Motor cable entry. You can place a second, larger boot over the original tiny one, and that worked for me.
2) Rubrail. I caulked the entire rubrail with black outdoor caulk and it stopped a bunch of leaks.
3) Chainplates. Need to remove the rivets and the cap plate, reseal, and reinstall the cap plate. Very easy to do and solved another leak.
4) Stanchions: I marine-siliconed the deck-plate of each stanchion and that solved a couple of more leaks.
5) All the screws holding the sliding hatch track. This is easy but long, and solved all the drips from the hole-caps in the cabin roof.
There was probably another one or two that I'm forgetting. But now there are no leaks, no ice-damage, no bilge buildup, and less mold.
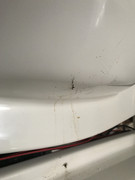
If memory serves, it was due to water getting in through the steering cable inlet. It pools in that bit of FRP, freezes, and splits it. Then leaks right through the crack when it rains.
The crack has nothing to do with the engine well, other than it being in a trim piece that hides the raw FRP work behind the removable panel.
Starscream wrote: ↑Fri Jun 19, 2020 4:56 am
1) Motor cable entry. You can place a second, larger boot over the original tiny one, and that worked for me.
2) Rubrail. I caulked the entire rubrail with black outdoor caulk and it stopped a bunch of leaks.
3) Chainplates. Need to remove the rivets and the cap plate, reseal, and reinstall the cap plate. Very easy to do and solved another leak.
4) Stanchions: I marine-siliconed the deck-plate of each stanchion and that solved a couple of more leaks.
5) All the screws holding the sliding hatch track. This is easy but long, and solved all the drips from the hole-caps in the cabin roof.
Sticking a pin in this for a rainy day.
Questions:
1) Caulk the upper edge of the rubrail, or lower, or both?
2-5) Which of these requires getting at bolts or what-have-you from inside, behind the the inner lining? Presumably that greatly increases the effort required.
Just the upper edge for leak control. Make the bead a lot smaller than you think you need to. I'll post the stuff that I used when I get a chance; so far it's held up really well over two years. I guess you could do the lower edge for spider control, if you wanted to. It's hard not to smear it, though, so be warned. Small bead.
Nothing I listed was difficult to do, nor do any of those things require special skills. The hatch track screws aren't hard, but there are a lot of them so it gets long.
Awesome leak prevention advice Starscream. Yep that’s the same crack leak. It seems like water runs down to the interior lining sump But can’t egress because it’s sealed to bottom and back of engine sump drain. So in colder climates it must freeze.
So I did find that water was dribbling down the throttle cables into boot area as the caulk seal was inadequate and the boot, well is just a boot and doesn’t work for water dribbling down into it.
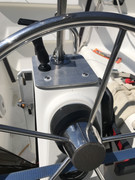
The other not so obvious offender is the mast crutch. I poured a cup of water over the base while the crutch was in place and as I expected it dribbled down the tube and dropped right onto the top of the rubber boot below that House those same throttle cables. No doubt that didn’t help.
I think I’ll leave the cracked section inside so I can tell if it’s happening again. I don’t like the idea of water pooling and not telling me it’s there.
Figured out the gimbal light. (Switching all to LED)
Since were talking leaks, any advice in an apparent leak at the port Interior light switch panel?
I too had the same leak / crack as shown in the original post on my 01 . I Dremel prepped it gel coated the crack. I'm now thinking that drilling a small drain hole would be prudent given the issue.
I've never dealt with the leak from the factory control cables routing on the pedestal, other that putting a catch basin under it in the aft berth when the boat is uncovered in weather.
Re a leak from behind the port fuse panel, I have a bulkhead compass in the cockpit that is in proximity to the fuse panel, and is not sealed for weather. I've not experienced leaks in that area, however, the track and winch fasteners above that area would be things to consider.
If fits right over the existing boot, and with a bit of sealant around its perimeter has seemed to work.
For the pedestal cable entry, I sealed that up when I bought the boat for spider-penetration purposes, so I don't know if it ever leaked water. I used basic duct-seal for that.
Had the same crack or in my case cracks. Pop the round bolt covers for the 4 bolts securing the pedestal. Place a drip pan below the holes. Next rain check for wetness on the bolts. Two of mine were leaking, pulled the angle iron and the two bolts securing it, cleaned up the area, scrapped the old caulk off and rebed with butyl tape from marinehowto.com. No leaks so far.
As far as my leak down the mast crutch base into the pedestal and ultimately the rubber boot. I plan to run a 2ft piece of vinyl 1” ID tube from Ace Hardware and shove it on the end of the tube inside adding a longer bolt to hold it on. Water will just drain into the deck and put under the sides. Just to be sure that ones over with.
Yeah the diagram did say that, I tried every angle of what it shows no luck but then a Stanley blade finally popped out the cover. I didn’t want to break it and make more work. I’m swapping the bulbs for LED.
As for the podium leak/repair. The gel coat had some cracking around the base of the old crutch and several old drilled holes. So I traced a piece of EBay 1/4” aluminum stock, cut with a skill saw, belt sander and drill bore. Sealed and screwed to the top. Solid and leak free. Just need to run my 1” hose drain to bottom of the crutch receiver to divert water from dribbling down on to top of boot below.
Ok, so yesterday was supposed to be a “set up the rig and prepare for the maiden voyage” day and it turned out to be a bit of a catastrophe.
I had finished tuning new wires for the gps and compass etc last week replacing the motor tilt assembly And tilt tube this week and ran the motor for a bit the other day.
Yesterday I just crawled down into the stern Berth to replace that coverboard and saw a drip again from the cracked bulge at the rear. I was puzzled as it hasn’t rained or been washed so I caught a drip on my finger and it felt slick. (I am unable to smell due to losing the sense in a car accident when I was 20) I lifted up the Berth cushions And they were coated in fluid. I scrambled out and had my son verify it was gasoline!
Disaster. The gas tank full of fresh gas swelled and despite the vent open it leaked out of the exit port seal to tank. Then made its way into the gas tank storage area and instead of draining out the little weep holes it went straight through the already swollen and deteriorated silicone caulk seal. My heart hit my feet as my wife is a chemiphobe and will not sleep near the slight smell of chemicals. Awesome.
I also realized that my little escapade could have been fatal in a brutal way. I’ve been wiring down there the past week, and using a lighter to shrink wrap my connections. If I had any more to do I would have burned in an intense fireball down below the cockpit.
I’ve cleaned with purple engine cleaner and then soap and water three times. And plan to pour hot water and cleaner down the leak to flush it. Silicone should never be used near gasoline because it swells. That seal will need to be replaced with perhaps an RTV gasket sealant. I now plan to repair the drip crack in original post but wonder where all these water and other leaks will end up with no egress.
The worst part here is that the boat reeks of gas to an unbearable level, I had to throw out the look hatch covers soaked in gas and wash all covers. A serious bummer.
So anyone who has water or fuel leaks in that back. Check the seal in the gas tank areas AND I also noticed that when assembled, the caulker got sloppy and missed several corners at the top inside the gas storage especially the hard to see ones too near opening. Any fumes in the storage will be allowed to pass into the space below if your storage area is closed. Seal those up.