Lazy Jacks

A forum for discussing topics relating to MacGregor Powersailor Sailboats
User avatar
c130king
Admiral
Posts: 2730
Joined: Sun Nov 05, 2006 5:30 pm
Sailboat: MacGregor 26M
Location: Wiggins, MS --- '05 26M "König" w/ 40hp Merc
Contact:

Re: Lazy Jacks

Post by c130king »

c130king wrote:
No impact on sail shape at all. In fact, when the sail is up the LJ lines go fairly slack like the topping lift. They weight of the boom pulls them tighter when I lower the main.

I will post pics of the upper attachment area and the "cross lines" that attach to the shrouds and a pic of the sail and how the LJ lines are somewhat slack under sail tomorrow.
Better late than never...

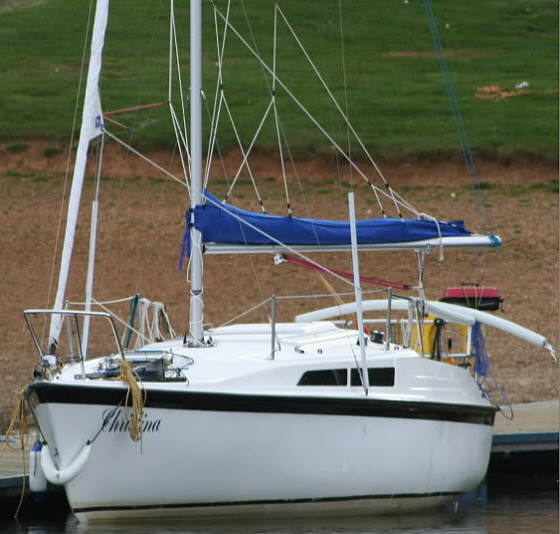
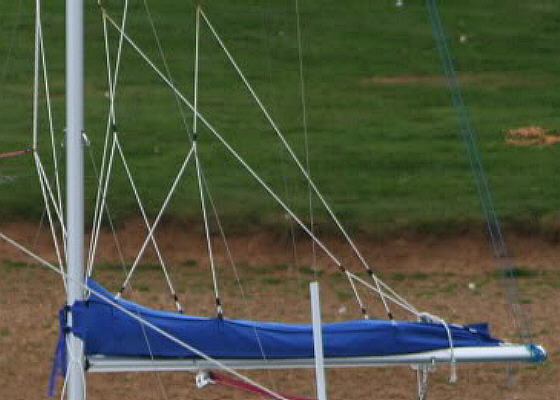
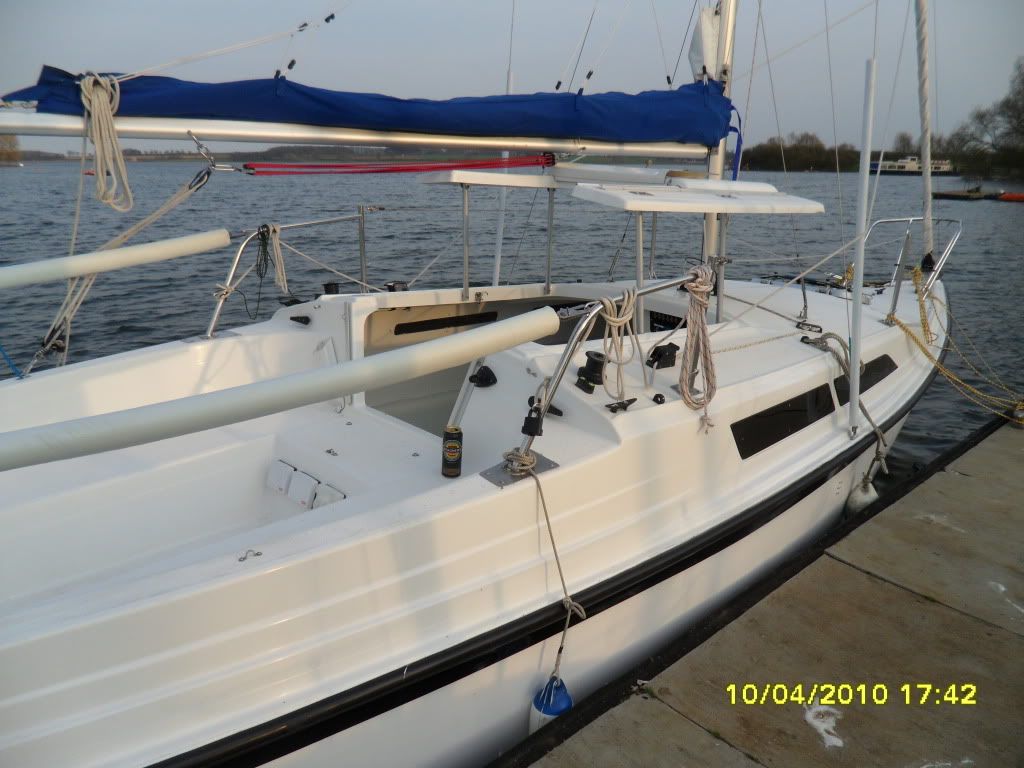
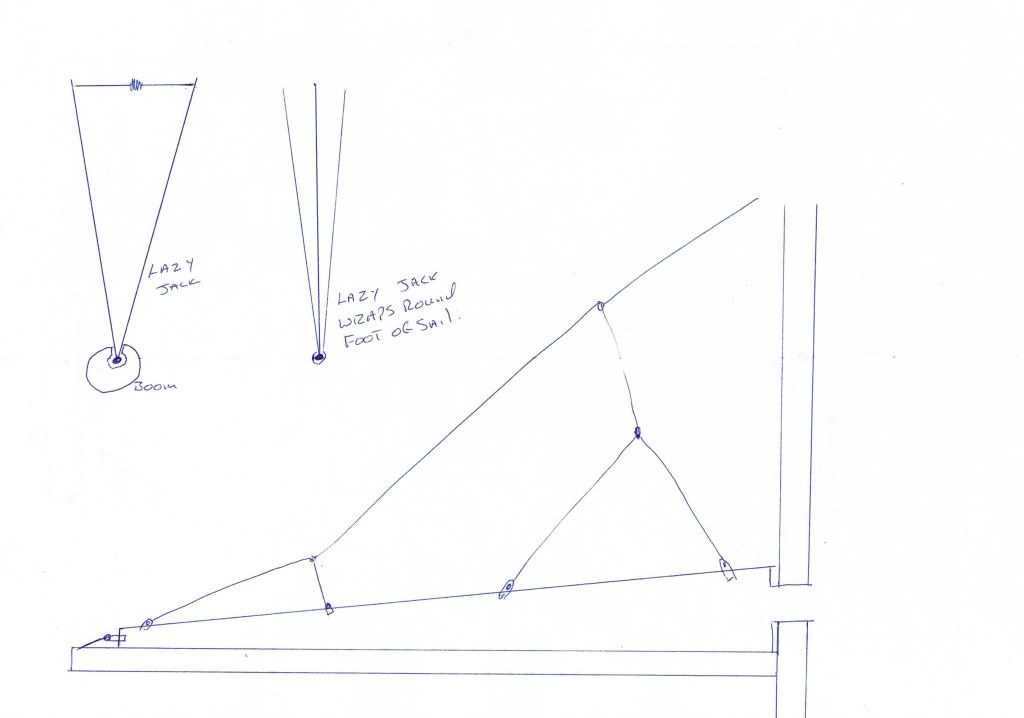
Here is the pic of the top part of my LJ system. The top end is attached to the mast about halfway between the spreaders and the top of the mast. Line is attached to a simple fairlead type thing attached to the mast. Lines run down to a little below the spreaders and end with small blocks. Then there is a 2' -ish line tied just above those small blocks and pulled out and tied to the upper stay/shroud. These lines pull the slot open as I mentioned.

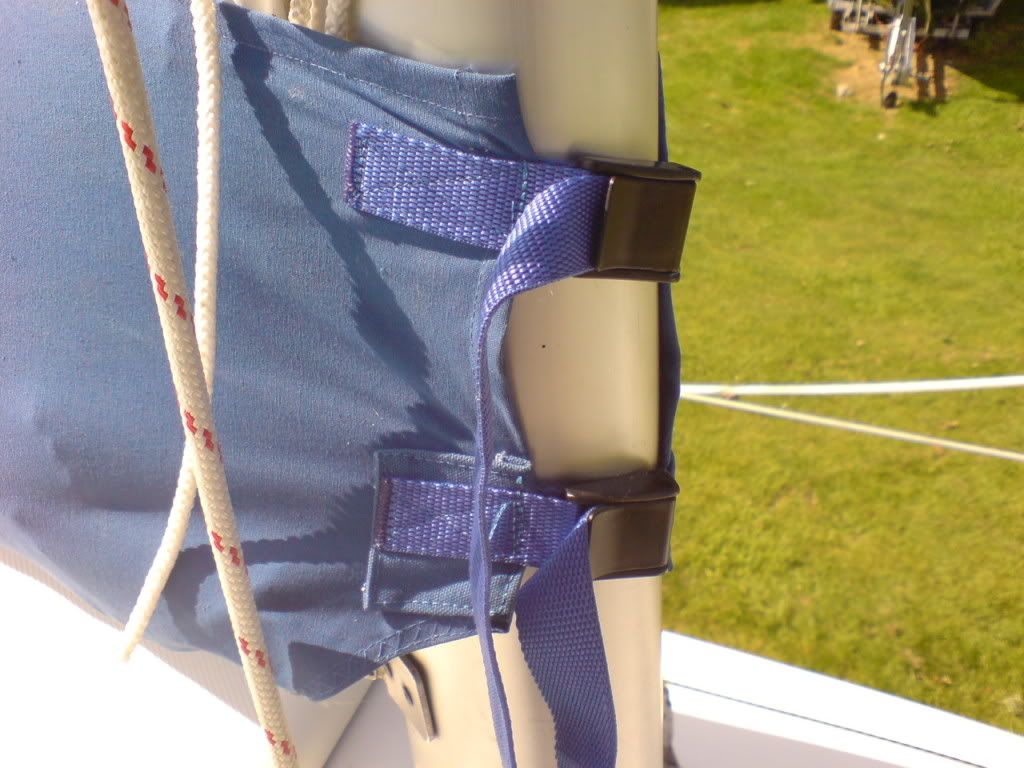
The "main" LJ lines run from the front end of the boom up through the small blocks and back to the end of the mast. One line for each side. The end of each line is a simple/cheap carabiner (bought in the camping section of WalMart). They connect to simple fairlead type things attached to each side of the boom at the front and rear. Easy to clip on and off. When off I can pull the lines up to the mast and the sunbrella cover goes over the top of them and they are held in place by the cover up against the mast.

The vertical lines are tied to the main LJ lines with simple granny knots and run under the boom through the same type of small fairlead type things. I have taken a few wraps of duct tape (about 1" wide) around the main LJ lines to keep the granny knots from sliding down.

Image

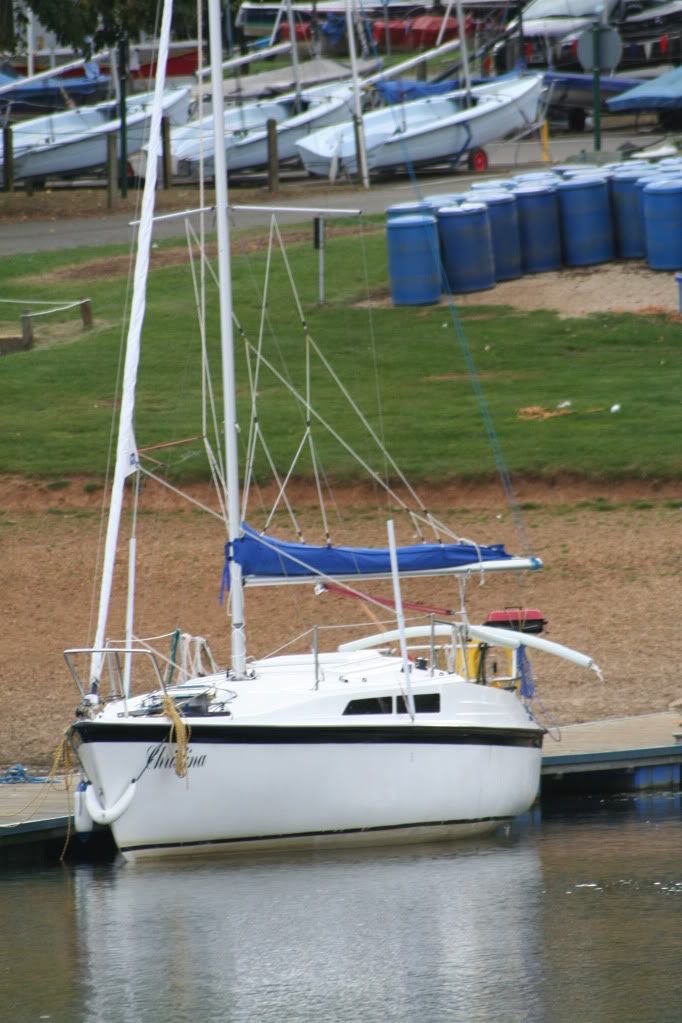
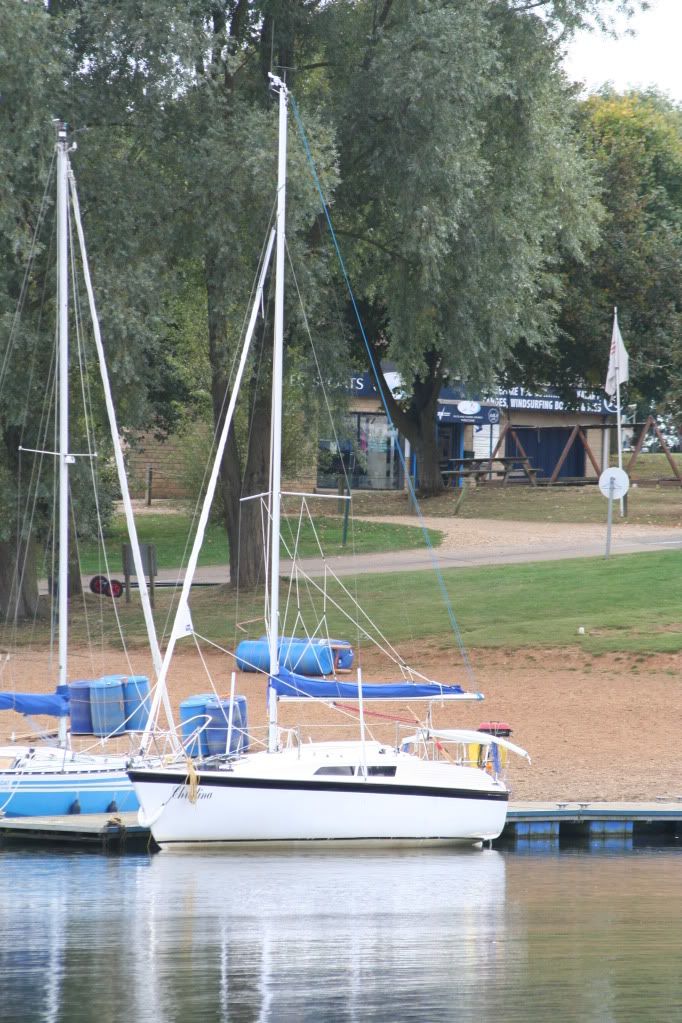
This second pic shows my Dad at the helm and you can see the LJ lines on the leeward side just up against the main. Yes, they touch. But no there is no chafing or issue with this and there is no impact on sail shape. But maybe there are sail shape purists that could not abide with this.

Image

As to some other comments that were made. I guess if there was a 25 knot direct tail wind then maybe the flaked sail being held in place by the LJ system and NOT tied down could possibly catch some air and flap around or maybe even partially "inflate". Never seen it happen. Not an issue that I really worry about. Once the sail is down I normally throw a couple of bungees around the sail to hold it in place. Not really necessary IMHO. And I don't have to leave the cockpit...just reach as far forward as I can for the first one that is far enough to keep the sail from flopping around in a big tailwind.

And I respectfully disagree with DaveB about the windage of the LJ lines. The boat has pretty good windage already from the mast, the furled foresail, the flaked main on the boom, the boom itself, and of course the high sides of the boat. The LJ lines maybe add about 0.364% increase in windage area (0.429% if you use 1/4" line instead of 1/8" line... 8) ). In other words, no effect that I have ever noticed.

And I only raise and lower the main when directly into the wind so I can't really comment on how well the LJ system works if you tried to lower the main with the wind on the beam. I think the slugs would have too much pressure on them to fall anyway.

Maybe about 20% of the time when raising the main one of the sail stiffners (actual item name escapes me right now...I guess your memory really is the second thing to go) will hang up on the intersection of the main LJ line and one of the vertical LJ lines. But I simply let the main back down a foot or two, let the main flop back over towards the center of the slot, and haul away again. Not really a problem IMHO.

They really do make my life much easier when single-handing. No worries about the main flopping all over and catching on things when it comes down.

Cheers,
Jim
Sailing on König
jschrade
First Officer
Posts: 422
Joined: Sat Jan 30, 2010 7:49 pm

Re: Lazy Jacks

Post by jschrade »

Dave,

Having the halyard led to the cockpit is very effective for raising the sail. You can certainly drop the sail from the cockpit with the halyard led aft but it's going to dump all over the deck and even end up hanging over the side - not good.

A quick lashing of the sails is not a problem with light winds and calm seas.

My thought is yours exactly, getting caught in a thunderstorm - single handed - and needing to get the sail down quickly ad secured with the seas and wind picking up, tuck tail and run. I suspect that even with the Lazy Jacks, you are still going to end up having to go up and secure the mainsail.

The only system that would solve this complete would be a main sail furling system.

Jim :macm:
User avatar
Indulgence
First Officer
Posts: 206
Joined: Mon Aug 11, 2008 6:53 pm
Sailboat: MacGregor 26X
Location: Calgary, Ab, Canada

Re: Lazy Jacks

Post by Indulgence »

There's a good article with illustrations in Good Old Boat this month
on how to set up your own lazy jacks and stack pack.
User avatar
madguy
Engineer
Posts: 138
Joined: Tue May 19, 2009 6:03 am
Sailboat: MacGregor 26X
Location: Nottingham, England

Re: Lazy Jacks

Post by madguy »

This is the lazy jack we made for our 26s. works great and were really happy with it.

Cost about £65 for all the bits and a bit of measuring and a friend with a decent sewing machine..

http://i973.photobucket.com/albums/ae21 ... G_1024.jpg

Madguy :evil:
User avatar
DaveB
Admiral
Posts: 2543
Joined: Mon Jan 07, 2008 2:34 pm
Sailboat: MacGregor 26X
Location: Cape Coral, Florida,1997 Mac. X, 2013 Merc.50hp Big Foot, sold 9/10/15

Re: Lazy Jacks

Post by DaveB »

Jim,
I stated the more lines you have A Loft the more windage you will have increasing heel.
Re read my post. Anytime you put more weight and resistance from wind above deck will increase the stabability of your boat in high winds.
Dave

And I respectfully disagree with DaveB about the windage of the LJ lines. The boat has pretty good windage already from the mast, the furled foresail, the flaked main on the boom, the boom itself, and of course the high sides of the boat. The LJ lines maybe add about 0.364% increase in windage area (0.429% if you use 1/4" line instead of 1/8" line... 8) ). In other words, no effect that I have ever noticed.

Cheers,
Jim
User avatar
Sumner
Admiral
Posts: 2375
Joined: Sun Jan 04, 2009 3:20 pm
Sailboat: MacGregor 26S
Location: SE Utah
Contact:

Re: Lazy Jacks

Post by Sumner »

madguy wrote:This is the lazy jack we made for our 26s. works great and were really happy with it.

Cost about £65 for all the bits and a bit of measuring and a friend with a decent sewing machine..

http://i973.photobucket.com/albums/ae21 ... G_1024.jpg

Madguy :evil:
Image

That is very nice. Ruth and I really like what you have done. Hope it is ok to ask a couple questions as we are just getting ready to make a sail pack/lazy jack combination and that looks like what you have done.

Image

We like what you did at the front around the mast. Simple yet effective looking. We have been debating what to do up there and don't like what we have seen so far as most of the solutions really aren't needed for a boat our size. We have an S also. So how has what you've done worked out and would you do it again or change anything?

I was going to go with the same number of lines as you in the lazy jack system with 4 lines per side, but was going to space them so that the length of the boom would be divided into 3 equal parts. There again was there a reason for where you placed the lines on the sail pack?

Last for now is do you have any shock cords or bungee cords going from the upper lazy jack lines to the spreaders? Have you had any problems raising the main and the main catching on the lines.

I'd like to see any other pictures you might have or other info on your system. Since they limit them to 3 at a time here if you have more you could e-mail them to us at:
 ! kmclemore:
Email address removed. We don't allow the posting of email addresses here in the forum. To contact Sam and Ruth, please use the envelope (email) button to the right.
Thanks,

Sum and Ruth

Our Trips to..

Our Mac Pages

Mac-Venture Links
User avatar
The Mutt
Captain
Posts: 611
Joined: Thu Nov 29, 2007 12:28 pm
Sailboat: MacGregor 26X
Location: Springwood, NSW, devinetemptations.com/macgregor26x.htm
Contact:

Re: Lazy Jacks

Post by The Mutt »

This might be helpful.

Image

Measurement guide for sail pack.
A = Boom length
B = Height from gooseneck to top of flaked sail
C = Boom to topping lift attachment
D = Top of flaked sail to top of topping lift
E = Width at widest part of flaked sail
Note for B: Use a soft tape measure around the natural flake of your sail while folded on the boom to get an accurate height.

Got it from here http://picasaweb.google.com/lh/photo/c9 ... C0a0sP19hQ

Wouldn't take much to adapt to a Mac's boom.

Glenn
User avatar
madguy
Engineer
Posts: 138
Joined: Tue May 19, 2009 6:03 am
Sailboat: MacGregor 26X
Location: Nottingham, England

Re: Lazy Jacks

Post by madguy »

Hi Ruth & Sum.

We came up with our design by taking everything into consideration very carefully, with calculated measurments, then when we got bored with that we got a bit of paper and drew what we wanted.

The reason there is four strings on each side actually happened by mistake but works very well. we have no problem lowering and raising the main sail, the ropes coming from the stays are just nylon plated cord and are tied to the cleats on the mast, this works fine as there not over tight so when the boom moves from one side to the other there is no snagging or stretching.

To put the cover onto the boom we just slide the bottom of the sail out of the boom, then put the sail in the cover and slide it all back on again. that way the rope in the bottom of the sail holds everything in place. (im not sure this is making much sense but it is easy)
we put it on and then reefed the main sail as we would we windy and marked were the reef holes are for the sail on the cover, then cut some slits and sewed in three 6 inch zips each side. we can now reef with no problem and without taking the cover off.
the wrap around the front of the mast is conected by two plastic wraps over buckles, we bought two very keep belts in blue nylon and simply cut most of the material off so that it wasnt to long.
The cover itself is just one peice of canvas that we bought from the canvas shop for about £40.

As i said i will post a diagram on Monday as i can draw it and scan it in at work.

I have loads of pics on photobucket but cant figure out how to paste a link so that you can go in and see all of them instead of just one at a time.
if you know give me a clue and you can see them all.

we have made loads of mods to her and love here to bits but were going to put her up for sale now and move on to a 26X.
then we can start all over again, i wouldnt be without a Mac now. drop me a line if you want to know anything else.

Cheers

Madguy :evil:
User avatar
Sumner
Admiral
Posts: 2375
Joined: Sun Jan 04, 2009 3:20 pm
Sailboat: MacGregor 26S
Location: SE Utah
Contact:

Re: Lazy Jacks

Post by Sumner »

madguy wrote:.... the ropes coming from the stays are just nylon plated cord and are tied to the cleats on the mast, this works fine as there not over tight so when the boom moves from one side to the other there is no snagging or stretching.

To put the cover onto the boom we just slide the bottom of the sail out of the boom, then put the sail in the cover and slide it all back on again. that way the rope in the bottom of the sail holds everything in place. (I'm not sure this is making much sense but it is easy)................Cheers ..... Madguy :evil:
Thanks for the reply. Are the lazy jack lines going out to the stays (shrouds) and then back down to the mast? It looks like they are out a ways, but the picture doesn't go that high. If they are going out to the stays, do you have a block attached there somehow? I'm having a hard time picturing what you might of done up high.

Our new sail is a loosefooted main, so the sail pack will have slugs on the bottom and will be attached to the boom in that manner.

If you go to your photobucket account in one window and have your post here in another then click on the URL link in the link box at the top of the page. It should then become highlighted. Move up there with the mouse and right click and then click on 'copy' and then 'paste' it over in your post on this site. We should then be able to go to it and see that page with all of the thumbnail pictures. I don't use photobucket so maybe someone else knows for sure what will work.

Thanks again and hope you enjoy the X,

Sum and Ruth

Our Trips to...

Our Mac Pages

Mac-Venture Links
User avatar
madguy
Engineer
Posts: 138
Joined: Tue May 19, 2009 6:03 am
Sailboat: MacGregor 26X
Location: Nottingham, England

Re: Lazy Jacks

Post by madguy »

Hi Ruth & Sum.

The lines to the cover are fitted to the shrouds about ten inches each side of the mast, all i did was get two stainless jubilee clips and two stainless rings and fix them to the shrouds. then i simply pass the lines through, one end is connected to the lines that spread out along the cover and the other end is led down the mast and tied to the mast cleats.

http://i973.photobucket.com/albums/ae21 ... M_0308.jpg
http://i973.photobucket.com/albums/ae21 ... 1025-1.jpg
http://i973.photobucket.com/albums/ae21 ... 1021-1.jpg

hope these pics help a little more.

Cheers

Madguy :evil:
User avatar
Sumner
Admiral
Posts: 2375
Joined: Sun Jan 04, 2009 3:20 pm
Sailboat: MacGregor 26S
Location: SE Utah
Contact:

Re: Lazy Jacks

Post by Sumner »

madguy wrote:..........The lines to the cover are fitted to the shrouds about ten inches each side of the mast, all i did was get two stainless jubilee clips and two stainless rings and fix them to the shrouds. then i simply pass the lines through, one end is connected to the lines that spread out along the cover and the other end is led down the mast and tied to the mast cleats..........Madguy :evil:
Thanks, the pictures help a lot. I can see where with the lines out there.....

Image

......that the sail would be less likely to hang up when hoisted. You said "shrouds", but from the pictures I think you meant out on the spreaders and I have a question about that. I can see you have a topping lift, so I'm assuming that when the sail is down that the boom and sail weight is held up by the topping lift and not the lazy jacks. If a person didn't have the topping lift setup to take that weight then the weight would go to the spreaders via the lazy jack lines. Has that happened and has there been any evidence of them bending from the weight?

One other thing is does you sail have full battens in it?

Thanks you and the pictures have been a big help,

Sum and Ruth

Our Trips to..

Our Mac Pages

Mac-Venture Links
User avatar
c130king
Admiral
Posts: 2730
Joined: Sun Nov 05, 2006 5:30 pm
Sailboat: MacGregor 26M
Location: Wiggins, MS --- '05 26M "König" w/ 40hp Merc
Contact:

Re: Lazy Jacks

Post by c130king »

Sum,

If you are worried about stress on the spreaders you can go a slightly different route. Attach lines to each side of the mast...about halfway between the spreaders and the top of the mast. These lines can come down to just about spreader height or just a bit lower as I have on mine. Attach small blocks on the ends of these lines. Then attach your LJ lines to/through these small blocks. Then use smaller lines to "pull you LJ slot open/wider" by attaching to your outer shrouds.

Thus no pressure/tension on your spreaders.

Just a thought. That's what I have. I just don't have MadGuy's nice looking built in cradle/sail cover. I'll bet Ruth will be able to make you a really nice cover with her sewing/sunbrella skills. Make sure you post some pics.

Cheers,
Jim
Sailing on König
User avatar
madguy
Engineer
Posts: 138
Joined: Tue May 19, 2009 6:03 am
Sailboat: MacGregor 26X
Location: Nottingham, England

Re: Lazy Jacks

Post by madguy »

Hi Sum..

Yes your right. i ment spreaders. i have a topping lift for when the boat is moored so that i can pull the boom up higher to keep it out of the way. when sailing the sail keeps it up. And i have 1/3 batton sails.

There isnt any pressure on the lazy jack at all so i dont need to worry about spreaders bending etc and it stays in place all the time and when sailing.

Bit of sad news in a way. today i shook hands with a guy who has purchased my beloved Christina. lock stock and barrels....going to really mis her as she was probely one of the cleanest and best kitted out 26S's in the country, the new owner seems t be very happy with her and as long as the bank transer comes in she will be off to a new home in Scotland to sail the lochs.

Now the hunt is on...im looking for a 26X now so that we can have more head room in the cabin.

I took all the measurements today for the lazy jack and will draw a diagram tomorrow and scan it in at work then i can post it for you.

Cheers

Madguy :evil:
User avatar
Sumner
Admiral
Posts: 2375
Joined: Sun Jan 04, 2009 3:20 pm
Sailboat: MacGregor 26S
Location: SE Utah
Contact:

Re: Lazy Jacks

Post by Sumner »

madguy wrote:....I took all the measurements today for the lazy jack and will draw a diagram tomorrow and scan it in at work then i can post it for you. Cheers Madguy :evil:
Thanks and the best of luck with finding and sailing your new boat,

Sum

Our Trips to..

Our Mac Pages

Mac-Venture Links
User avatar
madguy
Engineer
Posts: 138
Joined: Tue May 19, 2009 6:03 am
Sailboat: MacGregor 26X
Location: Nottingham, England

Re: Lazy Jacks

Post by madguy »

As promised, instructions on how i built my lazy jack..

Firstly, purchase a piece of canvas 3020mm long and 840mm wide.
Measure out the diagram below as you see it and cut out.
Fold each edge over by 10 mm and stitch all the way round to stop it fraying.
Fold over the material at fold 2 and stitch along between 5 and 10 mm in.
You then need to make 8 strips of material doubled over and stitched onto the edge of fold two both sides, placing evenly and corresponding to the tabs stitched on the other side,
This is were the strings will go to hold the cover up to the stays.
At the mast end were the two tabs are, evenly place two buckles on one tab and stitch on.
On the opposite tab stitch two straps at the same place as the buckles on the opposite tab so that when it is folded the buckles and straps are in the same place.
At the opposite end of the material fold along the fold 1 and stitch the end together leaving approx 3 inches at the bottom nearest fold one unstitched.(this is were the rope at the back end of the sail goes through to tie to the end of the boom)
You then need to sew a zip along both zip edges so that the whole thing can be zipped up.
Basically that’s it, all you then do is put the foot of the sail into the cover following fold one and pull the cover and sail into the boom as you would with the sail.

If you want to get posh, when the sail and cover is in place reef the sail front and back and mark in chalk on the cover were the reef holes are in the sail then remove the cover and cut a slit long enough to take a zip about 6 inches long, fold the edges of the slit over and stitch them to stop it fraying and sew a zip in place.
You can then reef your sail
By opening the zips and passing the ropes, ties etc through the cover and securing to the boom.
I also put a tab at the back of the cover and tied it to the end of the boom to stop it sliding forward and to keep the shape a little better.

When I make the next one I intend to stitch in a second layer of material between fold one and fold two so that I can slide a sheet of thin plastic inside, this will give the cover stiffer sides and could then be sign written with the name of the boat etc.

For the ropes holding it up.

If you have four tabs each side you tie some string to the end tab furthest away from the mast and then connect it to the second tab, you then do the same with the third tab and connect that to the fourth tab nearest the mast.
Then you need another rope going from rope on the first two tabs to the rope on the second two tabs, then another rope up to your stays and back down the mast to tie of to the mast cleats.

I hope this makes sense, it does to me,,,,but I have added a couple of diagrams to try to help.

Let me know if you need any of my directions explaining better.
The cover works really well and makes life much easier lowering and raising the sail and can be done single handed with no trouble.

http://i973.photobucket.com/albums/ae21 ... _00000.jpg


http://i973.photobucket.com/albums/ae21 ... _00001.jpg

http://i973.photobucket.com/albums/ae21 ... C00248.jpg

http://i973.photobucket.com/albums/ae21 ... C00247.jpg

Cheers guys.

Madguy :evil:
Post Reply